Getting Started
General Information
Thank you for purchasing our theme. We are happy that you are one of our customers and we assure you won't be disappointed. We do our best to produce top notch themes with great functionality, premium designs and human readable code. Before you get started we highly encourage you to get familiar with this documentation file. Spending half an hour reading the manual may save a lot of your time and avoid questions with obvious answers.
We also recommend to check our video tutorials and articles.
If you have any questions that are beyond the scope of this help file, please feel free to contact us.
Please Note! Our support covers getting setup, troubles with using any of the features and any bug fixes. Unfortunately, we cannot provide support for customizations or 3rd party plugins. If you need help with customizations of your theme, then you should enlist the help of a developer.
IMPORTANT! Please be aware that we do not include theme related .PSD files in the theme package, because it might significantly increase the size of a downloadable archive.
In case you need these files you can always request them by contacting our support department.
Bundled Plugins
The theme package contains a number of bundled plugins. Please click here to view the list of plugins that come included into the theme.
If a new version of a bundled plugin is available, it will be included in the next theme release. You can also request it by submitting a support ticket.
Bundled plugins are fully functional without the activation using a registration license key. In case you are willing to receive automatic updates and support from the plugin team, you will need to purchase the plugin separately. Only the direct buyers get the plugin license key.
WordPress Information
To use this theme you must have WordPress engine installed. We assume you have a working version of WordPress downloaded at WordPress.org already up and running.
How to install WordPress - A tutorial on how to install WordPress on your hosted domain.
We also encourage you to actively use the links below. These useful resources cover most of general WordPress questions you may have:
- WordPress FAQ - Information and resources about WordPress including history, features, semantics, glossary, and information to help you determine whether or not WordPress is the blogging tool for you.
- WordPress Documentation - Great source of knowledge for WordPress beginners
- PHP Function References - Detailed information on WordPress PHP functions and usage examples
Getting Support
We strive to provide best tech support ever. To get free assistance, please use our ticketing system. We will respond as soon as possible (within 24 - 48 hours, usually faster). We are open from 10am to 7pm (CET), from Monday till Friday.
Before submitting a ticket, please check this documentation file first, articles and video tutorials as well. Most of the issues that may arise have already been resolved and answered.
Please Notice!
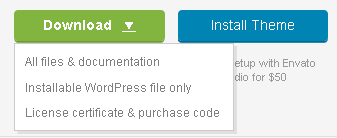
To be able to request a technical support help, you need to have a purchase code. To get the code, please go to your ThemeForest "Downloads" page and click on the theme download link.
Please check this link for more information on this matter.
Please note that as authors of this theme (template) we do provide support only for the theme-related (template related) features and for the issues related strictly to this theme (template). We do not provide support for configuration, installation, maintenance, customization, 3rd party plugins integration (due to incompatibility issues of an additional plugins integration/functionality that might interfere with theme's pre-installed plugins or any other reasons) or any other compatibility issues that might arise.
Installation Information
Theme Requirements
To use this theme you must be running WordPress 6.0 or higher and PHP 7.4 or higher. External plug-ins may require additional limitations (for WooCommerce plug-in WordPress 6.4+). If you use hosting with limited resources (for example GoDaddy and other lowcost shared hosting providers), you may experience issues with one-click demo data installation feature.
We recommend you to contact your web hosting service provider to make sure that your server PHP configuration limits are as follows:
- max_execution_time 600
- memory_limit (up to) 256M or 512M for creating custom color schemes with LESS CSS compiler.
- post_max_size 32M
- upload_max_filesize 32M
If you are running unmanaged dedicated server or VPS, you should check your php.ini file. Alternatively, you can edit .htaccess file in the root of your website and add the following values:
php_value max_execution_time 600
php_value memory_limit 256M
php_value post_max_size 32M
php_value upload_max_filesize 32M
Setting these values will ensure you will not get error messages during the installation. To safeguard your website, please use secure passwords and the latest version of WordPress and plugins.
IMPORTANT! To avoid any errors that might come up during the installation we recommend to have memory limit set up to 512M.
Here is the list of other recommended web hosting services:
- BlueHost (Exclusive Offer for our Customers: -70% OFF)
- SiteGround
- InMotion Hosting
Installation
Unpacking the theme
Before installing the theme please make sure you unpacked the archive and extracted theme files. After unzipping the archive you will see the following files:
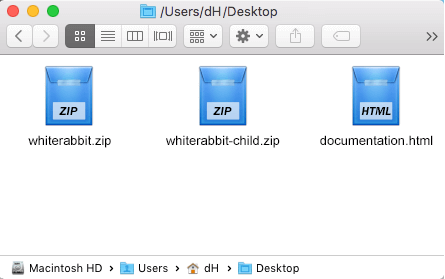
If you try to install the wrong files you will get missing style.css file error. This is the most common error meaning you are trying to install incorrect package.
To install "WhiteRabbit" theme you need to have a working version of WordPress already installed. For information in regards to installing the WordPress platform please see the WordPress Codex or check this video tutorial.
Update WordPress: To ensure a positive user experience, we highly recommend you to update your WordPress to the latest stable version. This will help to ensure that you are able to utilize all of the latest features of WordPress.
You can install the theme in two ways:
-
via FTP:
- Log into your web server with FTP client software
- Unzip the whiterabbit.zip file and ONLY use the extracted /whiterabbit theme folder
- Upload the extracted /whiterabbit theme folder into /wp-content/themes folder
- Activate the newly installed theme. Go to Appearance > Themes and activate it.
- via WordPress:
- Login to admin panel.
- Go to Appearance - Themes and click on the Add New button.
- Choose Upload theme option. Click on Browse...(Choose file in Safari/Chrome), select the "whiterabbit.zip" and click Install Now button.
- After successfull installation click on Activate or go to Appearance - Themes and click on Activate to activate the newly installed theme.
- After the theme's activation you will be prompted to install recommended
plugins: Contact Form 7, Essential Grid, Revolution Slider, Smash Balloon Instagram Feed, ThemeREX Updater, WPBakery PageBuilder, WooCommerce.

All these plugins are included into the theme's archive or optionally can be installed from the WordPress.org repository.
The theme can function without any of these plugins. But if you want your website look precisely as on demo page, you have to install all recommended plugins and import demo content. This is a good idea if you are building your website from scratch.
However, if you have an existing website, you should be very careful with plugin installation and importing demo data - this may affect your site content and structure. Please read the Demo Content article for details. - A new menu item Appearance -> Theme Options will appear.
- Attention! If you want to make changes in theme’s templates or functions, we recommend activating a child theme before demo data installation, otherwise the Theme Options will be lost. Please see the Child Theme section for more information.
Child Theme
Child theme is for developers willing to make changes to core functions and code. If you are not planning to dig that deep, you can easily skip this chapter.
IMPORTANT: If you want to make changes in theme’s templates or functions, we recommend that you install child theme and make changes there. To learn more about the purpose and basis of creation of child theme, visit WordPress Codex.
In the theme pack you will see materials for the child theme. It’s located in the "whiterabbit-child.zip" archive. You can install the child theme the same way as you install the main theme (see above in the section "Installation").
A few recommendations on how to use Child Theme from AxiomThemes:
- Almost all files from the main theme can be replaced in the theme. It doesn’t concern only .php-files with templates and basic logics, but also both .js, .css files from respective folders and files with images, icons etc..
- If you want to change some of the theme-related functions or to add new ones, copy/add all the required functions into 'functions.php' in the "whiterabbit-child" folder. If our
theme contains functions with such names, they will be replaced with yours, if not – your functions will
complete our theme’s logics.
IMPORTANT: If you want to replace some functions from other files (except functions.php), e.g. from _wp_utils.php or _utils.php, we strongly do not recommend you copy respective files into the child theme, but you should create the respective functions in functions.php in the child theme. This should be done so that when updating the theme, new functions from these files are available for use.
As for other files - putout templates from the folder 'templates', images from the folder 'images' etc. - to make changes, copy theme into the folder 'child theme' and make changes there. -
Attention! When activating a child theme or switching back to the parent theme, the theme options will be lost (That was the requirement of the ThemeForest team).
We recommend activating a child theme before demo data installation. Alternatively, you can disable options reset. In order to do this, please open wp-content/themes/whiterabbit/includes/theme.options.php file and look for the code like this:
// Clear all saved Theme Options on first theme runYou need to comment the function:
add_action('after_switch_theme', 'whiterabbit_options_reset');
// Clear all saved Theme Options on first theme runSave the file and upload it to the server.
//add_action('after_switch_theme', 'whiterabbit_options_reset');
Plugins Installation
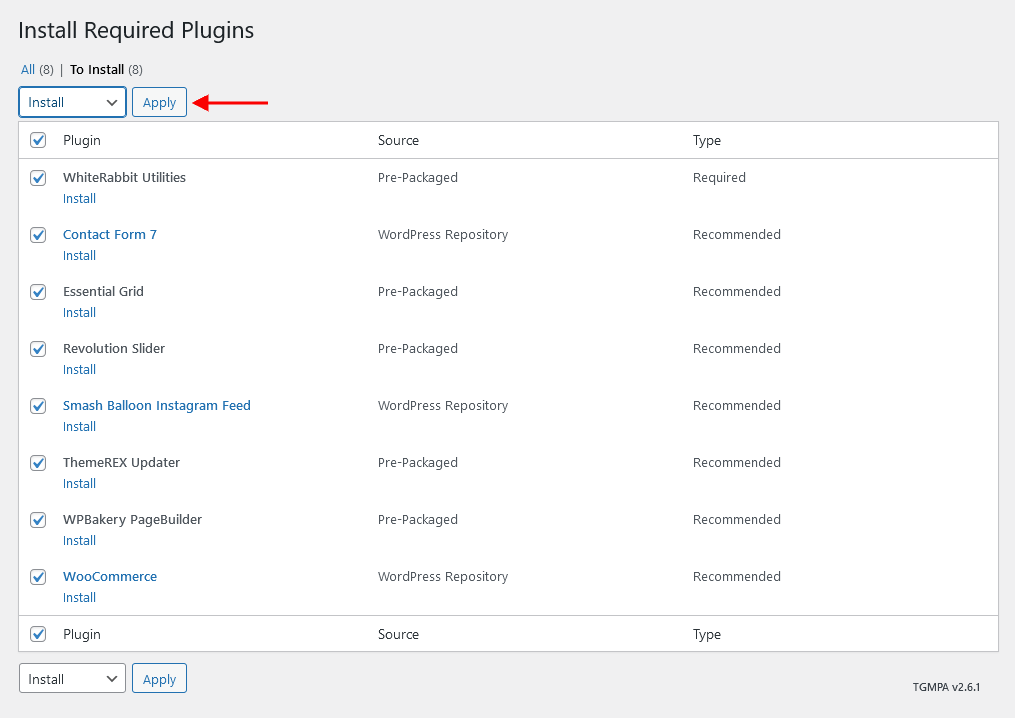
In order to make the theme look exactly as at demo page you need to install recommended plugins. Click on Begin installing plugins link.

You will be redirected to plugins installation page. Check all listed plugins, select Install option and click on Apply button. Installation may take few minutes, please be patient and do not refresh the page.
After installation you will see this notification informing that plugins were installed successfully.

Attention! Please be aware that this theme is compatible with The GDPR Framework plugin, though it is not provided with the theme.
Gutenberg Compatibility
Our theme is compatible with Gutenberg page builder. You can create new pages using this editor.
All existing demo pages are built using WPBakery Page Builder and should be customized using WPBakery Page Builder ONLY.
PLEASE NOTE! It is possible to switch between the page builders. Please use One page builder for creating/customizing One particular page/post.
Demo Content
Our themes have simple One click demo data import tool. It's very easy to use, and you can get precise copy of our demo website in just 1 click.
Before installing demo data make sure you have installed all required plugins, please refer to Plugins installation section of this document for details.
To import demo content into a WordPress site follow these steps:
- Log in to your site as an administrator.
- If you see a message prompting to install WhiteRabbit Utilities plugin - click on "Begin installing plugins" and install it on the corresponding page.
IMPORTANT: The rest of recommended plugins (for example, Revolution Slider, WPBakery Page Builder, and others) are not mandatory for installation of demo content but recommended.

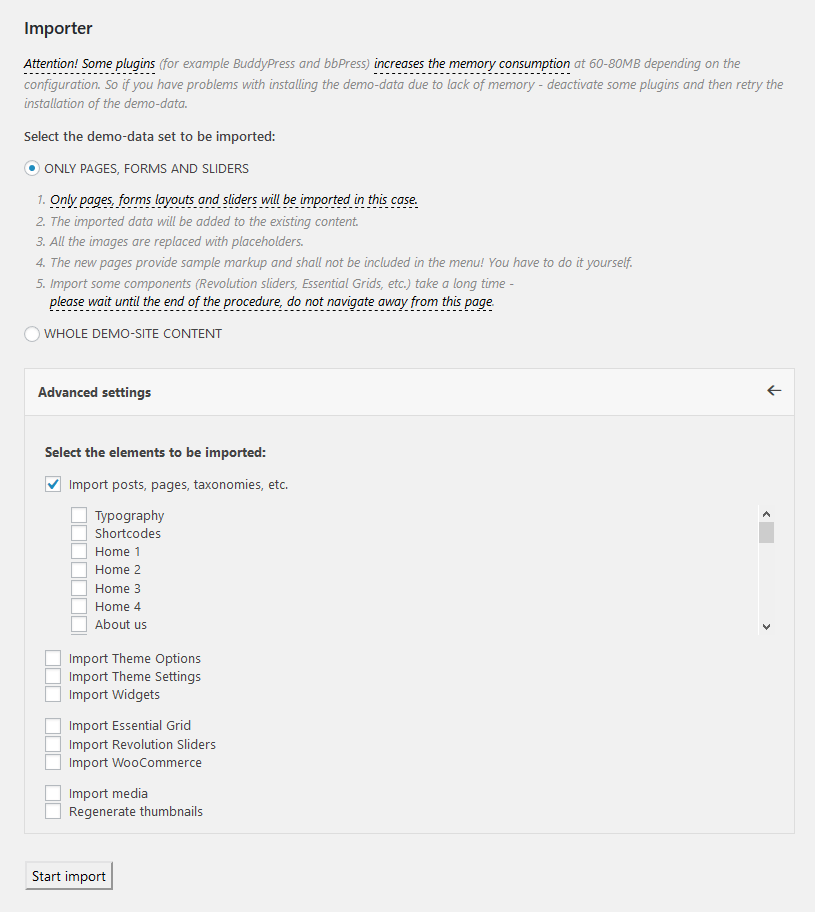
- Go to Appearance > Install Demo Data:

- On the page that showed up please set the required parameters.
- Only pages, forms and sliders - Allows you to select the content you need to be imported for a definite page, slider, etc. It is recommended when the site is already built.
- Whole demo-site content - Allows you to import whole demo content. It is recommended for new installations of WordPress.
IMPORTANT: When installing whole demo-data ALL EXISTING CONTENTS of your website will be deleted and replaced with the new data! We highly recommend that you install demo data only on blank WordPress install.
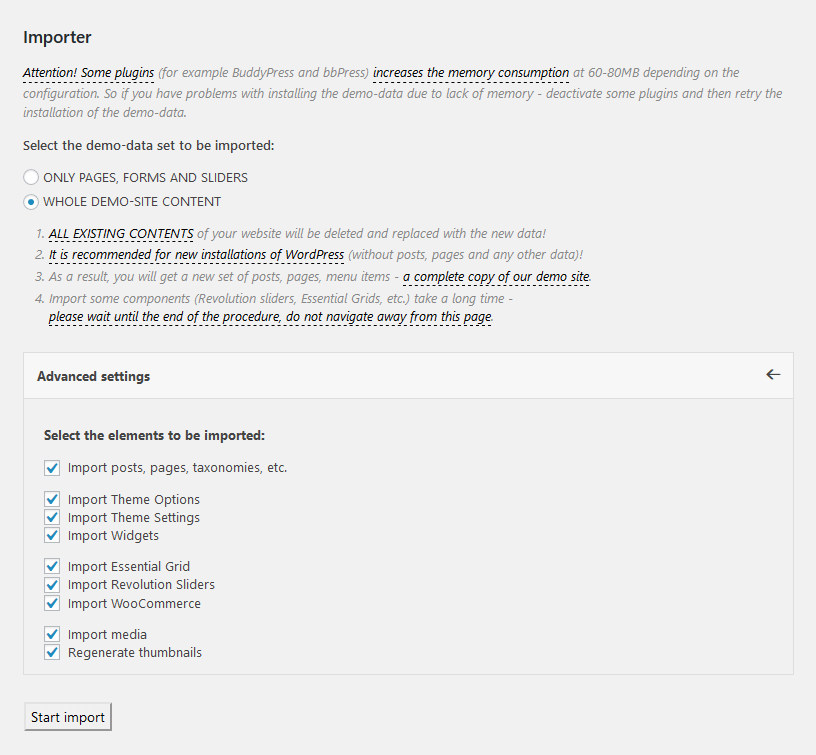
- Click on "Install Demo Data" button.
IMPORTANT: Please wait while demo data is being copied from our server to your site. It may take a while and depends significantly upon Internet connection speed between your website and our server. Please wait patiently and do not refresh/leave the page.
- After the data is successfully imported you will see the "Congratulations" message:
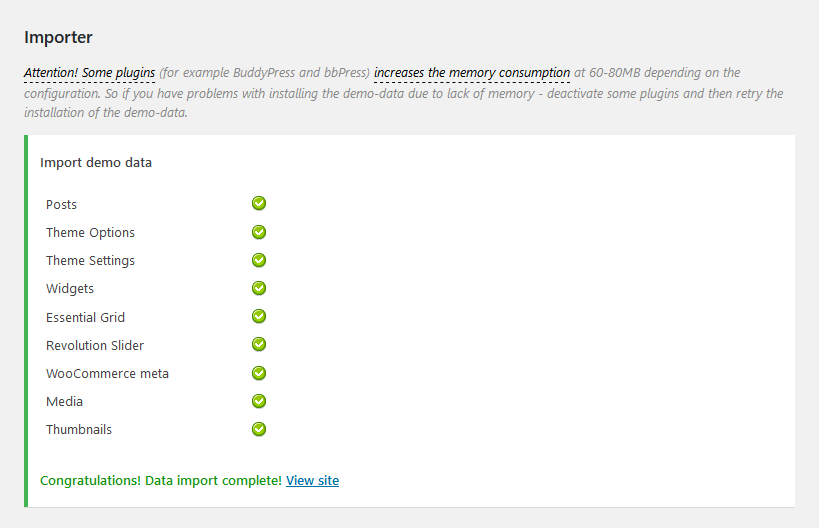
In 99.9% it works fine, but if something went wrong and data was not imported, please repeat the procedure, by clicking the "Continue Import" button. The system finds the last item imported successfully and continues the import.
If you are making the install on your local machine, please check your Internet connection and firewall settings, this may affect the data transfer.
In case demo data installation is stuck and you see "Error load data from the file ... " error message, you can manually install it by downloading the demo.zip archive from our server. Extract the archive to demo/ folder and upload this demo/ folder to wp-content/themes/whiterabbit directory.
Treat the screenshot below as an example only. The list of folders inside a theme package may vary.

If the issue persists, please contact your hosting service provider to make sure that your server configuration meets the Theme Requirements. If you still have issues, please contact our support team. Our tech support operators will assist you.
Theme Update
IMPORTANT: Before you go ahead with the update please check theme changelog and make sure you backup your old theme folder. Download it to your computer locally.
It is the best practice to backup both your files and database regularly and especially before making some serious updates.
Update Option 1. Update using the ThemeREX Updater plugin
(for theme version 1.3.5 and above only!)
- Please make sure the ThemeREX Updater plugin is installed and activated. This plugin is provided with the theme.
-
Navigate to Appearance > ThemeREX Updater and enter your purchase code to get the latest versions of bundled plug-ins and theme updates through the WordPress admin panel. To get the code, please navigate to your ThemeForest "Downloads" page and click on the theme download link. Check this guide for more details.
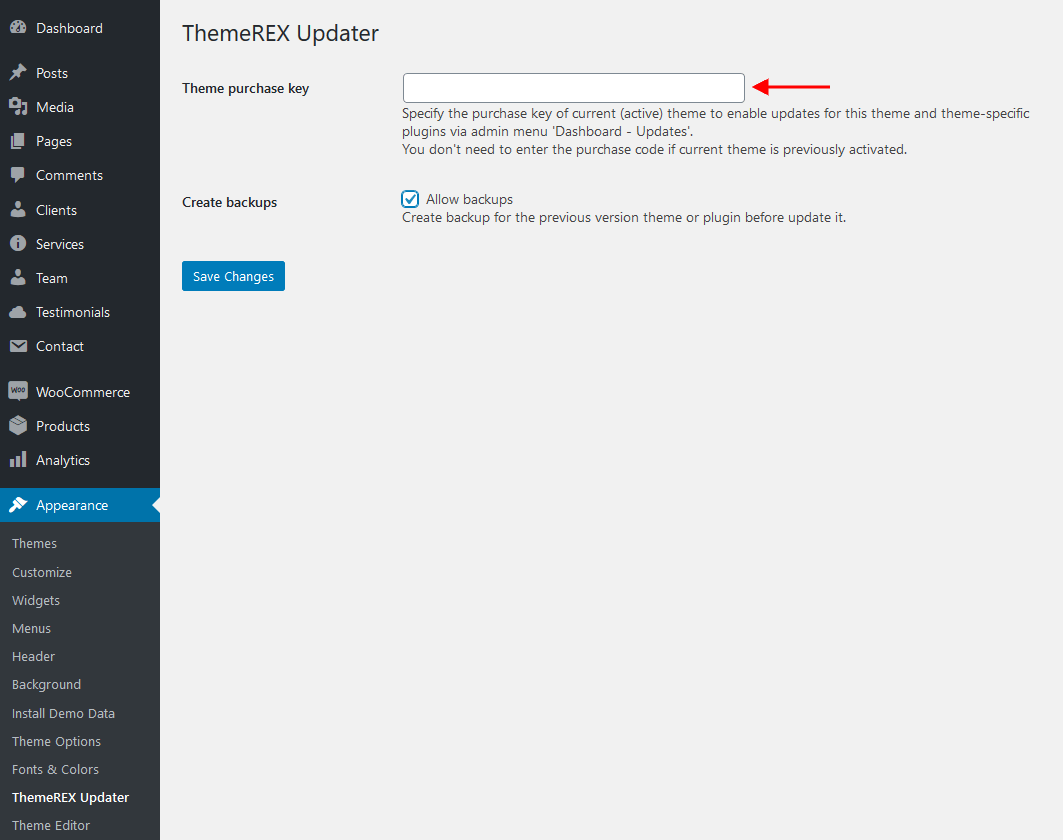
- We recommend you to check the "Create backups" option to allow the system create backups for plugins versions and the theme automatically.
-
Proceed to WP Dashboard > Updates and check if any updates are available.
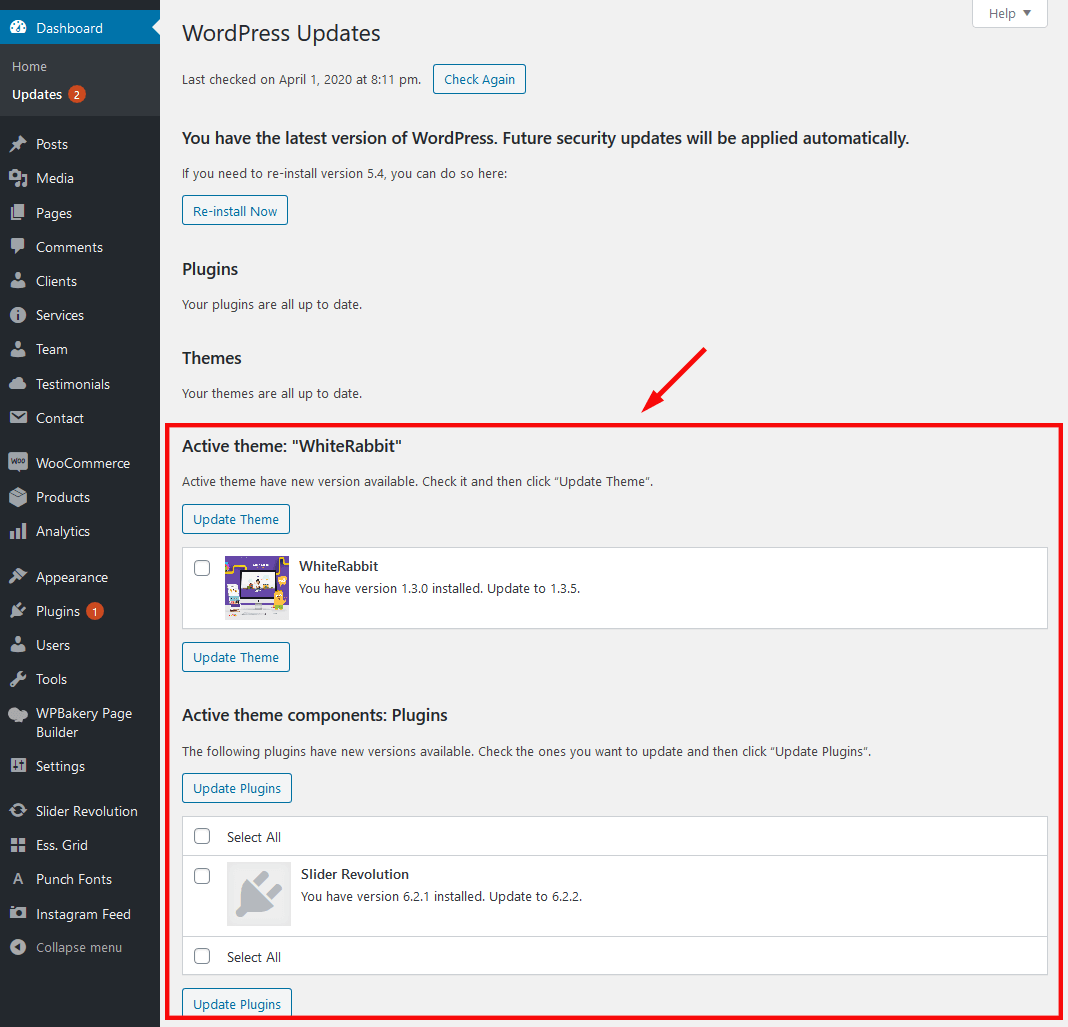
- Choose the options for an update (plugin, theme, etc.) and click on Update button.
-
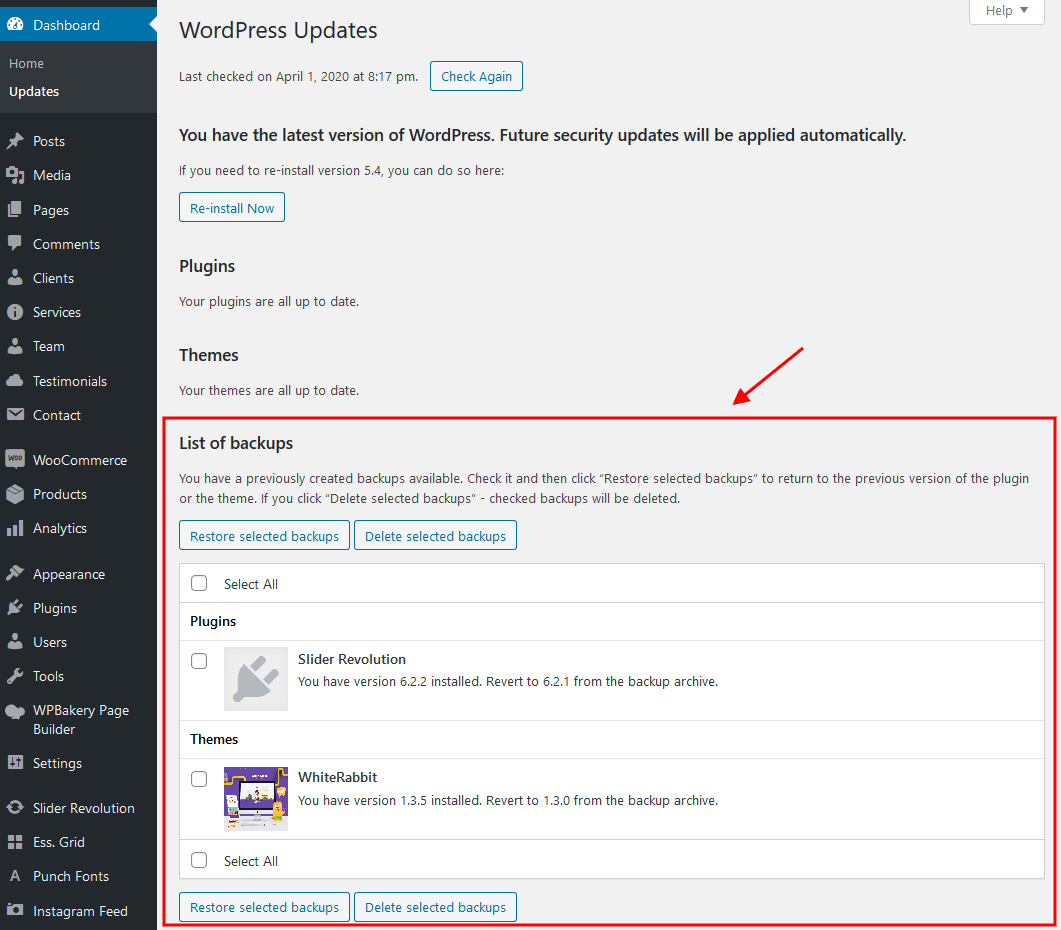
You can restore the backups created by the system in WP Dashboard > Updates or in Appearance > ThemeREX Updater (if the "Create backups" option was checked before the update).
Update Option 2. Update using FTP client
- Log into your Themeforest account and navigate to your downloads tab. Find the theme and download “Installable WordPress file”.

- Connect to your server using desktop client software (we recommend CyberDuck and Filezilla)
- Change directory to /wp-content/themes
- Remove existing folder with old theme files
- Unpack theme installable files downloaded from ThemeForest and upload to themes folder
- Update the included plugins if you see a notification message letting you know the plugins have a new version.
- Navigate to WP Dashboard > Plugins > Installed Plugins.
- Update ThemeREX Utilities plugin. You can click on "Update" button (if available in a particular theme) or deactivate and delete this plugin. Then follow the prompt to install it again. This will load a new plugin version on the site.
- Deactivate and delete the rest plugin(s) of old version.
- Go to Appearance > Install Plugins and install the plugin(s) like it was described in the Plugins Installation section of this documentation.
Fonts and colors
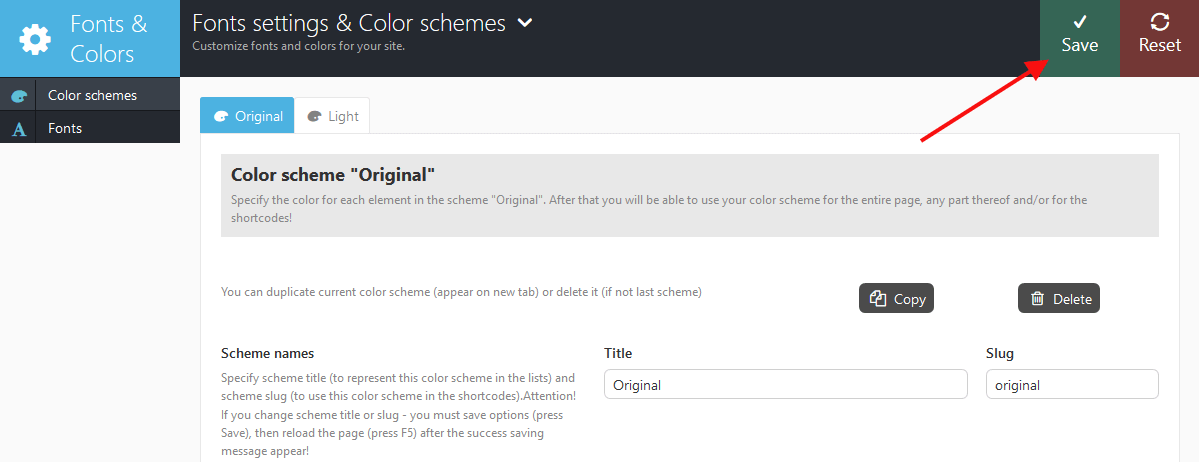
In case fonts or color styles/schemes (accent styles), for some reason (for example after the theme update) fall back to their default settings/values, then you need to regenerate the styles and colors again. All you need to do is just click on "Save" button.
Quick Start
After the theme's activation and demo content import we are ready to get started with basic theme settings like site title, tagline, logo, favicon etc.
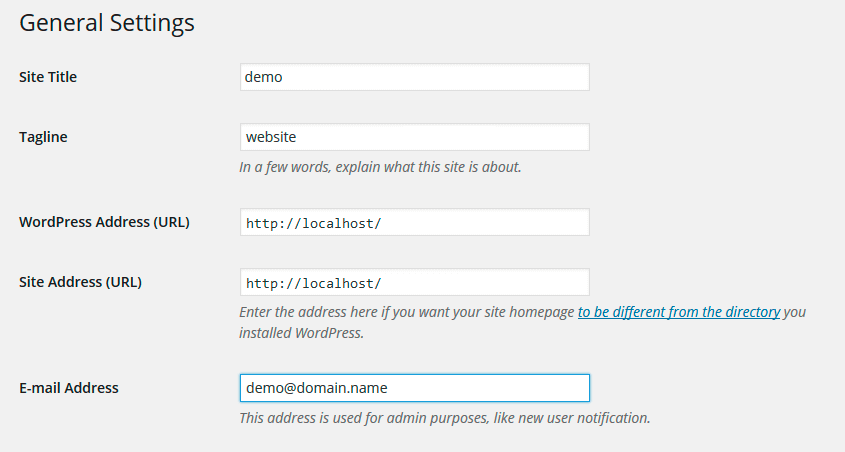
To change your site title and tagline, go to Settings -> General. Please note, these parameters are important for search engines.
Another great idea may be setting custom permalinks structure to make them more SEO friendly and human readable. Go to Settings -> Permalinks and make changes according to the example below.

Now let's navigate to Appearance > Theme Options > Global Options. It gives you control over most of theme settings from one place. There are quite a lot of parameters here, but luckily the majority of them have default values that suit most of the users. We will take a closer look at them a bit later. Now just a few words about how it all works to give you an idea of our Settings Inheritance System.
IMPORTANT:
One of the most important theme features is Settings Inheritance System. You can flexibly control the appearance and behaviour of the whole website and individual pages, posts and categories. You can set individual display styles, sliders, output settings of page
components (posts), and many more for the required category or for each post separately. In other words you can set global styles and then change them for certain post/page types and each single page/post/category individually. These changes will override global styles affecting selected elements and their descendant elements.

How it works
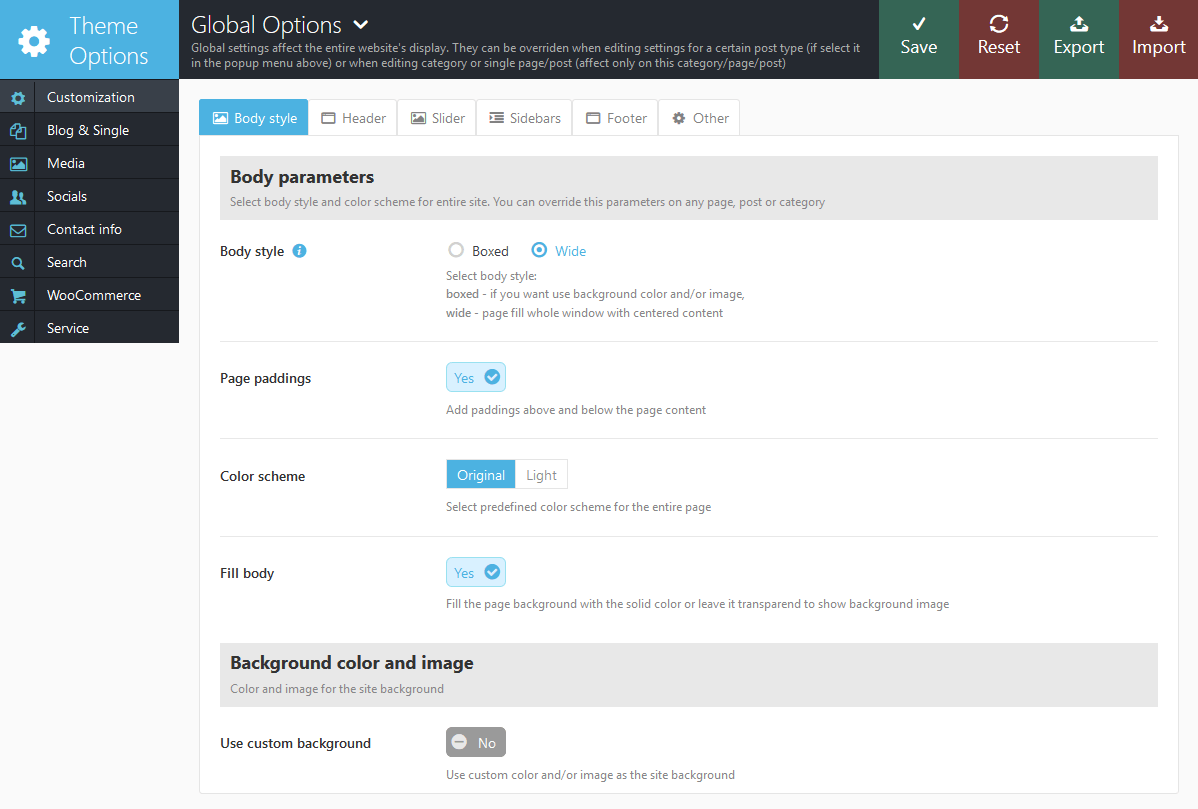
First, you should navigate to Appearance > Theme Options > Customization and set global options that will work throughout the entire site. These settings will be default for all categories, pages and posts of the theme:
As we mentioned above, most of global theme settings can be overridden in certain post/page types and each single page/post/category individually. For example, you need to change style of blog stream page for category that contains Portfolio type posts. Navigate to that category, click the edit button and at the bottom of the page change appearance settings according to your needs:
From now on all the posts in this category and its sub-categories will be displayed in the style of "Portfolio (4 columns)". However hover-effect "Dir" will be preserved for them. Posts of the rest of categories (unless individual settings were applied) will be displayed as defined in Theme Options. By the way, the remaining settings of the category that were not changed (overridden) will also be inherited from the parent ones. If the settings were not changed here too - from Theme Options.
If you want to change the appearance of individual post in the category you should find that post, click the "edit" button and set custom parameters. You can find "Post Options" at the bottom of the post edit page. These parameters will override both category settings and global settings defined in Theme Options panel.
Homepage
Now, let's proceed with creating our home page. You can create as many options of the main page, as you want.
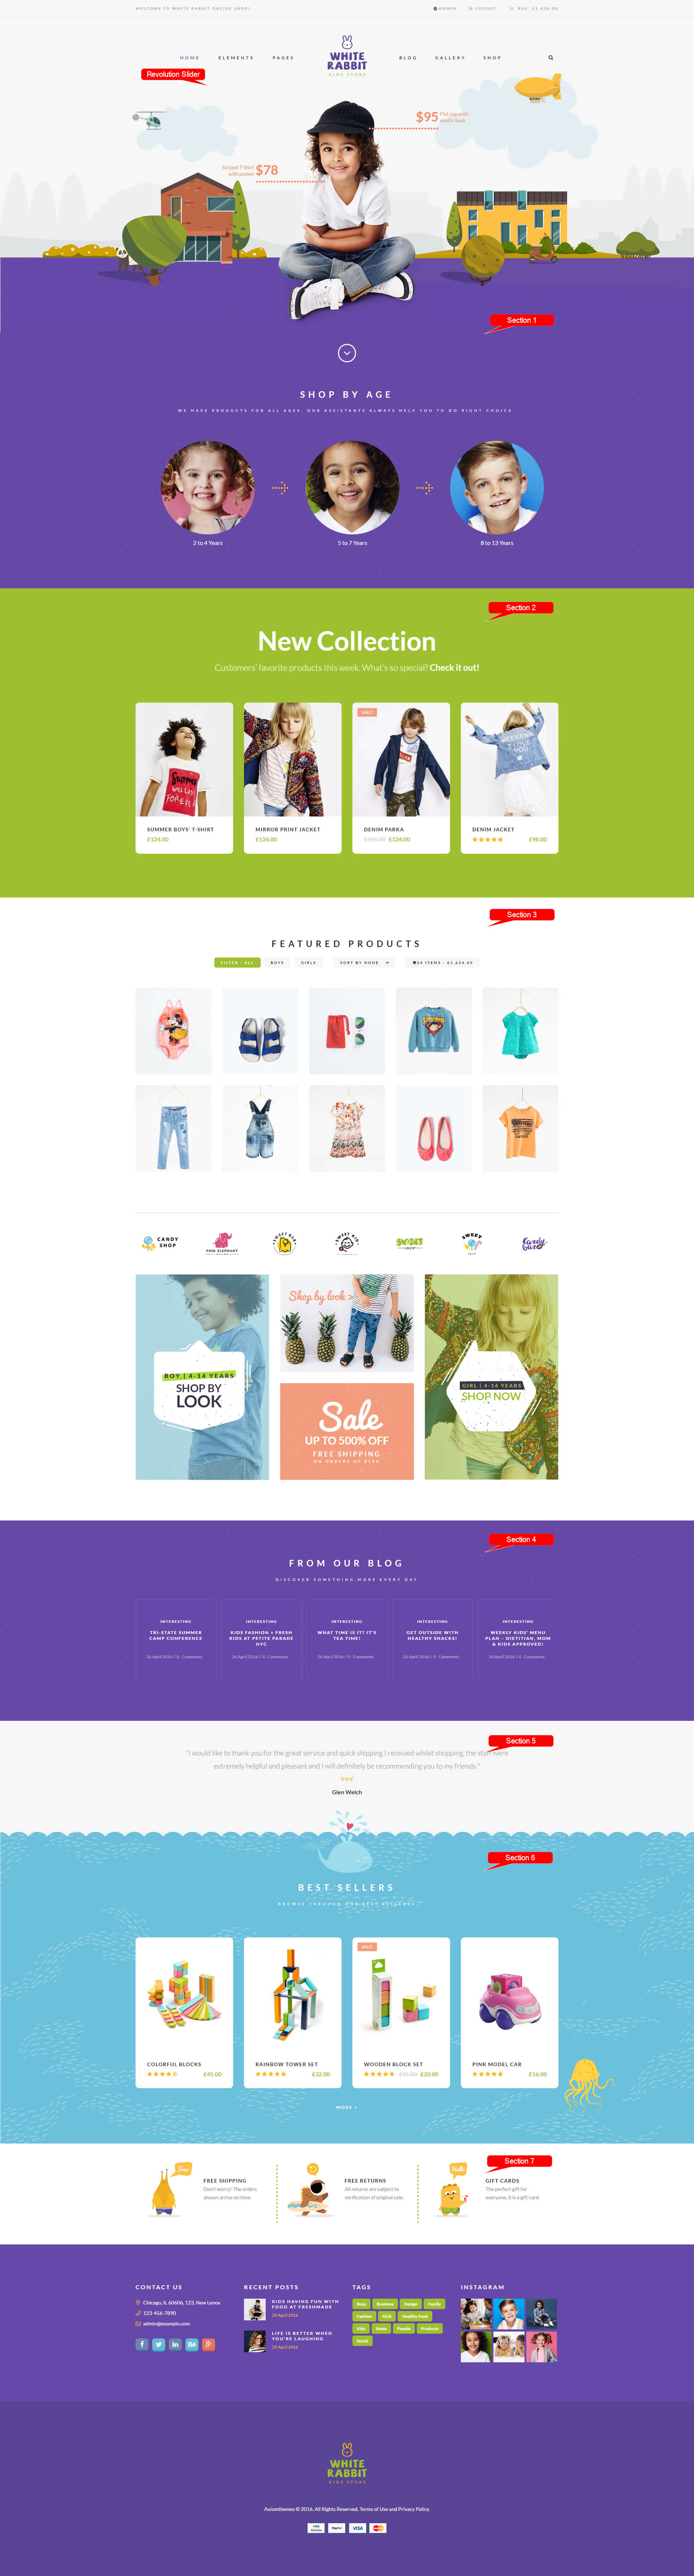
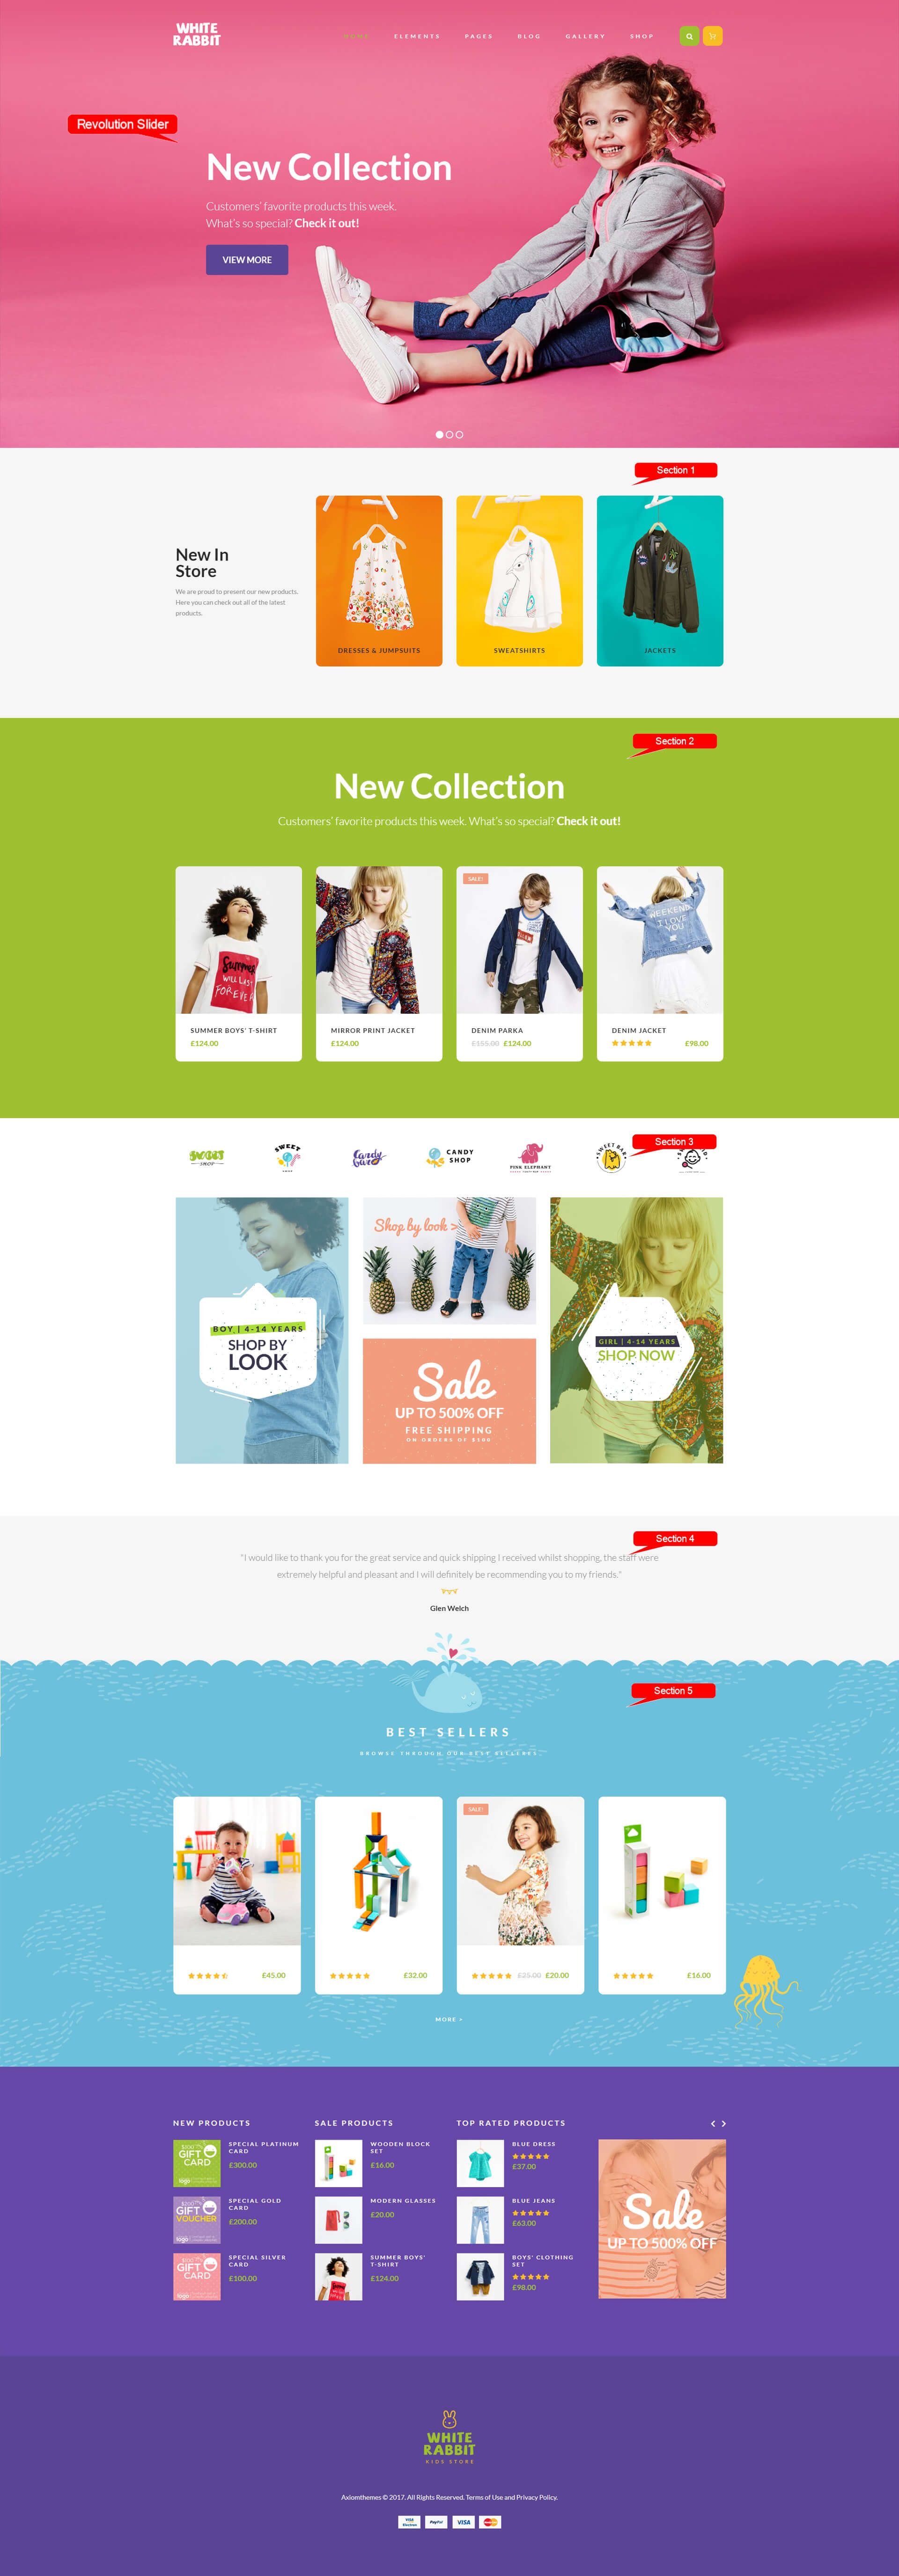
We will show you how to configure one of our Homepages, which is "Home Wide" (just the same one as on our demo).
Home 1
The picture below demonstrates the page style we are aiming at:

The algorithm of our actions would be as follows:
- Select Pages > Add New and create a new page.
- Specify a name for it (e.g. Home 1).
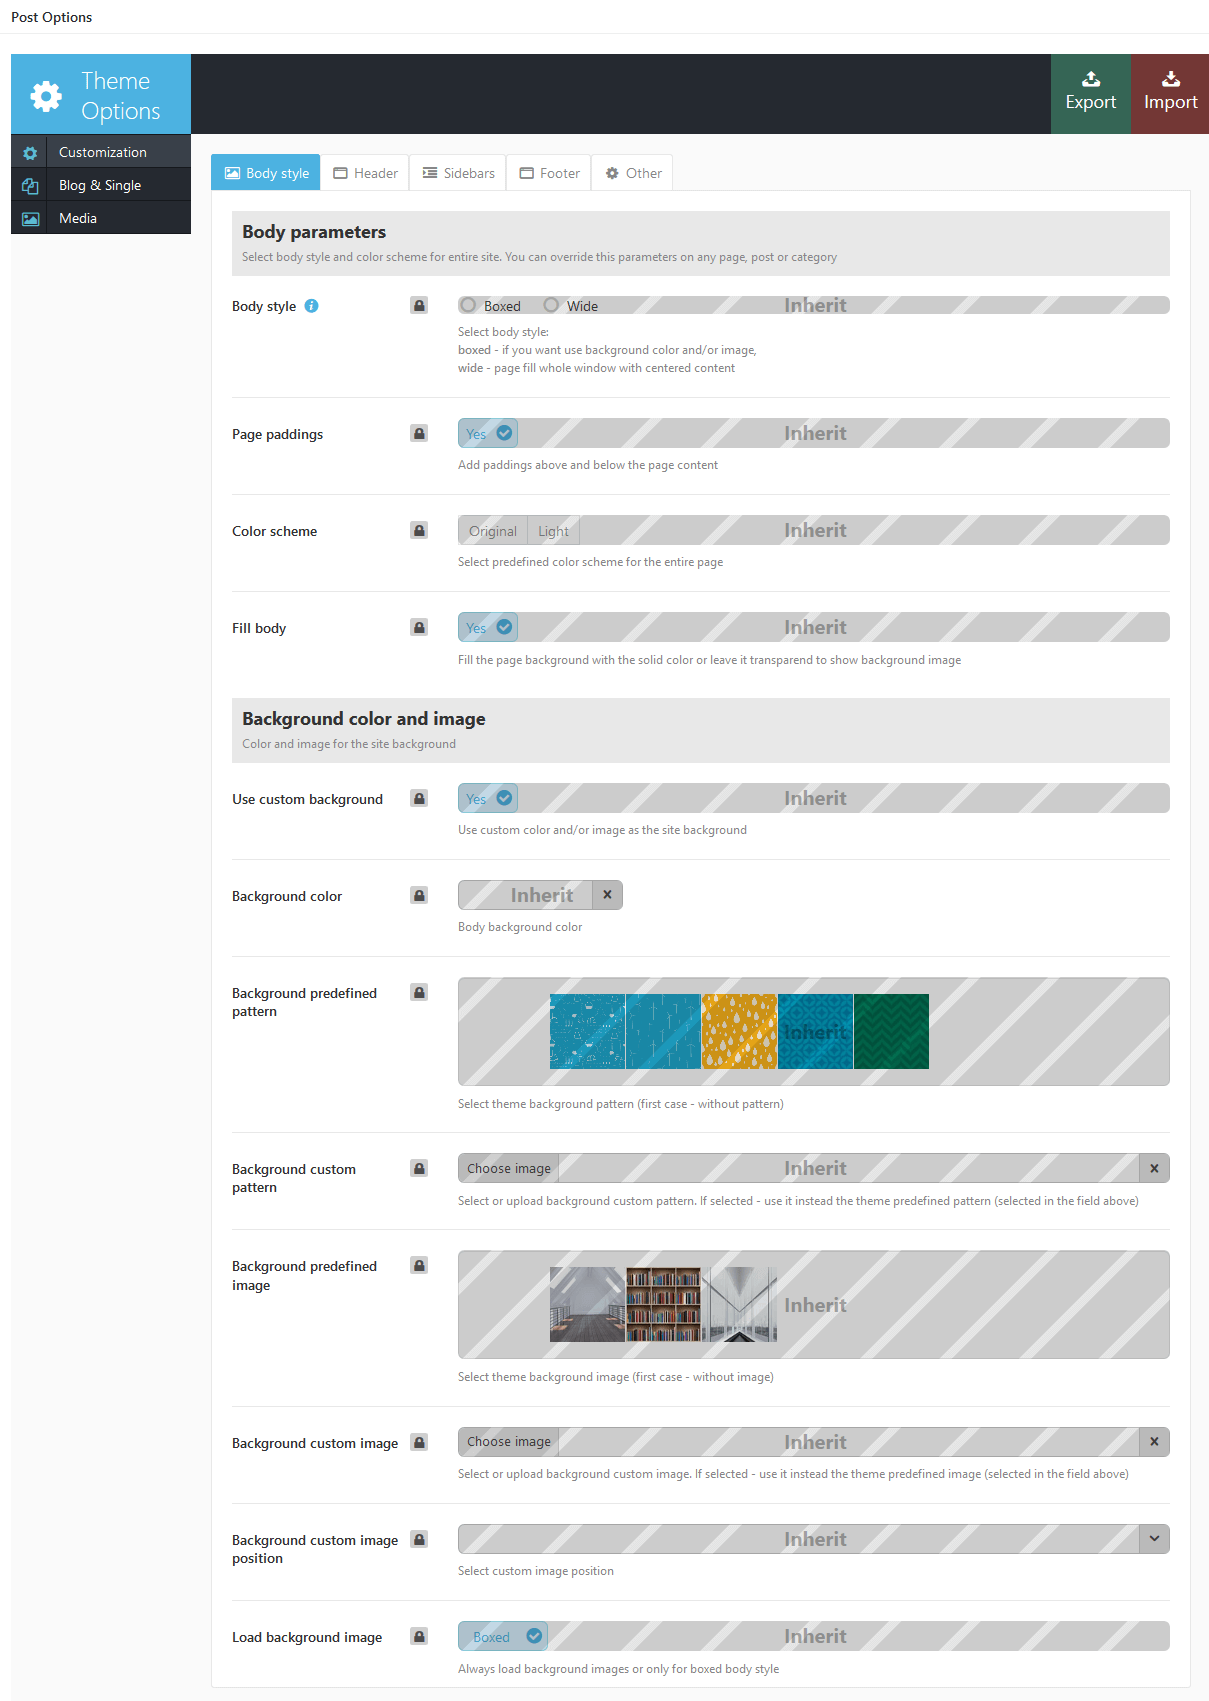
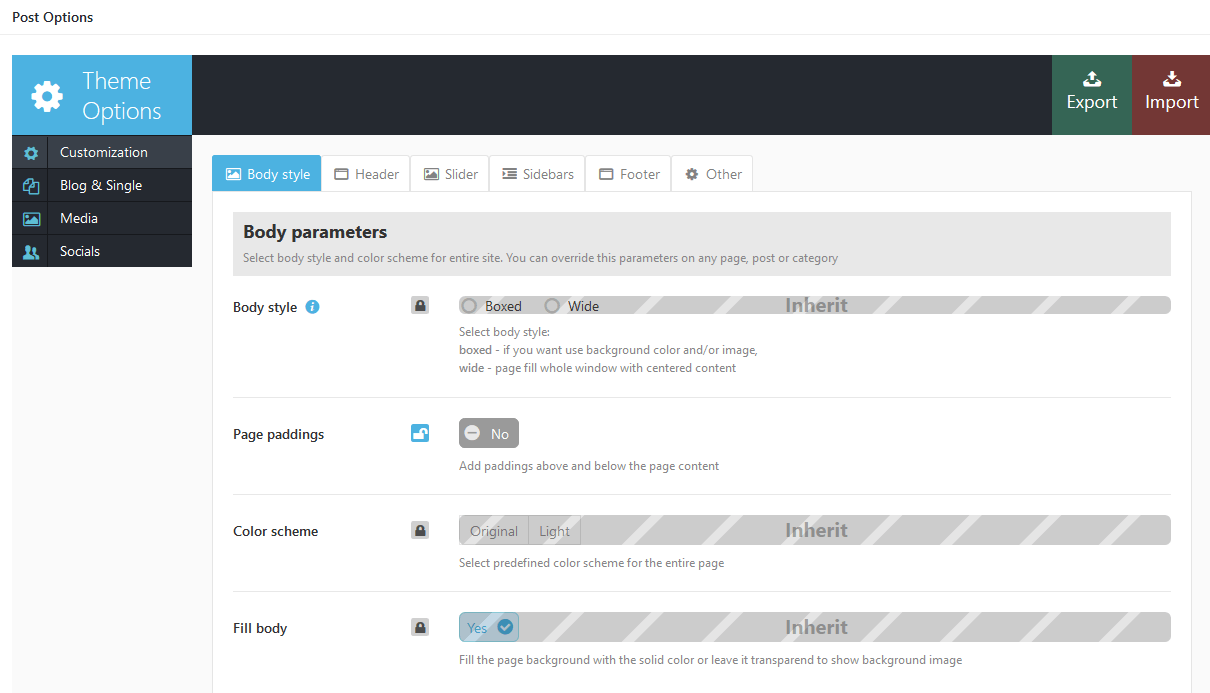
- Navigate to Post Options > Customization > Body style section and set the options according to the screenshot below.
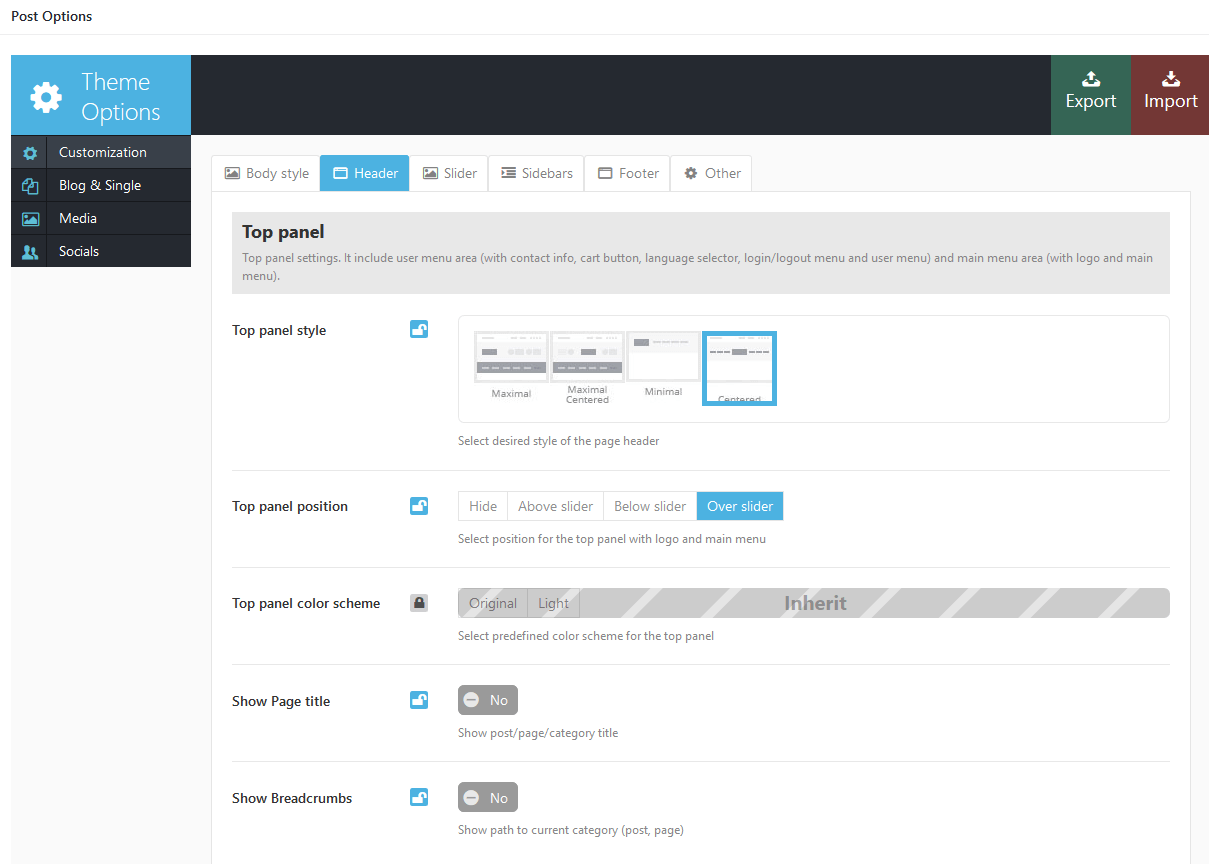
- In the Post Options > Customization > Header section set the following options.
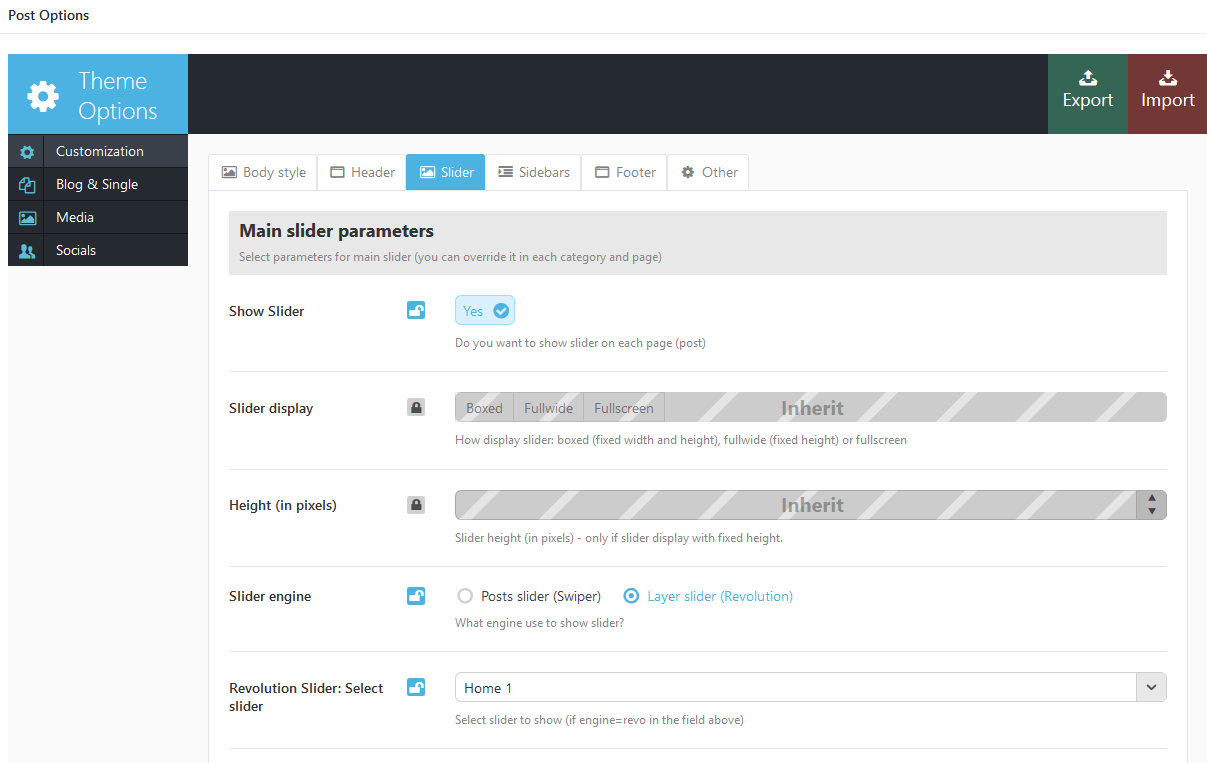
- Now let's add a slider. To do this go to the Post Options > Customization > Slider tab and enable "Show Slider" option. Then select the necessary "Slider Engine" and the slider itself in the "Revolution Slider: Select slider" field.
Please be aware that to enable the one particular slider on the necessary page (or set of pages) you need to disable the slider in Global Theme Options first and only then enable it for each and every page (or set of pages) in its "Post Options" settings.
Now the page is ready for further customization with WPBakery Page Builder. Before you start, please check these WPBakery Page Builder related tutorials. They will give you a basic understanding of how to build a page properly.
- Official WPBakery Page Builder FAQ page.
- Getting Started With WPBakery Page Builder Guide.
- WPBakery Page Builder: A Guide To Drag & Drop Page Building.
- How to Add Row and Column with WPBakery Page Builder.
- How to Add Row or Column Background with WPBakery Page Builder.
- How to Create Empty Space Between Elements with Custom Height.
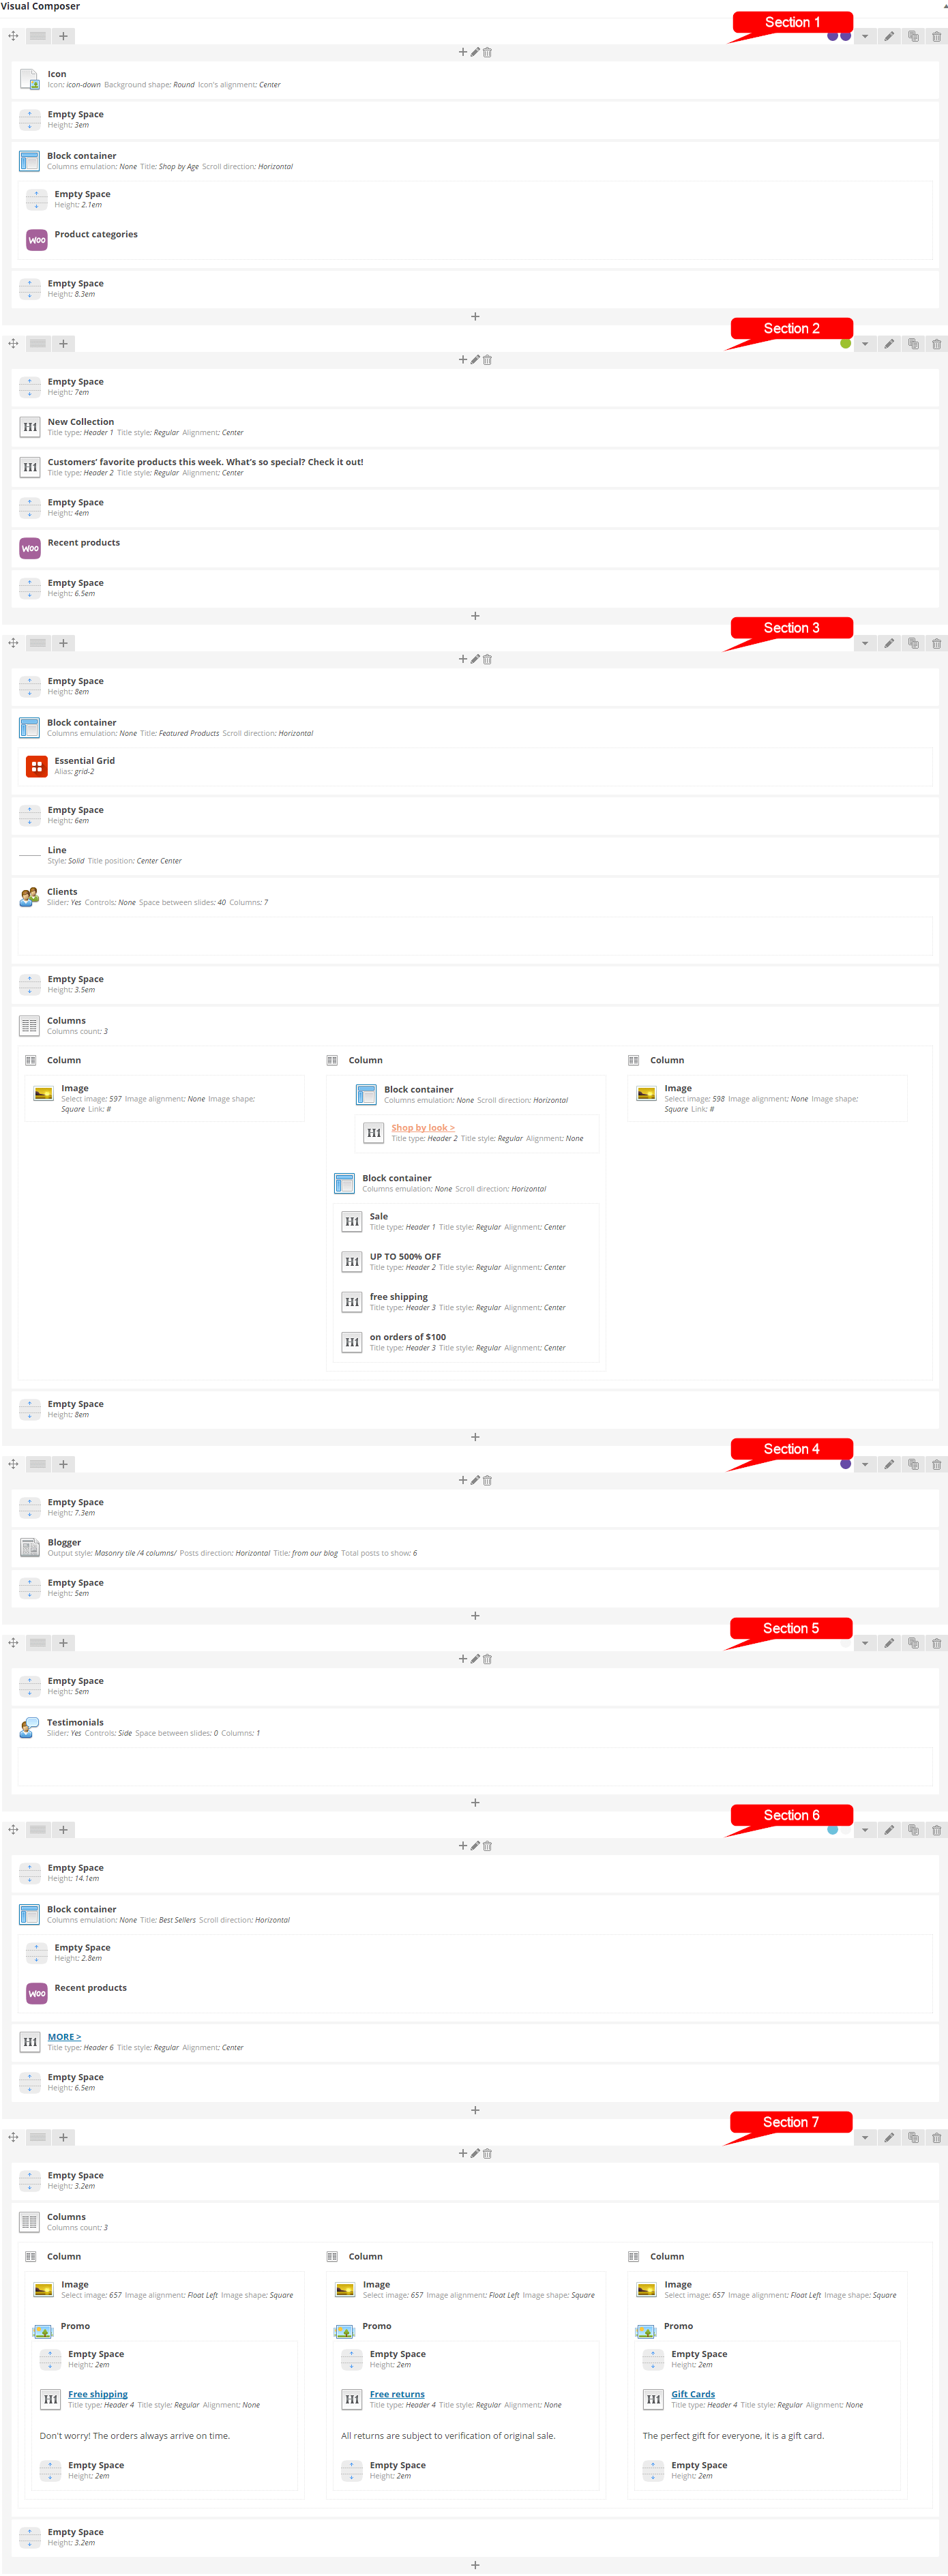
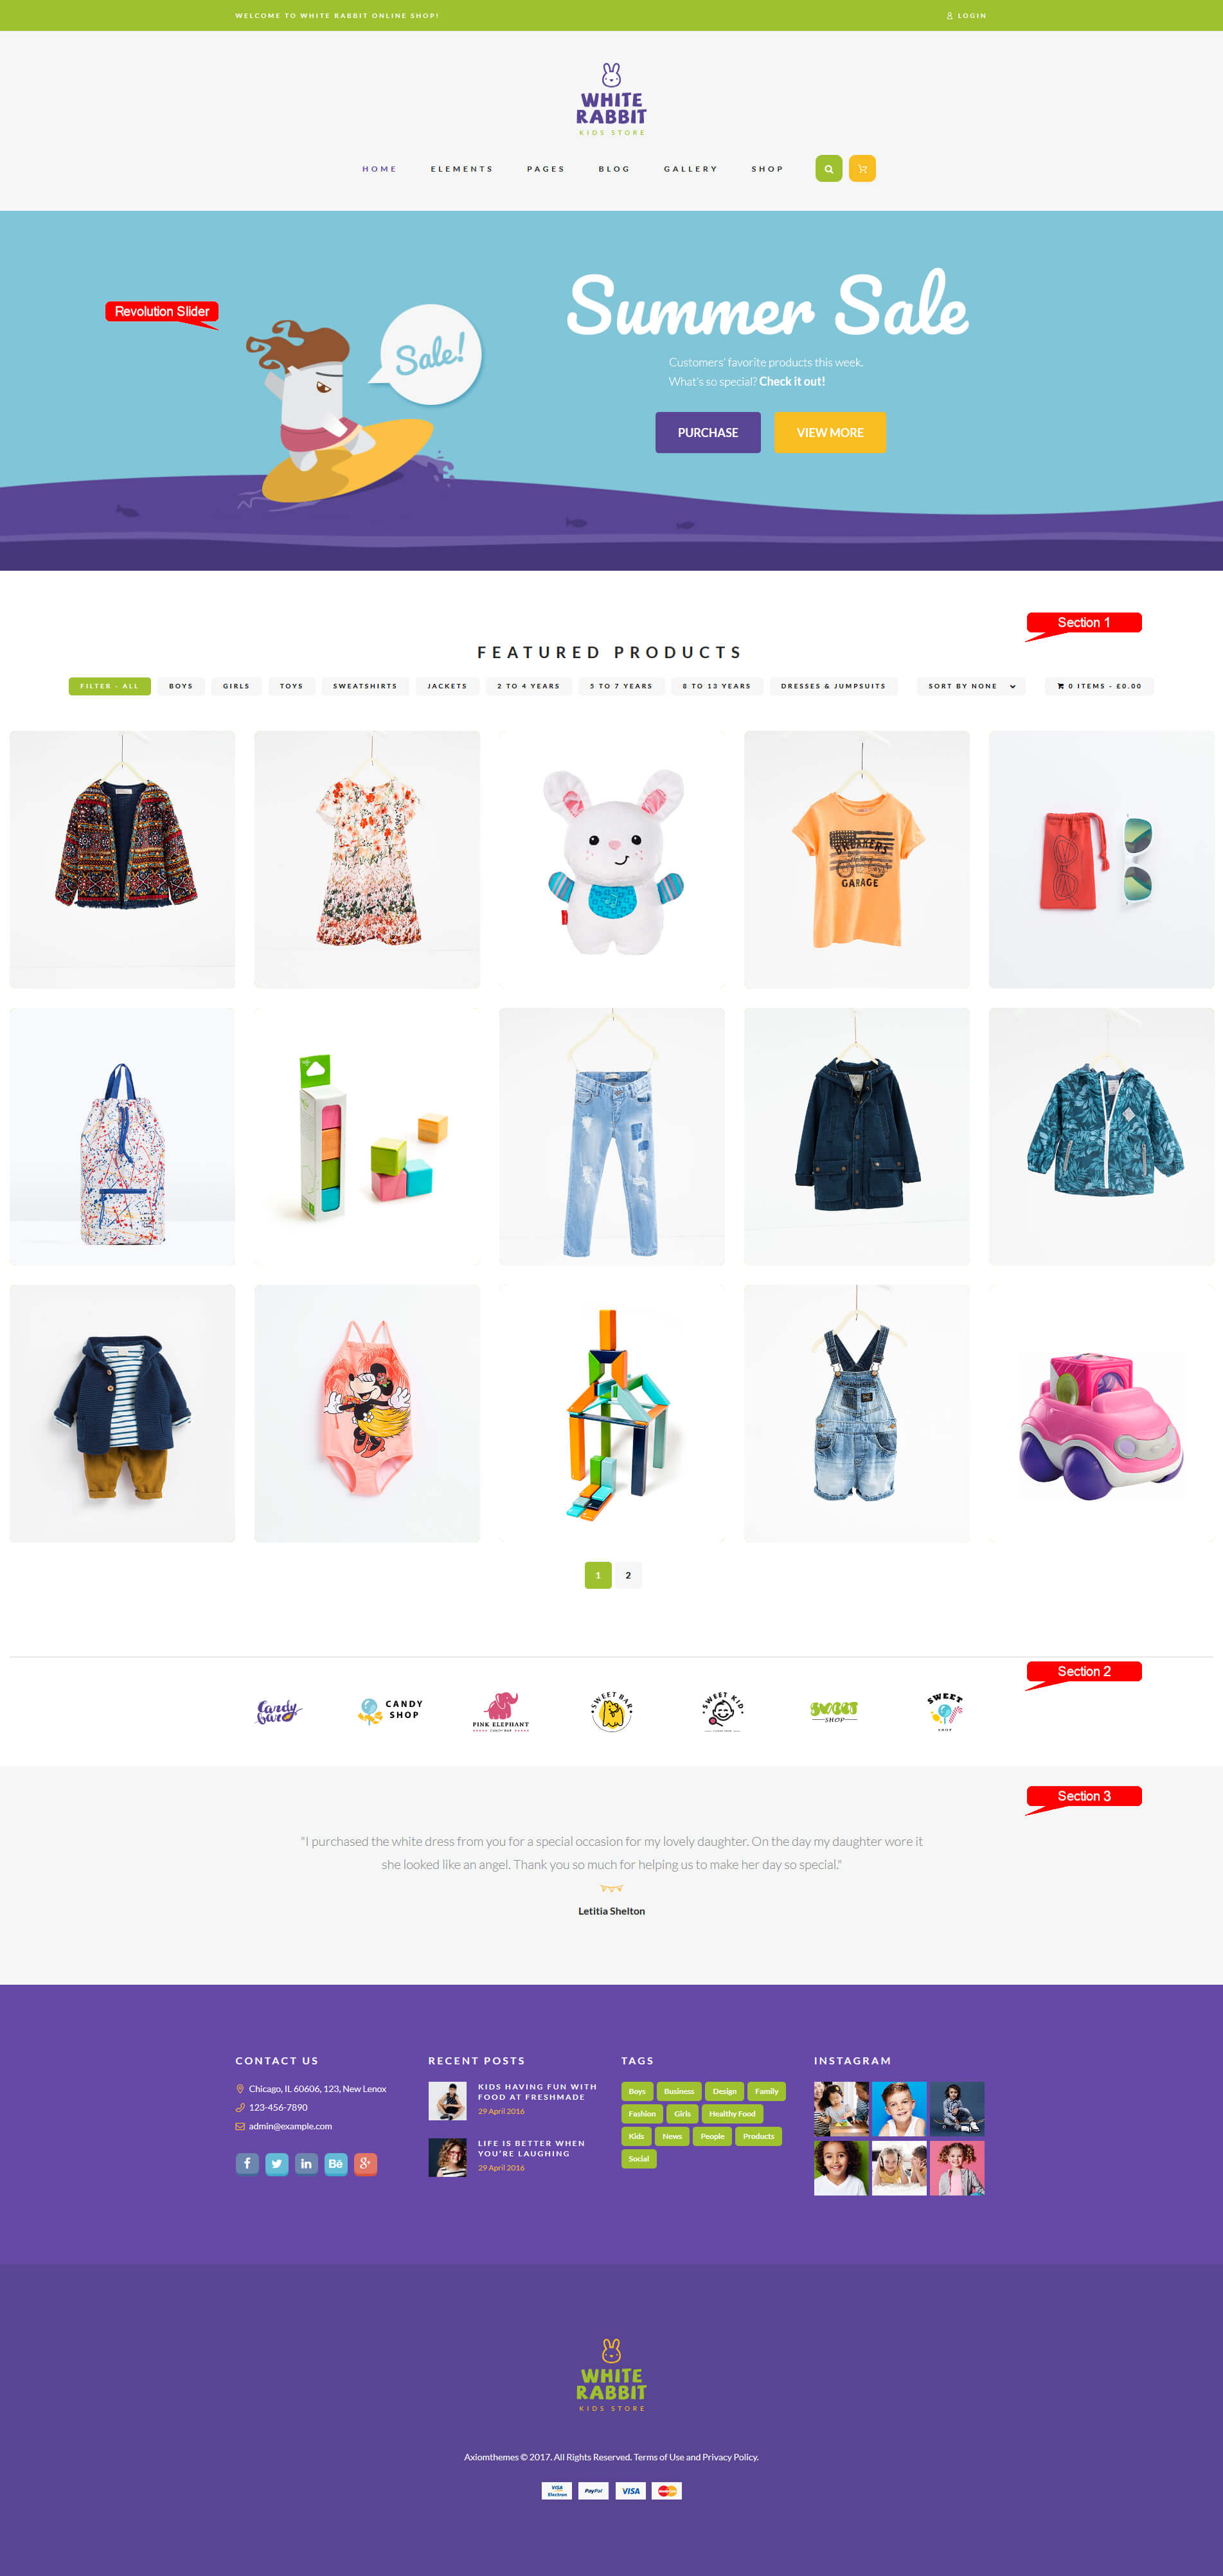
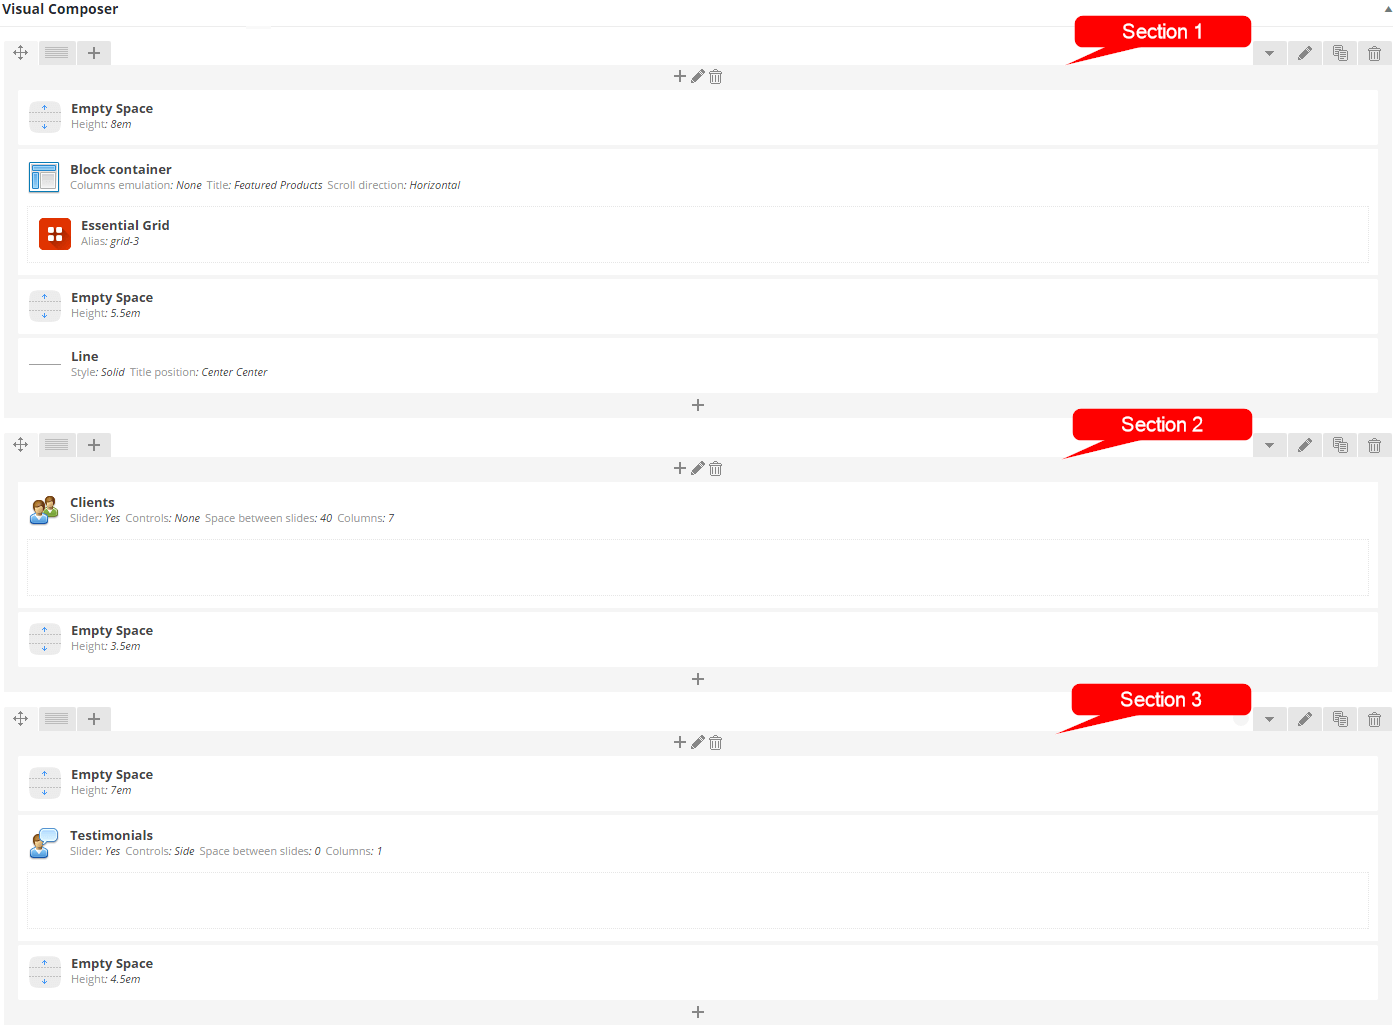
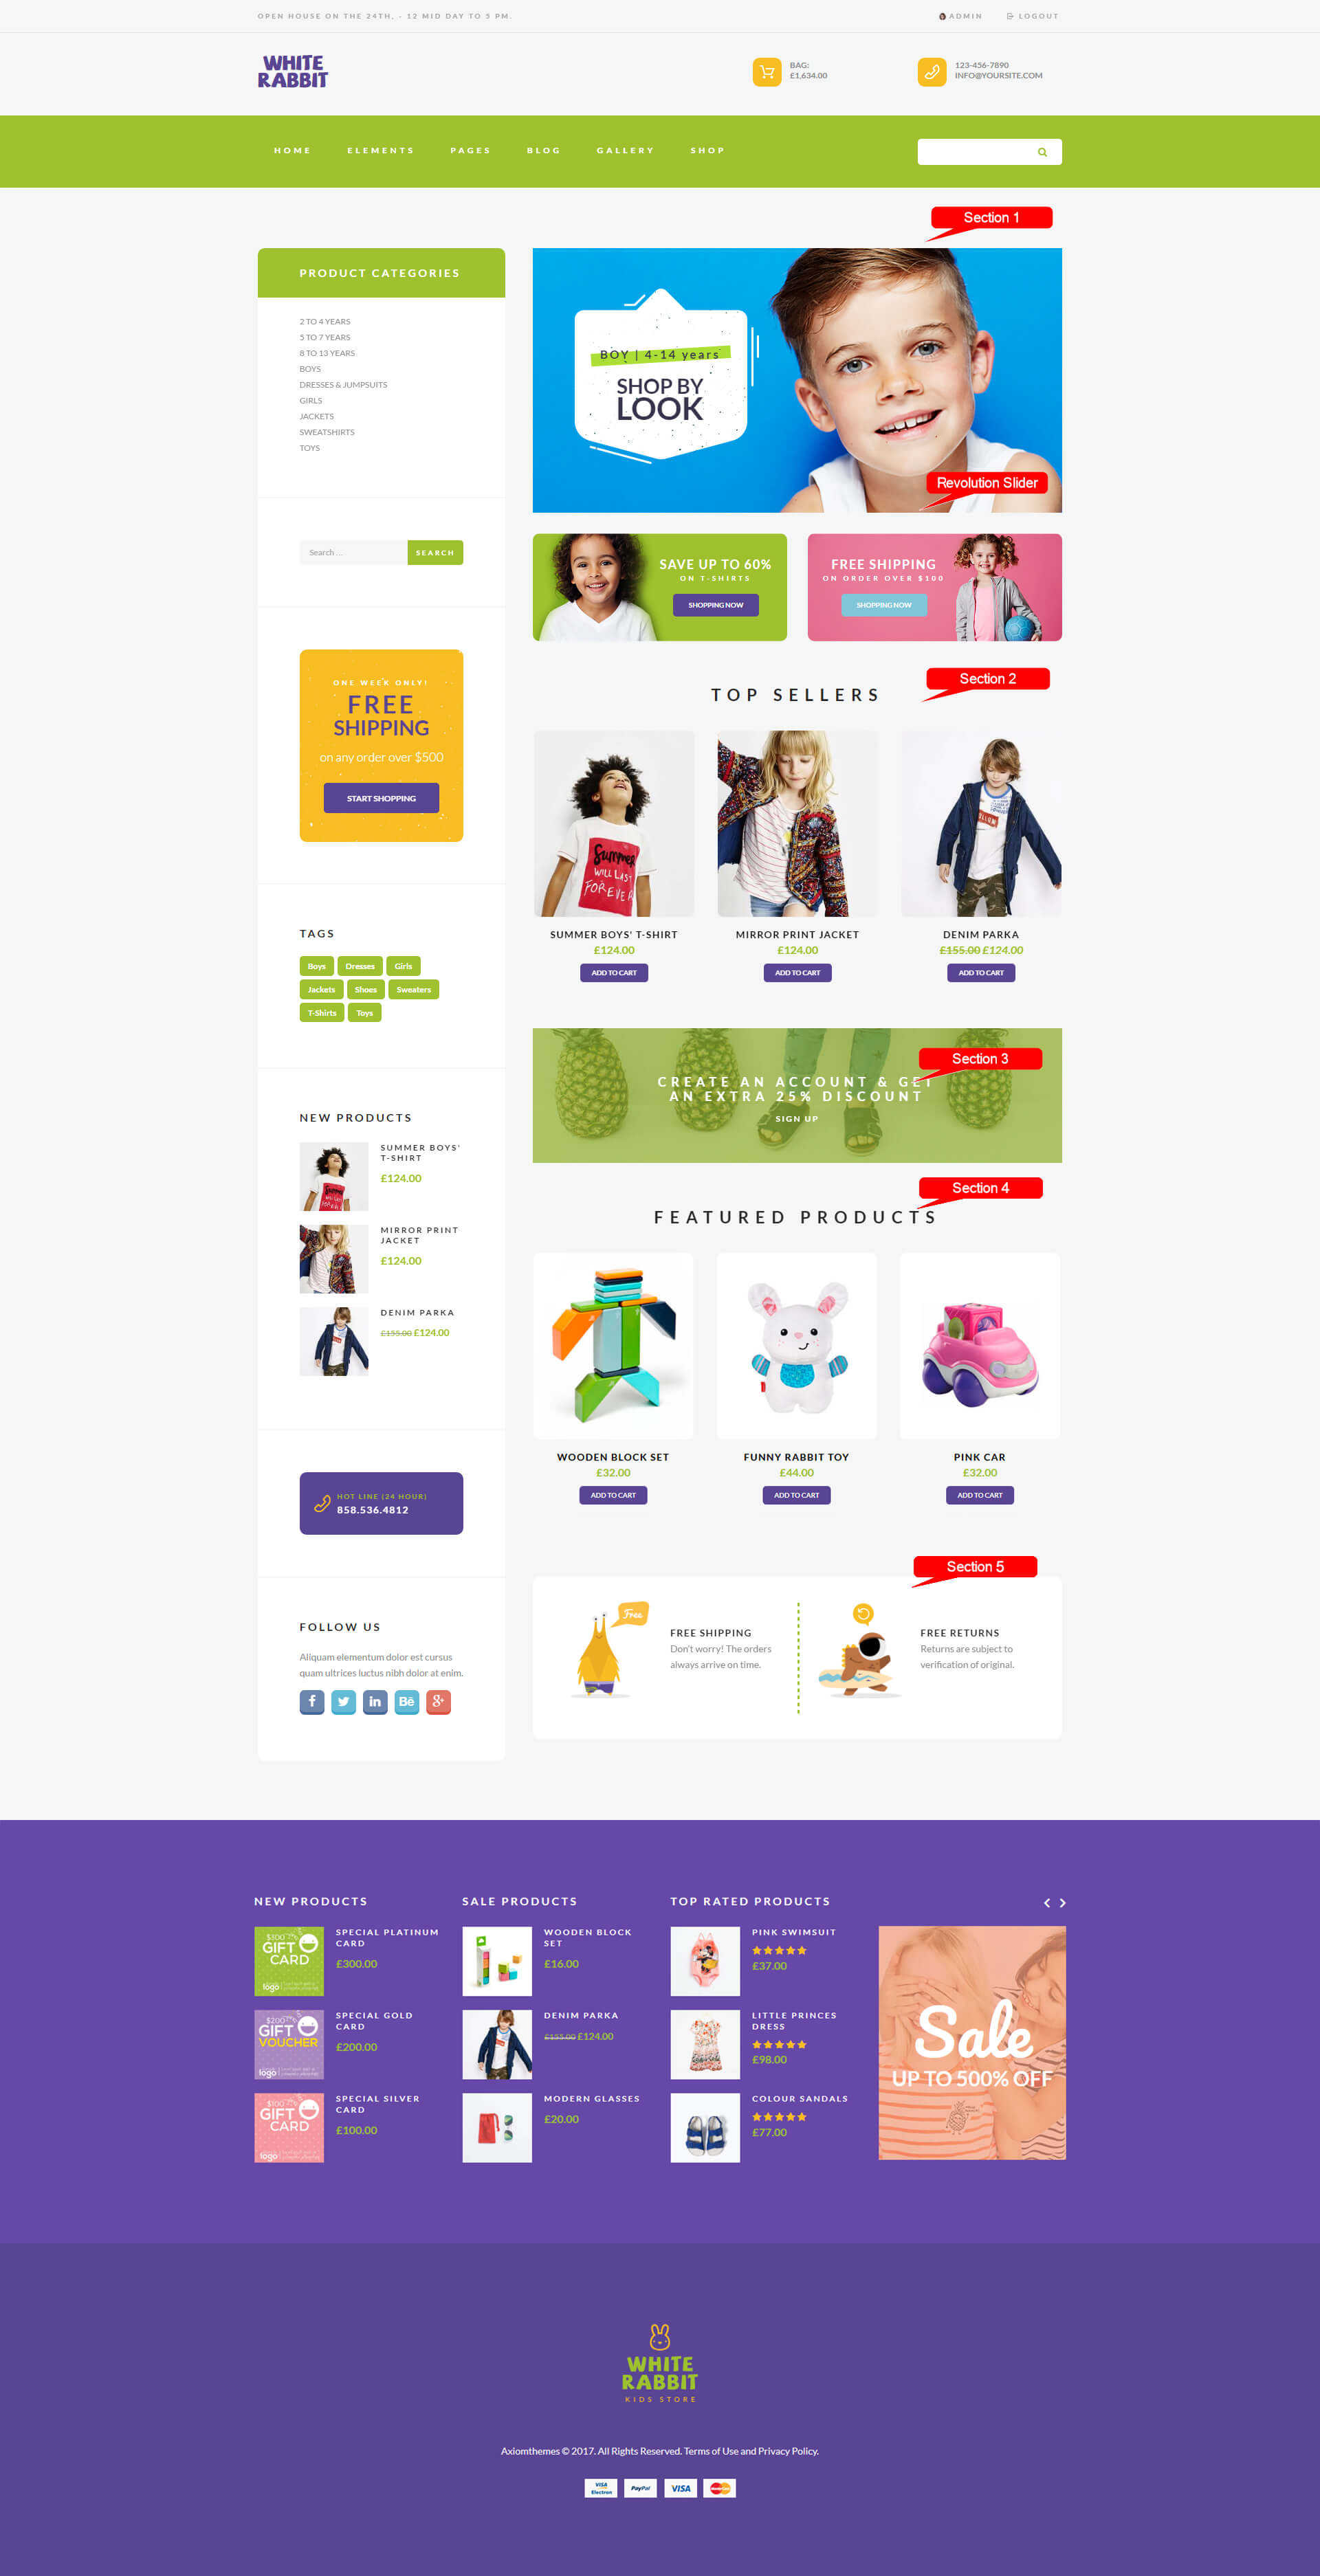
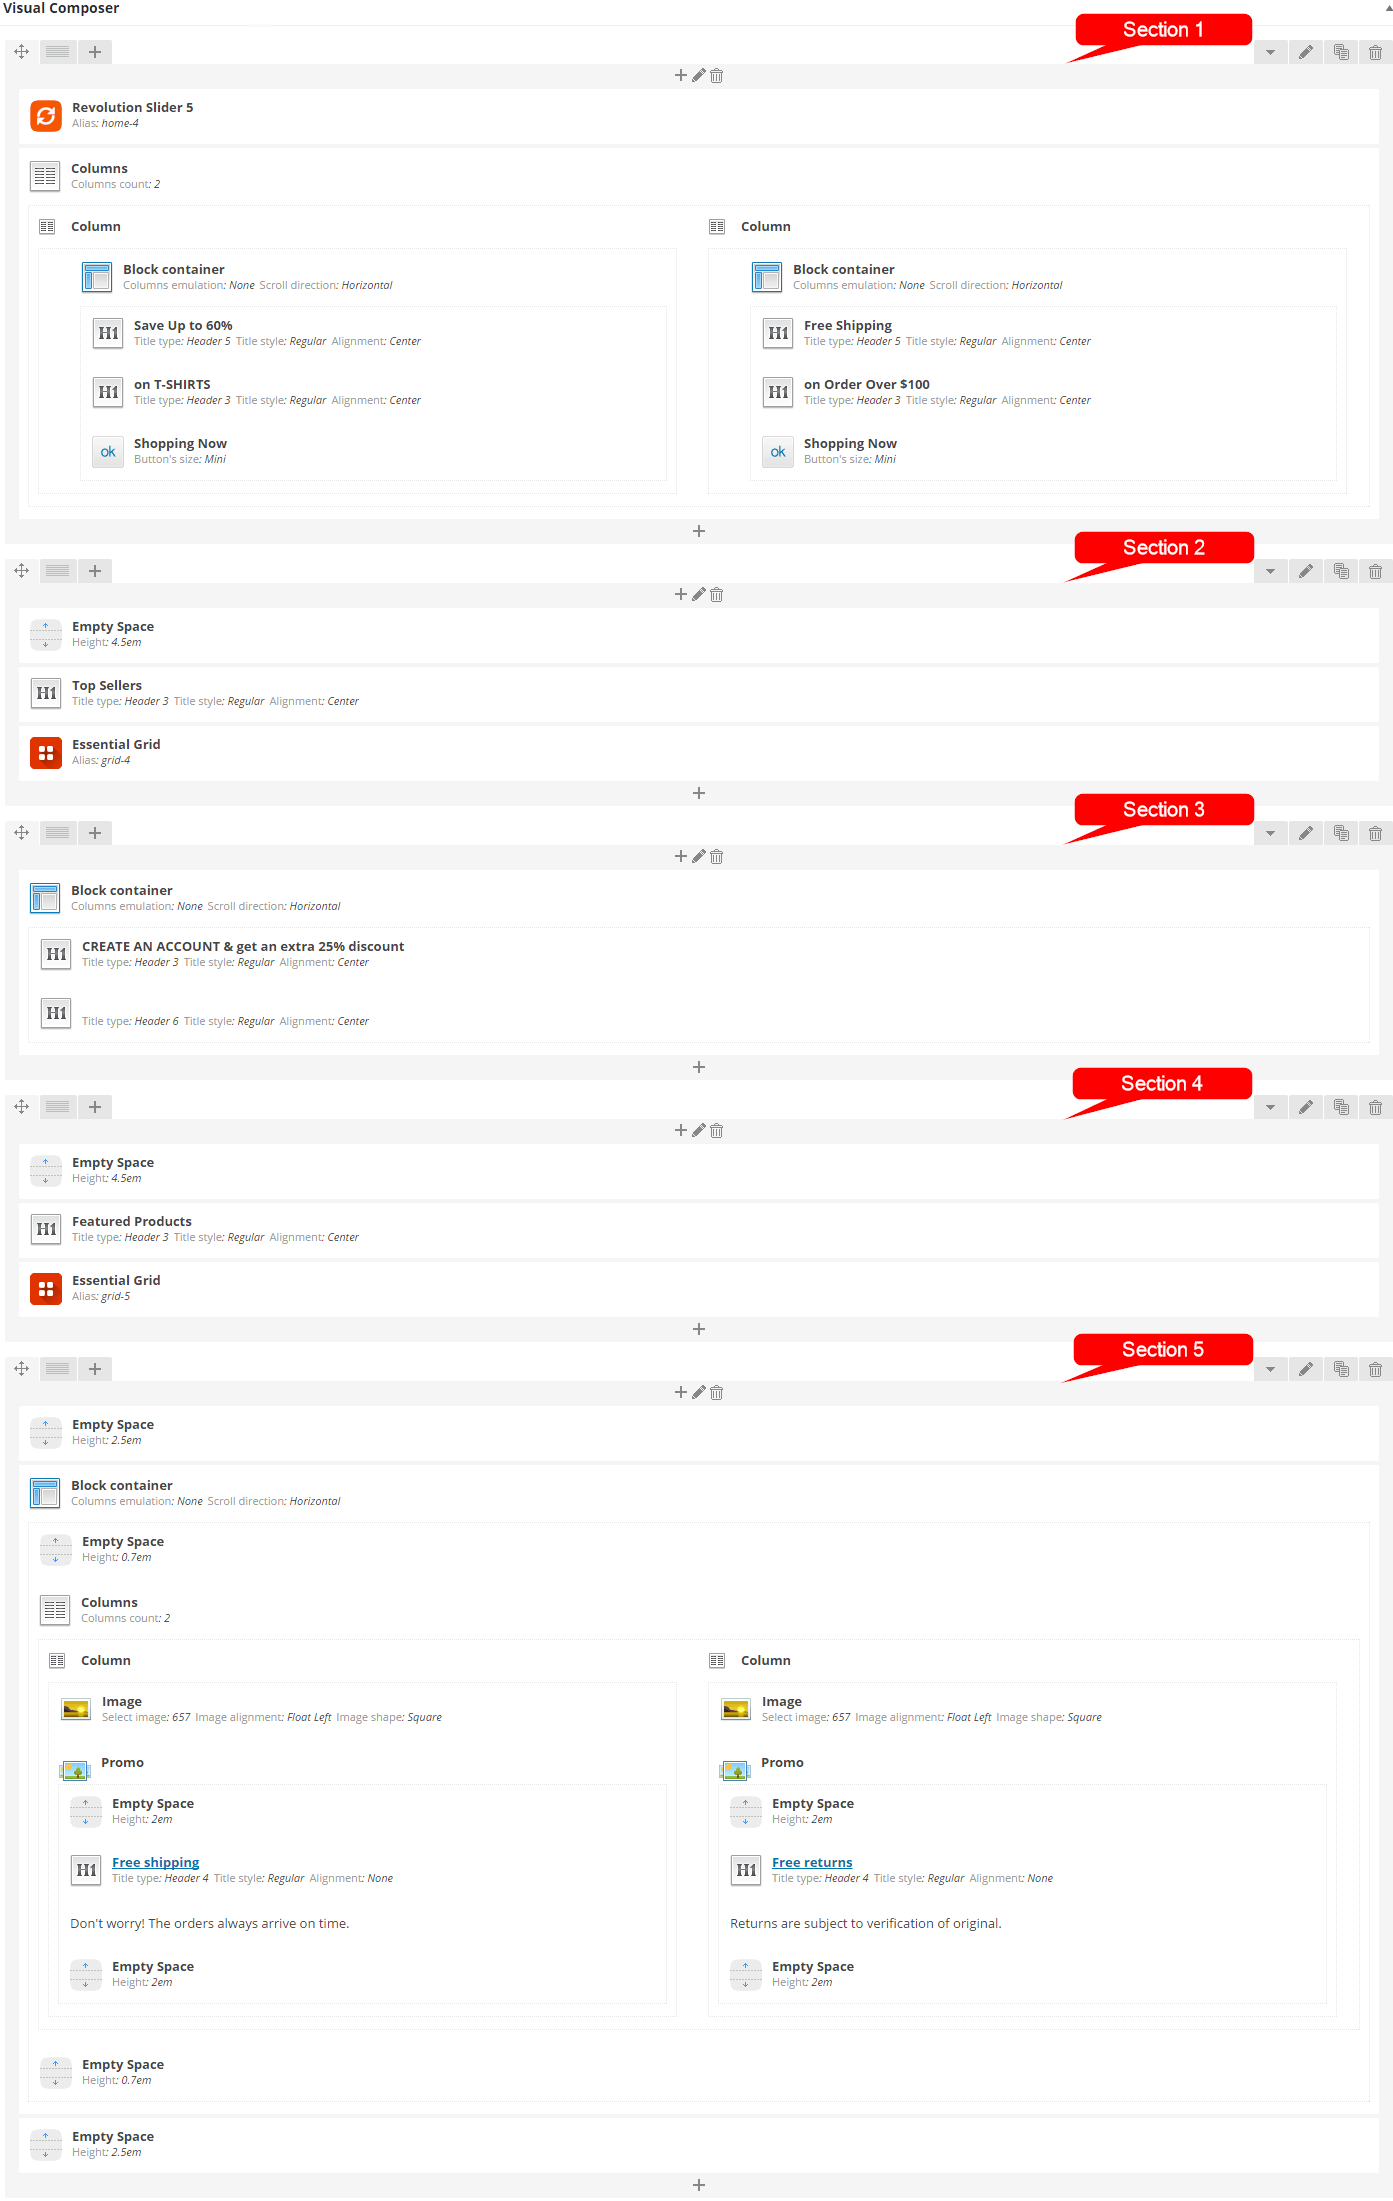
The whole page is build with the following elements: Rows, Block containers, Content blocks, Gaps, Columns and shortcodes. On the below screenshots you can see which backend section corresponds to a frontend section.
Here is how it looks on the frontend:
And here is how it looks in the WPBakery Page Builder's backend editor:
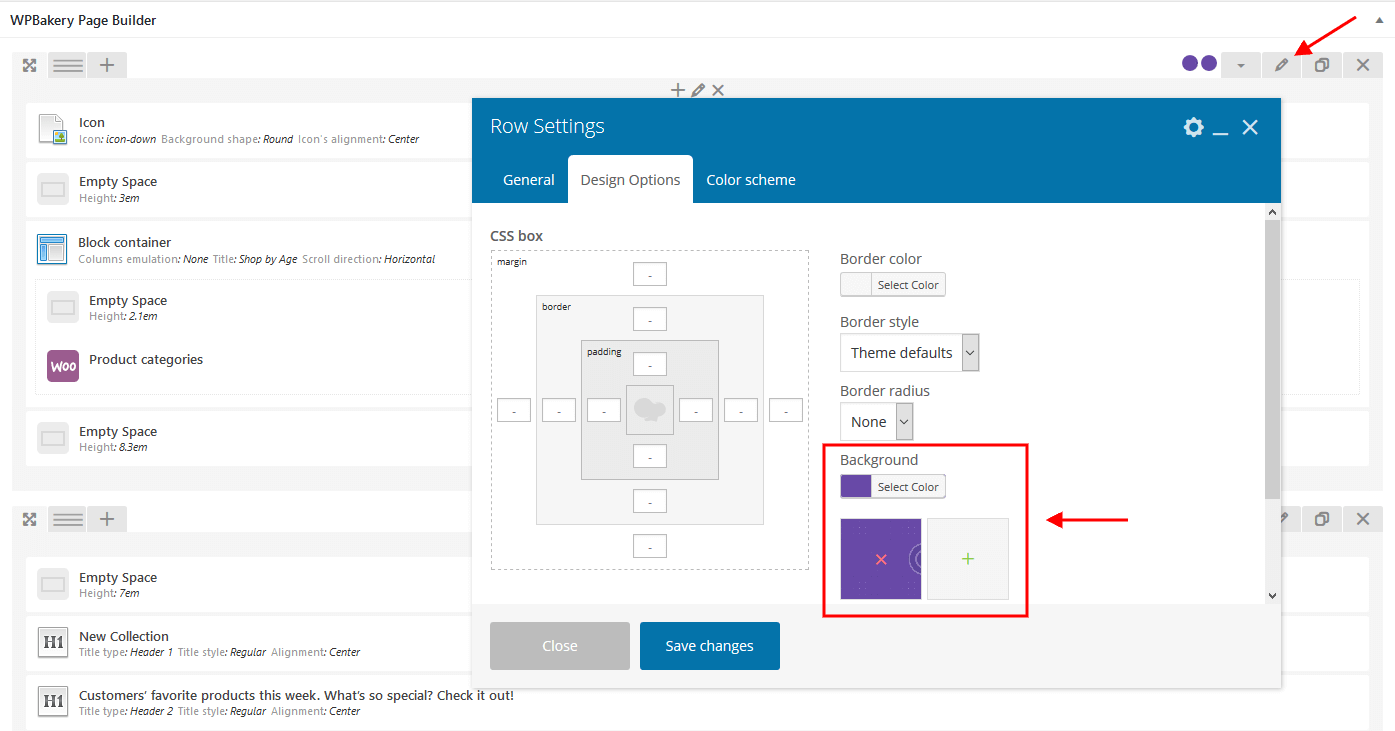
The background color/image for the page blocks can be customized in the Row Settings > Design Options tab in the WPBakery backend editor.
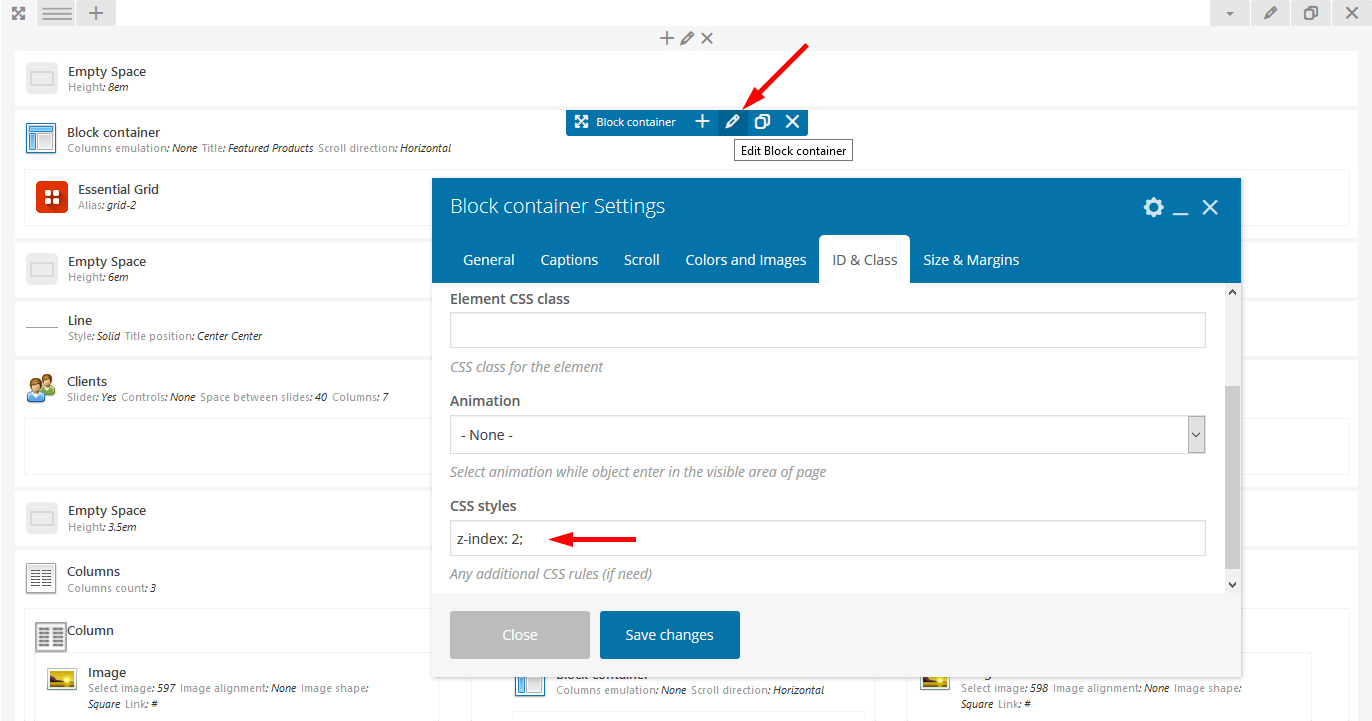
We have applied additional CSS rules for some elements in the Block Container Settings > ID & Class tab.
Find the Homepage 1 plain code below:
[vc_row full_width="stretch_row" inverse="yes" css=".vc_custom_1461669182517{background: #6648a7 url(/wp-content/uploads/2016/04/bg.jpg?id=525) !important;}"][vc_column][trx_icon icon="icon-down" bg_color="rgba(255,255,255,0.01)" bg_shape="round" font_size="2.2em" align="center"][vc_empty_space height="3em"][trx_block title="Shop by Age" description="We have products for all ages. Our assistants always help you to do right choice."][vc_empty_space height="2.1em"][product_categories orderby="" order="" columns="3" hide_empty="3" ids="17, 18, 19"][/trx_block][vc_empty_space height="8.3em"][/vc_column][/vc_row][vc_row full_width="stretch_row" inverse="" css=".vc_custom_1461672003158{background-color: #9ec12f !important;}"][vc_column][vc_empty_space height="7em"][trx_title align="center" color="#ffffff" bottom="0.15em"]New Collection[/trx_title][trx_title type="2" align="center" font_size="1.714em" font_weight="300" color="#ffffff"]Customers’ favorite products this week. What’s so special? <strong>Check it out!</strong>[/trx_title][vc_empty_space height="4em"][recent_products per_page="4" columns="4" orderby="date" order="ASC"][vc_empty_space height="6.5em"][/vc_column][/vc_row][vc_row full_width="stretch_row" css=".vc_custom_1462884122241{background-color: #ffffff !important;}"][vc_column][vc_empty_space height="8em"][trx_block title="Featured Products" css="z-index: 2;"][ess_grid alias="grid-2"][/trx_block][vc_empty_space height="6em"][trx_line bottom="3.5em"][trx_clients slider="yes" slides_space="40" cat="0" columns="7" count="7"][/trx_clients][vc_empty_space height="3.5em"][trx_columns count="3" margins=""][trx_column_item][trx_image url="597" link="#"][/trx_column_item][trx_column_item][trx_block bg_image="599" bg_tile="" class="custom_section_Shop" bottom="30px"][trx_title type="2" font_size="2.14em" font_family="Pacifico" line_height="1.7em" font_weight="400" top="0.7em"]<a style="color: #f29d7d;" href="#">Shop by look ></a>[/trx_title][/trx_block][trx_block bg_image="439" bg_tile=""][trx_title align="center" font_size="6.42em" font_family="Pacifico" font_weight="400" color="#ffffff" class="custom_text_Sale" top="0.21em" bottom="-0.13em"]Sale[/trx_title][trx_title type="2" align="center" font_size="2.14em" color="#ffffff" bottom="0.18em"]UP TO 500% OFF[/trx_title][trx_title type="3" align="center" font_size="1.285em" color="#ffffff" css="letter-spacing: 0.25em;" bottom="0"]free shipping[/trx_title][trx_title type="3" align="center" font_size="10px" color="#ffffff" css="letter-spacing: 0.5em;" bottom="2.9em"]on orders of $100[/trx_title][/trx_block][/trx_column_item][trx_column_item][trx_image url="598" link="#"][/trx_column_item][/trx_columns][vc_empty_space height="8em"][/vc_column][/vc_row][vc_row full_width="stretch_row" inverse="yes" css=".vc_custom_1461746706983{background-image: url(/wp-content/uploads/2016/04/bg.jpg?id=525) !important;}"][vc_column][vc_empty_space height="7.3em"][trx_blogger style="masonry_4" columns="5" info="" descr="0" title="from our blog" description="Discover something more every day" cat="1" count="6" offset="0" scroll="yes"][vc_empty_space height="5em"][/vc_column][/vc_row][vc_row full_width="stretch_row" css=".vc_custom_1461747800964{background-color: #f5f6f6 !important;}"][vc_column][vc_empty_space height="5em"][trx_testimonials controls="side" cat="0" bottom="2.8em" style="testimonials-2"][/trx_testimonials][/vc_column][/vc_row][vc_row full_width="stretch_row" inverse="yes" css=".vc_custom_1462891094401{background: #f5f6f6 url(/wp-content/uploads/2016/04/bg-1.png?id=986) !important;}"][vc_column][vc_empty_space height="14.1em"][trx_block title="Best Sellers" description="Browse Through Our Best Selleres"][vc_empty_space height="2.8em"][products columns="4" orderby="date" order="" ids="702, 703, 704, 705"][/trx_block][trx_title type="6" align="center" color="#ffffff" top="15px" bottom="0"]<a href="/shop/">MORE ></a>[/trx_title][vc_empty_space height="6.5em"][/vc_column][/vc_row][vc_row full_width="stretch_row" css=".vc_custom_1461749096180{background-color: #ffffff !important;}"][vc_column][vc_empty_space height="3.2em"][trx_columns count="3" margins="no"][trx_column_item][trx_image url="657" align="left" class="hide_on_ipad" css="opacity: 0;"][trx_promo size="small" image="643" image_width="36.22%"][vc_empty_space height="2em"][trx_title type="4" bottom="0"]<a href="#">Free shipping</a>[/trx_title][vc_column_text]Don't worry! The orders always arrive on time.[/vc_column_text][vc_empty_space height="2em"][/trx_promo][/trx_column_item][trx_column_item][trx_image url="657" align="left" class="hide_on_ipad"][trx_promo size="small" image="649" image_width="36.22%"][vc_empty_space height="2em"][trx_title type="4" bottom="0"]<a href="#">Free returns</a>[/trx_title][vc_column_text]All returns are subject to verification of original sale.[/vc_column_text][vc_empty_space height="2em"][/trx_promo][/trx_column_item][trx_column_item][trx_image url="657" align="left" class="hide_on_ipad"][trx_promo size="small" image="645" image_width="36.22%"][vc_empty_space height="2em"][trx_title type="4" bottom="0"]<a href="#">Gift Cards</a>[/trx_title][vc_column_text]The perfect gift for everyone, it is a gift card.[/vc_column_text][vc_empty_space height="2em"][/trx_promo][/trx_column_item][/trx_columns][vc_empty_space height="3.2em"][/vc_column][/vc_row]
Once you finished with building your page you would need to assign it as Homepage. To do this:
- Select the menu item Settings > Readings
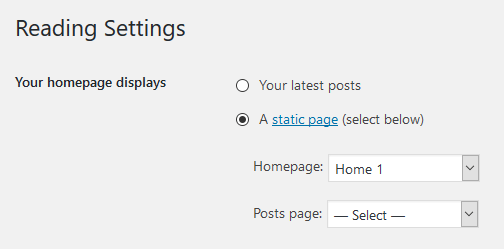
- In the Homepage displays section select "A static page (select below)" option, in the "Homepage:" dropdown list choose the page you have already created.
Below you can find another variation(s) of the same Homepage we have described above.
Home 2
This is how the second version looks like.

Plain code (Homepage 2):
[vc_row full_width="stretch_row" css=".vc_custom_1461761793450{background-color: #f5f6f6 !important;}"][vc_column][vc_empty_space height="7.8em"][trx_columns count="4" margins=""][trx_column_item][trx_title type="2" line_height="1em" class="custom_text_New" top="40%" bottom="0.35em"]New In
Store[/trx_title][vc_column_text css=".vc_custom_1463473951087{margin-bottom: 30px !important;}"]We are proud to present our new products. Here you can check out all of the latest products.[/vc_column_text][/trx_column_item][trx_column_item][trx_image url="676" class="hover_scale"][trx_title type="4" align="center" top="-3.1em" bottom="1.8em"]<a href="http://mysite.com/product-category/dresses-jumpsuits/">DRESSES & JUMPSUITS</a>[/trx_title][/trx_column_item][trx_column_item][trx_image url="677" class="hover_scale"][trx_title type="4" align="center" top="-3.1em" bottom="1.8em"]<a href="http://mysite.com/product-category/sweatshirts/">SWEATSHIRTS</a>[/trx_title][/trx_column_item][trx_column_item][trx_image url="678" class="hover_scale"][trx_title type="4" align="center" top="-3.1em" bottom="1.8em"]<a href="http://mysite.com/product-category/jackets/">Jackets</a>[/trx_title][/trx_column_item][/trx_columns][vc_empty_space height="7.8em"][/vc_column][/vc_row][vc_row full_width="stretch_row" inverse="" css=".vc_custom_1461672003158{background-color: #9ec12f !important;}"][vc_column][vc_empty_space height="7em"][trx_title align="center" color="#ffffff" bottom="0.15em"]New Collection[/trx_title][trx_title type="2" align="center" font_size="1.714em" font_weight="300" color="#ffffff"]Customers’ favorite products this week. What’s so special? <strong>Check it out!</strong>[/trx_title][vc_empty_space height="4em"][recent_products per_page="4" columns="4" orderby="date" order="ASC"][vc_empty_space height="6.5em"][/vc_column][/vc_row][vc_row full_width="stretch_row" css=".vc_custom_1461676221532{background-color: #ffffff !important;}"][vc_column][vc_empty_space height="3.5em"][trx_clients slider="yes" slides_space="40" cat="0" columns="7" count="7"][/trx_clients][vc_empty_space height="3.5em"][trx_columns count="3" margins=""][trx_column_item][trx_image url="597" link="#"][/trx_column_item][trx_column_item][trx_block bg_image="599" bg_tile="" class="custom_section_Shop" bottom="30px"][trx_title type="2" font_size="2.14em" font_family="Pacifico" line_height="1.7em" font_weight="400" top="0.7em"]<a style="color: #f29d7d;" href="#">Shop by look ></a>[/trx_title][/trx_block][trx_block bg_image="439" bg_tile=""][trx_title align="center" font_size="6.42em" font_family="Pacifico" font_weight="400" color="#ffffff" class="custom_text_Sale" top="0.21em" bottom="-0.13em"]Sale[/trx_title][trx_title type="2" align="center" font_size="2.14em" color="#ffffff" bottom="0.18em"]UP TO 500% OFF[/trx_title][trx_title type="3" align="center" font_size="1.285em" color="#ffffff" css="letter-spacing: 0.25em;" bottom="0"]free shipping[/trx_title][trx_title type="3" align="center" font_size="10px" color="#ffffff" css="letter-spacing: 0.5em;" bottom="2.9em"]on orders of $100[/trx_title][/trx_block][/trx_column_item][trx_column_item][trx_image url="598" link="#"][/trx_column_item][/trx_columns][vc_empty_space height="8em"][/vc_column][/vc_row][vc_row full_width="stretch_row" css=".vc_custom_1461747800964{background-color: #f5f6f6 !important;}"][vc_column][vc_empty_space height="5em"][trx_testimonials controls="side" cat="0" bottom="2.8em" style="testimonials-2"][/trx_testimonials][/vc_column][/vc_row][vc_row full_width="stretch_row" inverse="yes" css=".vc_custom_1461748268783{background: #f5f6f6 url(/wp-content/uploads/2016/04/bg-1.png?id=638) !important;}"][vc_column][vc_empty_space height="14.1em"][trx_block title="Best Sellers" description="Browse Through Our Best Selleres"][vc_empty_space height="2.8em"][products columns="4" orderby="date" order="" ids="702, 703, 704, 705"][/trx_block][trx_title type="6" align="center" color="#ffffff" top="15px" bottom="0"]<a href="/shop/">MORE ></a>[/trx_title][vc_empty_space height="6.5em"][/vc_column][/vc_row]
Home 3
This is how the third version looks like.
Plain code (Homepage 3):
[vc_row full_width="stretch_row_content" css=".vc_custom_1461830778004{background-color: #ffffff !important;}"][vc_column][vc_empty_space height="8em"][trx_block title="Featured Products" css="z-index: 2;"][ess_grid alias="grid-3"][/trx_block][vc_empty_space height="5.5em"][trx_line bottom="3.5em"][/vc_column][/vc_row][vc_row full_width="stretch_row" css=".vc_custom_1461833928129{background-color: #ffffff !important;}"][vc_column][trx_clients slider="yes" slides_space="40" cat="0" columns="7" count="7"][/trx_clients][vc_empty_space height="3.5em"][/vc_column][/vc_row][vc_row full_width="stretch_row" css=".vc_custom_1461747800964{background-color: #f5f6f6 !important;}"][vc_column][vc_empty_space height="7em"][trx_testimonials style="testimonials-2" controls="side" cat="0" bottom="2.8em"][/trx_testimonials][vc_empty_space height="4.5em"][/vc_column][/vc_row]
Home 4
This is how the fourth version looks like.
Plain code (Homepage 4):
[vc_row][vc_column][rev_slider alias="home-4"][trx_columns margins="" top="30px"][trx_column_item bg_image="1002" bg_tile=""][trx_block align="right" width="165px" top="2.4em " bottom="2.4em" left="0" right="1.5em"][trx_title type="5" align="center" font_size="1.285em" color="#ffffff" css=" letter-spacing: 0.1em;" bottom="0"]Save Up to 60%[/trx_title][trx_title type="3" align="center" font_size="10px" color="#ffffff"]on T-SHIRTS[/trx_title][trx_button size="mini" align="center" link="/shop/" css="max-width: 125px;" bottom="0.2em"]Shopping Now[/trx_button][/trx_block][/trx_column_item][trx_column_item bg_image="1001" bg_tile=""][trx_block align="left" width="180px" top="2.4em " bottom="2.4em" left="1.5em" right="0"][trx_title type="5" align="center" font_size="1.285em" color="#ffffff" css=" letter-spacing: 0.1em;" bottom="0"]Free Shipping[/trx_title][trx_title type="3" align="center" font_size="10px" color="#ffffff"]on Order Over $100[/trx_title][trx_button size="mini" bg_color="#81c5d8" align="center" link="/shop/" css="max-width: 125px;" bottom="0.2em"]Shopping Now[/trx_button][/trx_block][/trx_column_item][/trx_columns][/vc_column][/vc_row][vc_row][vc_column][vc_empty_space height="4.5em"][trx_title type="3" align="center" bottom="1.35em"]Top Sellers[/trx_title][ess_grid alias="grid-4"][/vc_column][/vc_row][vc_row][vc_column][trx_block bg_image="753" bg_tile="" top="1.6em"][trx_title type="3" align="center" font_size="1.28em" line_height="1.2em" color="#ffffff" top="3em"]CREATE AN ACCOUNT & get an extra 25% discount[/trx_title][trx_title type="6" align="center" line_height="1em" color="#ffffff" bottom="3.6em"]<a style="color: #fff;" href="#">sign up</a>[/trx_title][/trx_block][/vc_column][/vc_row][vc_row][vc_column][vc_empty_space height="4.5em"][trx_title type="3" align="center" bottom="1.35em"]Featured Products[/trx_title][ess_grid alias="grid-5"][/vc_column][/vc_row][vc_row][vc_column][vc_empty_space height="2.5em"][trx_block bg_color="#ffffff" css="border-radius: 10px;"][vc_empty_space height="0.7em"][trx_columns margins="no"][trx_column_item][trx_image url="657" align="left" class="hide_on_ipad" css="opacity: 0;"][trx_promo size="small" image="643" image_width="36.22%"][vc_empty_space height="2em"][trx_title type="4" bottom="0"]<a href="#">Free shipping</a>[/trx_title][vc_column_text]Don't worry! The orders always arrive on time.[/vc_column_text][vc_empty_space height="2em"][/trx_promo][/trx_column_item][trx_column_item][trx_image url="657" align="left" class="hide_on_ipad"][trx_promo size="small" image="649" image_width="36.22%"][vc_empty_space height="2em"][trx_title type="4" bottom="0"]<a href="#">Free returns</a>[/trx_title][vc_column_text]Returns are subject to verification of original.[/vc_column_text][vc_empty_space height="2em"][/trx_promo][/trx_column_item][/trx_columns][vc_empty_space height="0.7em"][/trx_block][vc_empty_space height="2.5em"][/vc_column][/vc_row]
Main Slider
Now, let's set up the main theme's slider.
Built-in Theme Slider (Swiper)
Built-in theme slider allows you to display Featured images from the posts of this category. You can select a category and specify the number of the posts displayed. This is a rather simple solution that can be optionally used, though we prefer using revolution slider.
Revolution Slider
Our theme is fully compatible with an extremely powerful Revolution Slider plugin.
After the demo content installation Revolution Slider item will show up in theme's menu (otherwise you'd need to install this plugin manually and create the necessary slides on your own).
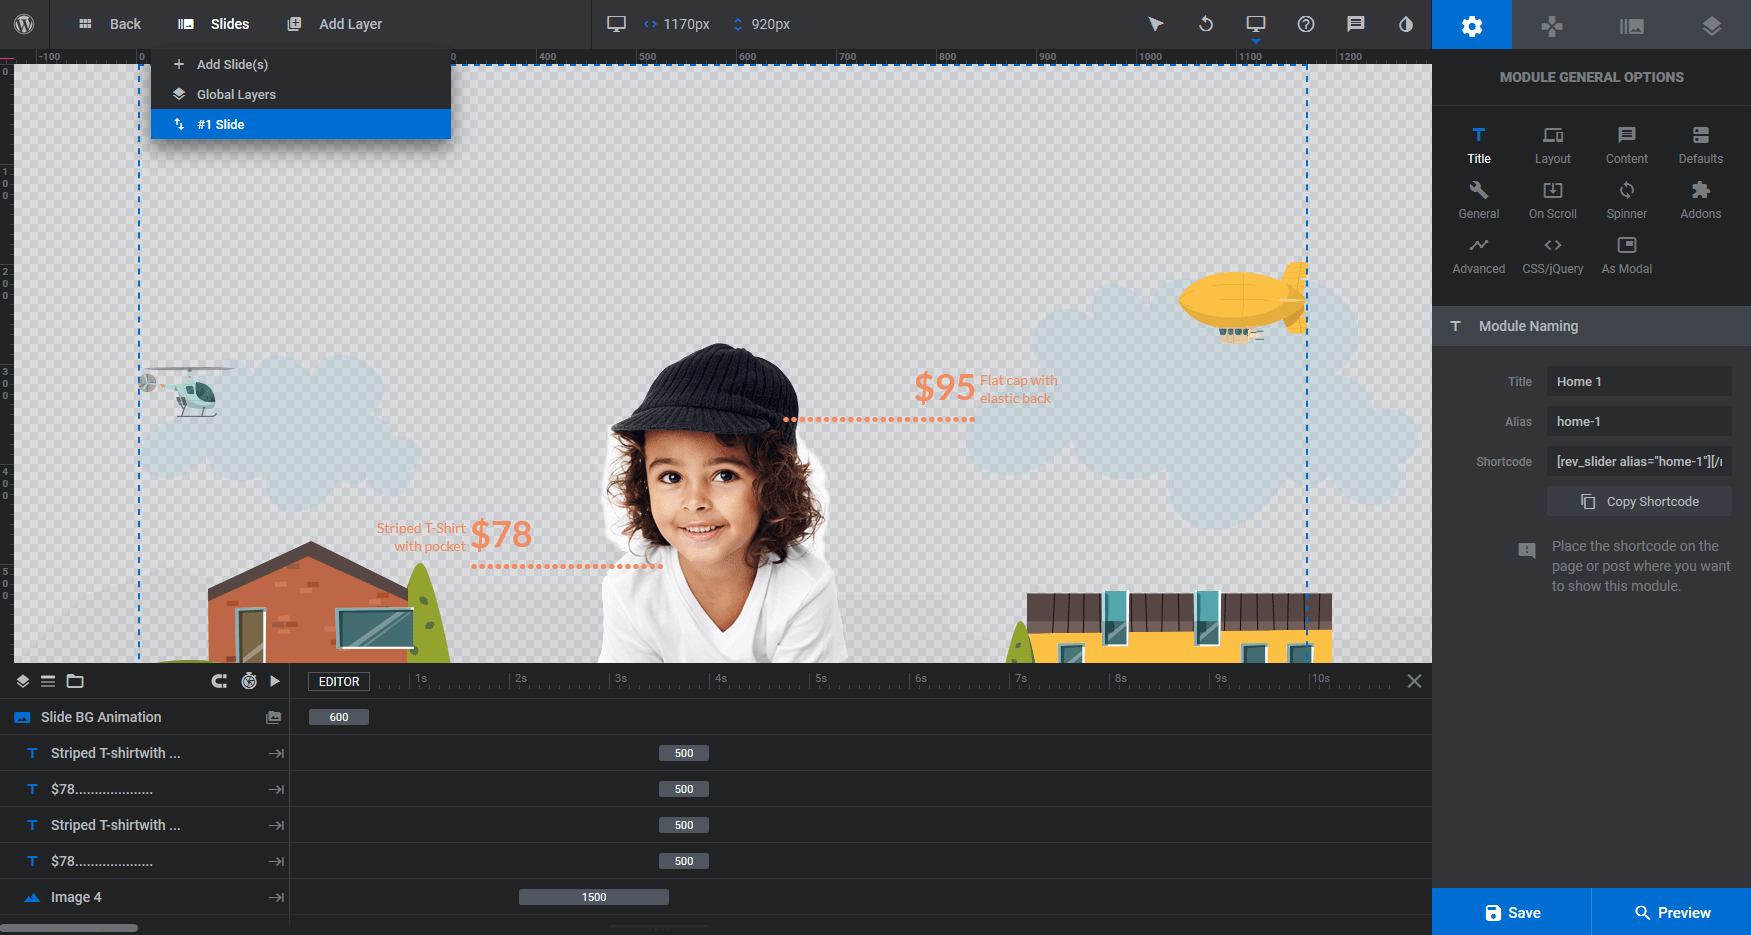
To set it up, please proceed to the Appearance > Theme Options > Customization > Slider section and enable Show Slider option. Choose the Layer Slider (Revolution) in the Slider Engine field and specify name of the slider in the Revolution Slider: Select slider field as it is shown on the screenshot below.

Here's how your Homepage 1 slider might look like.
Please check the following links for more information regarding the Revolution Slider functionality:
Find the backend layer settings for a few of our homepage slides:
Home 1:
Menus
The theme supports various menu styles and locations. You can set it in Appearance > Menus > Manage Locations section.

See the location of menu areas on the screenshot below:

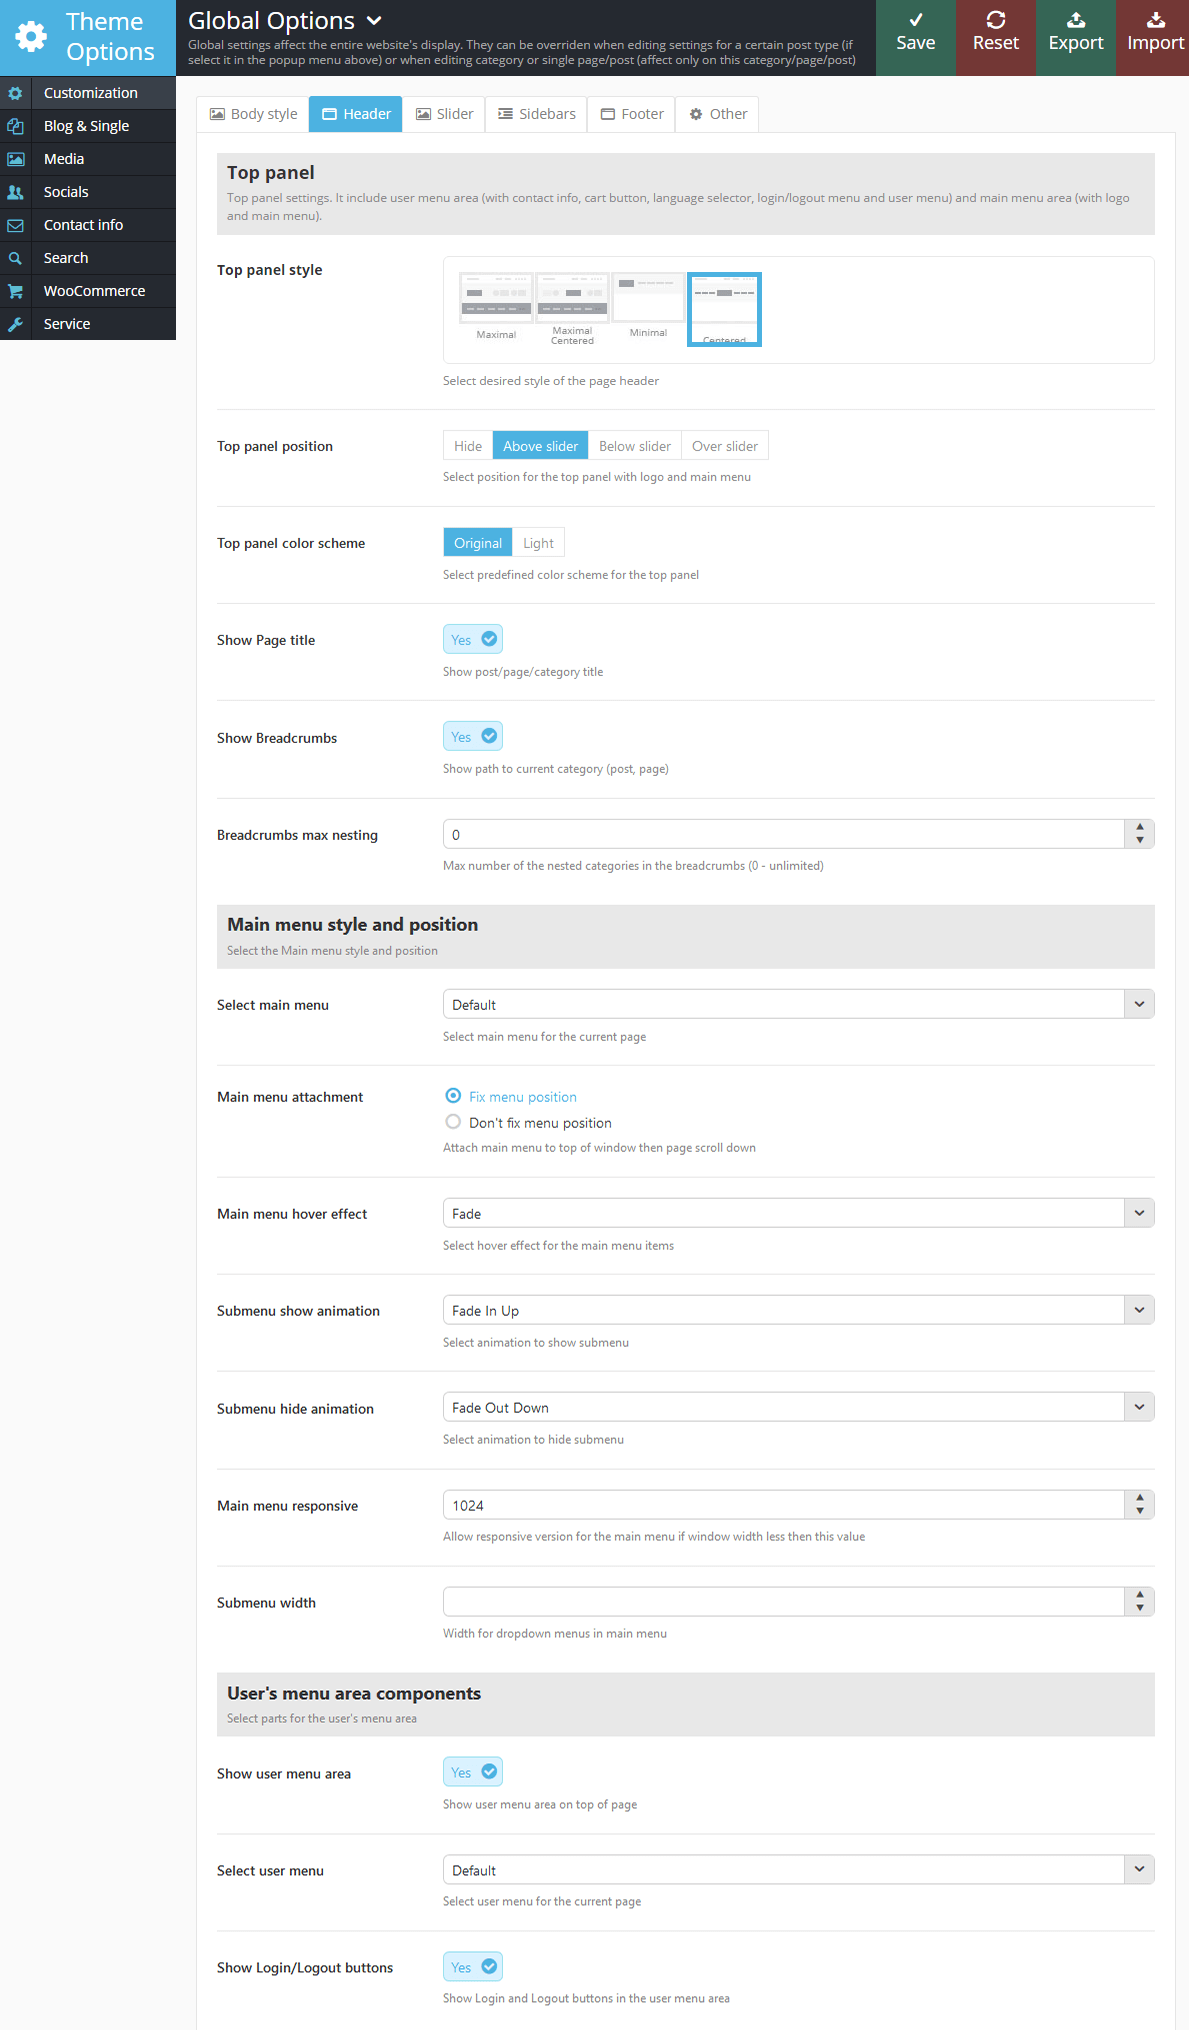
You can assign a separate, pre-created menu to any of the locations. Also, you can enable/disable displaying of each section independently using Theme Options and settings of pages, posts, and categories. Check the Appearance > Theme Options > Customization > Header > Main menu style and position/User's menu area components sections.
Blog
Now that you have finished working on the appearance of the homepage of your website, it is time to start a blog.
Please note that blog is a very handy tool for company news and events page, so it's not just for bloggers. Besides that we use blog functionality to create awesome galleries for your portfolio. To use the blog's functionality in our theme you need to create the blog stream page. To do this you need to:
- Go to Pages under the WordPress menu and then click Add New.
- Put your Title as usual ("Blog streampage" for example)
- Choose "Blog streampage" as the page's template
- Publish this page.
IMPORTANT: It was an optional step. Even if you do not create a separate page for your blog stream page, you will still use the correct template to display a list of posts. However, creating a separate page will give you an extra advantage - you can set up individual features for blog stream page (position and type of sidebars, color scheme for each element on the page etc.)
Now, assign the newly created page as "Posts page" (blog streampage). To do this:
- Select the menu item Settings - Readings
- In the field Homepage displays select "A static page (select below)", and in the list "Posts page:"choose the page you have created.
Blog Items
Now you can create blog posts.
- Go to Posts under the WordPress menu and then click Add New.
- Put your Title as usual.
- Put Content if needed.
- Select one or more categories to the Categories.
- Select desired Post Format.
- Standard - just set the featured image or without featured image.
- Gallery - add a gallery in the post with standard means of WordPress (with Add Media button located above the editor). In the theme settings you can specify whether you want to replace the original gallery with the built-in theme slider.
- Video - Add the YouTube or Vimeo video in the post with the shortcode [video]
- Audio - Add the Audio in the post with the shortcode [audio]
- Link - Add a link to the body of the post.
- Quote - Add text of the quotes (IMPORTANT: select it and mark as "Blockquote"), and after it - a link to the original source.
- Image - Add an image to the body of the post.
- Status - Add a one-row message to the body of the post.
- Aside - Add a short message to the body of the post.
- Chat - Normally it contains a block of messages - correspondence of two or more people. For pretty formatting you can use the shortcode [trx_chat].
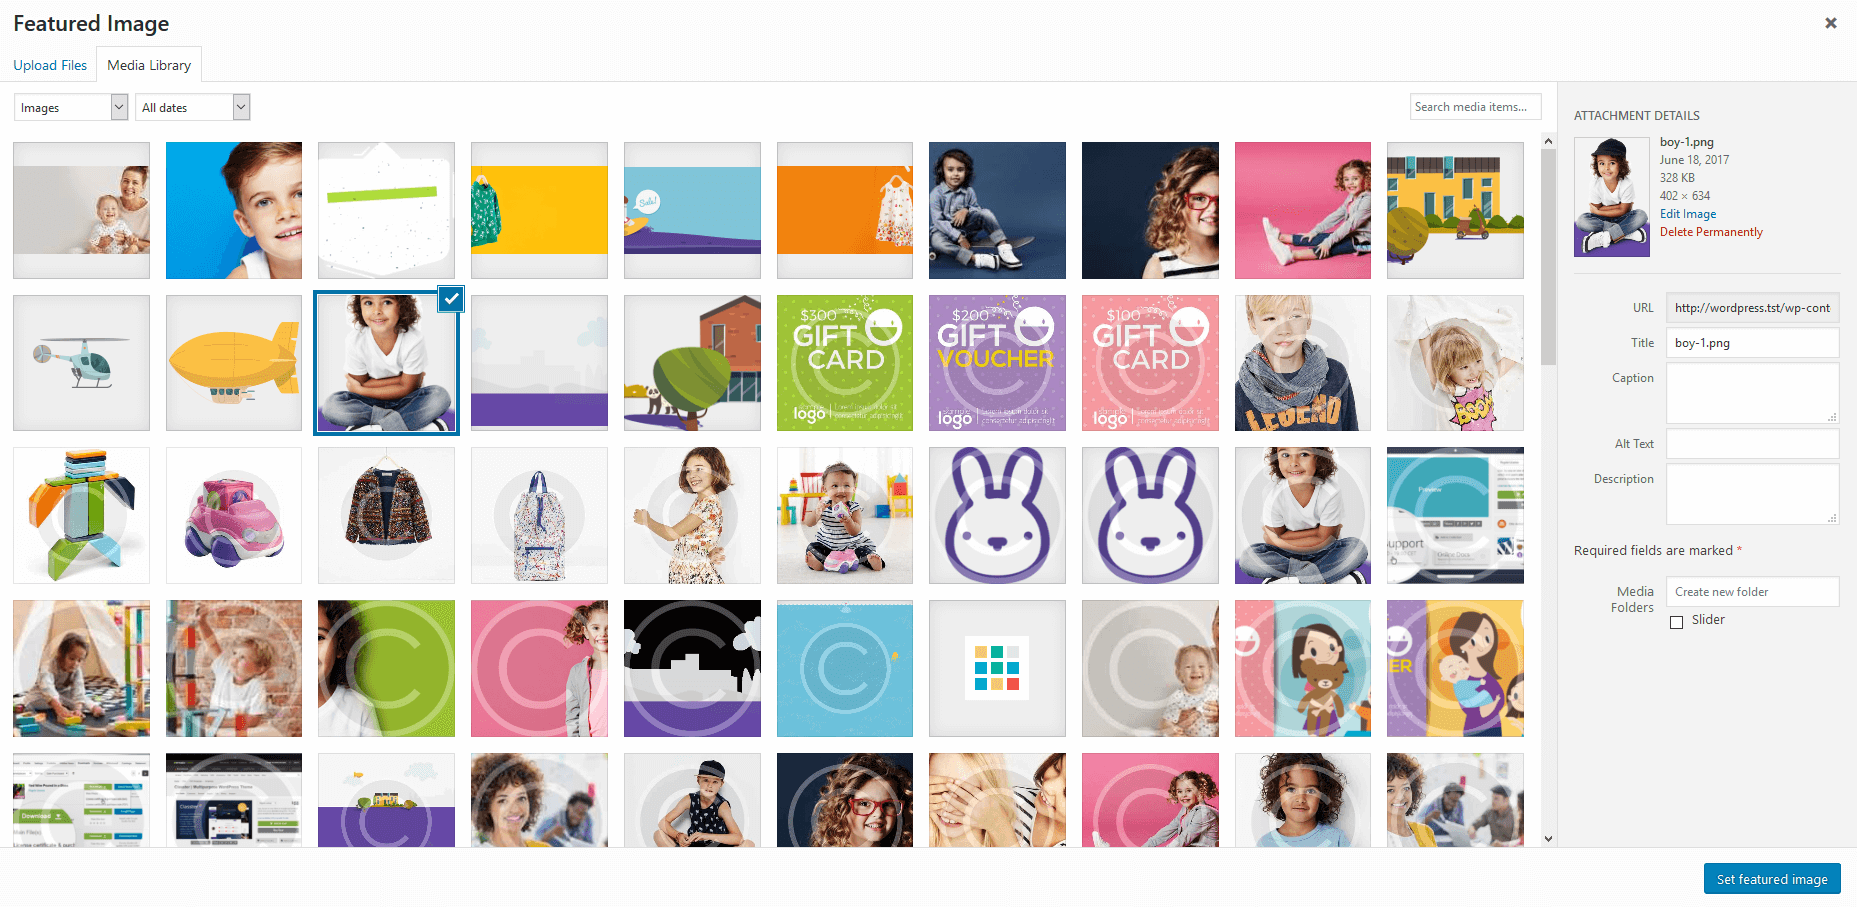
- For every post item it is necessary to upload an image and to set it as featured. Click Set featured image on the right in the Featured Image section:
- Click Select Files button and select image to upload (the full size image). WordPress will crop the image, depending on which portfolio template you will use.
- After image was uploaded you need to set this image as featured. Click Set featured image.

- IMPORTANT: In the Post Options section you can flexibly customize the appearance and behaviour of each of the post: select or hide the slider above the post, select and set sidebars and their position (or hide the unnecessary ones), set up the display of different parts of the page and the post (information about the author, related posts, a comment block and many more). There are default settings for each post that are specified in the category to which the post belongs. If the settings are not specified in the category, then they are inherited from the overlying category. If there is no settings specified in any of the parental categories, the settings indicated in Appearance > Theme Options > Blog will be used.
- Publish this post.
Portfolio
This section describes how to create portfolio page and add new items.
Our theme provides easy and powerful tools helping to create eye catching galleries. Portfolio items are just usual posts with improved look and feel features and work exactly as blog posts.
To get started you should create posts category that will contain your portfolio entries and sub-categories.
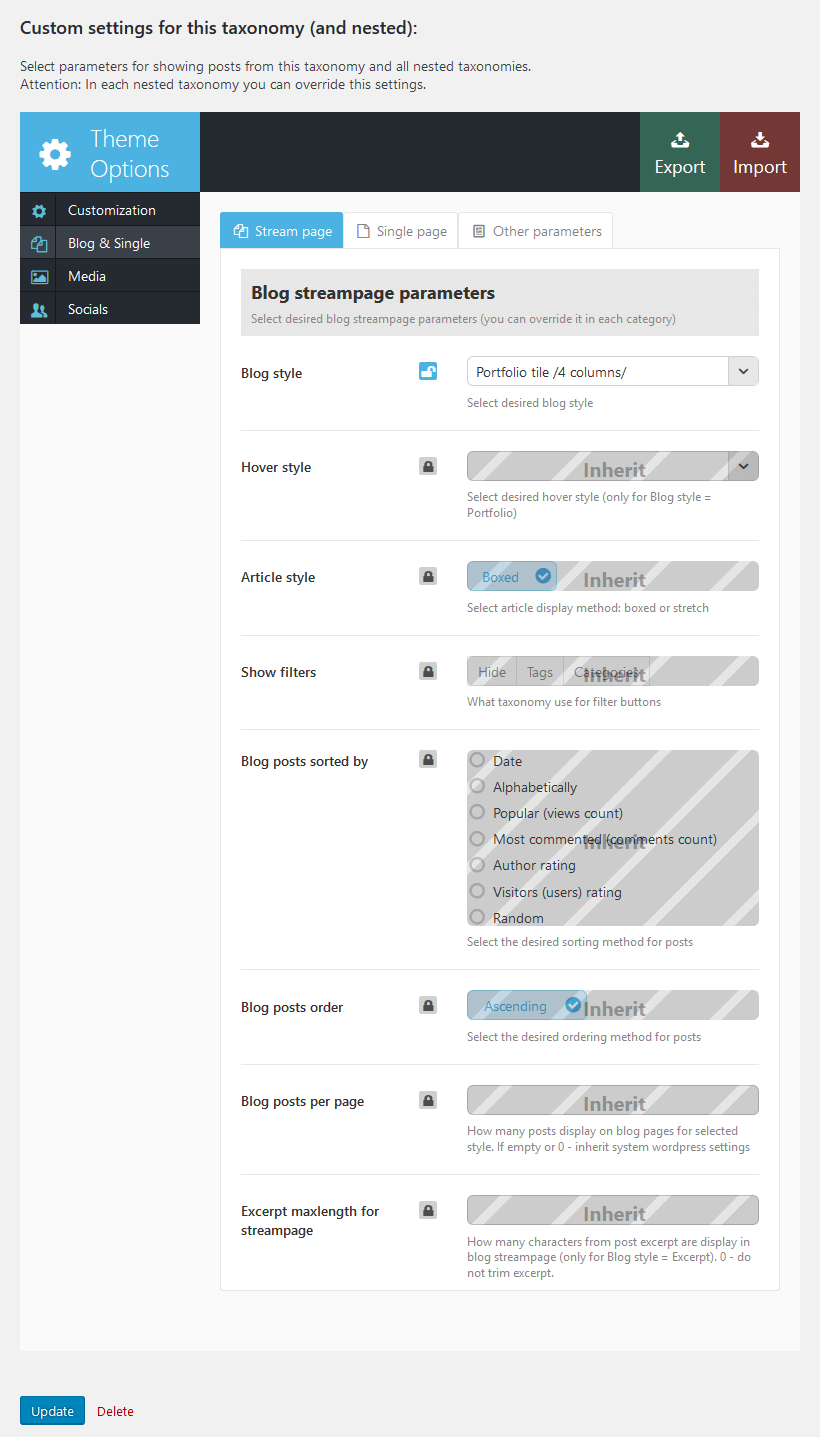
- Navigate to Posts -> Categories -> Add New, name the category and add some description.
- Go to the bottom of the page and in the section "Custom settings for this taxonomy (and nested)" click on Blog and Single tab
- Unlock Blog style options
- Select one of the layouts that suits your needs. Later you can play around with the layouts and hover effects to achieve desired look and feel.
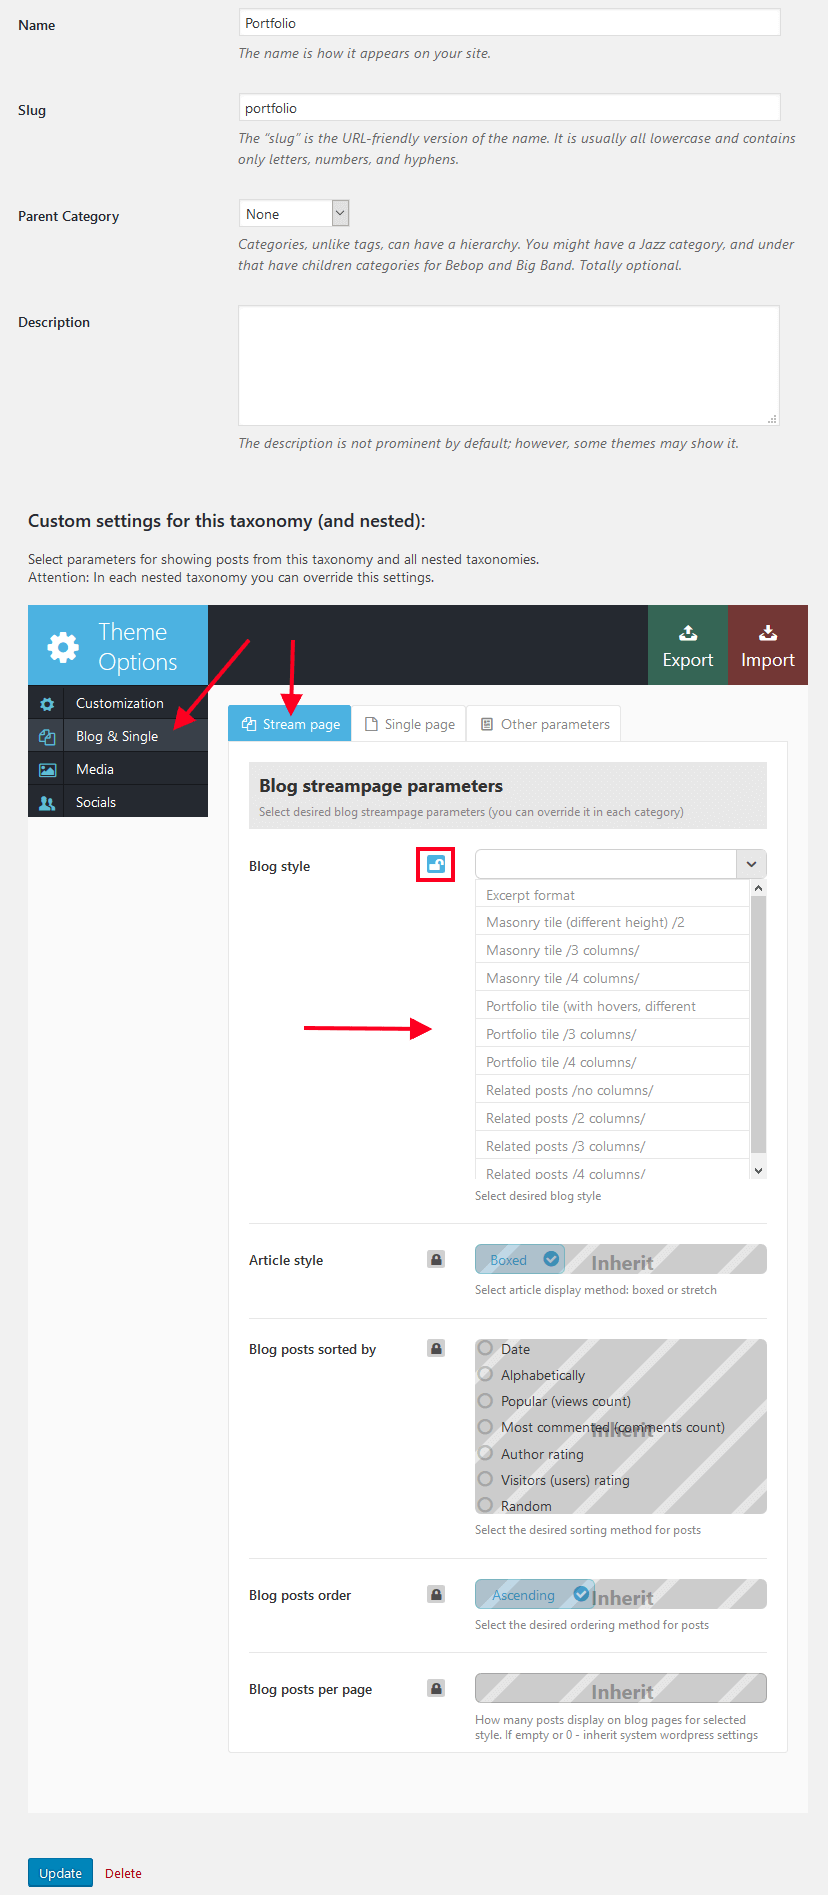
Now we have just created a category that will contain our portfolio items and display them proper way. If you add some sub-categories to this main category, they will inherit parent style unless you choose to override them at category options page. Lets add some portfolio items!
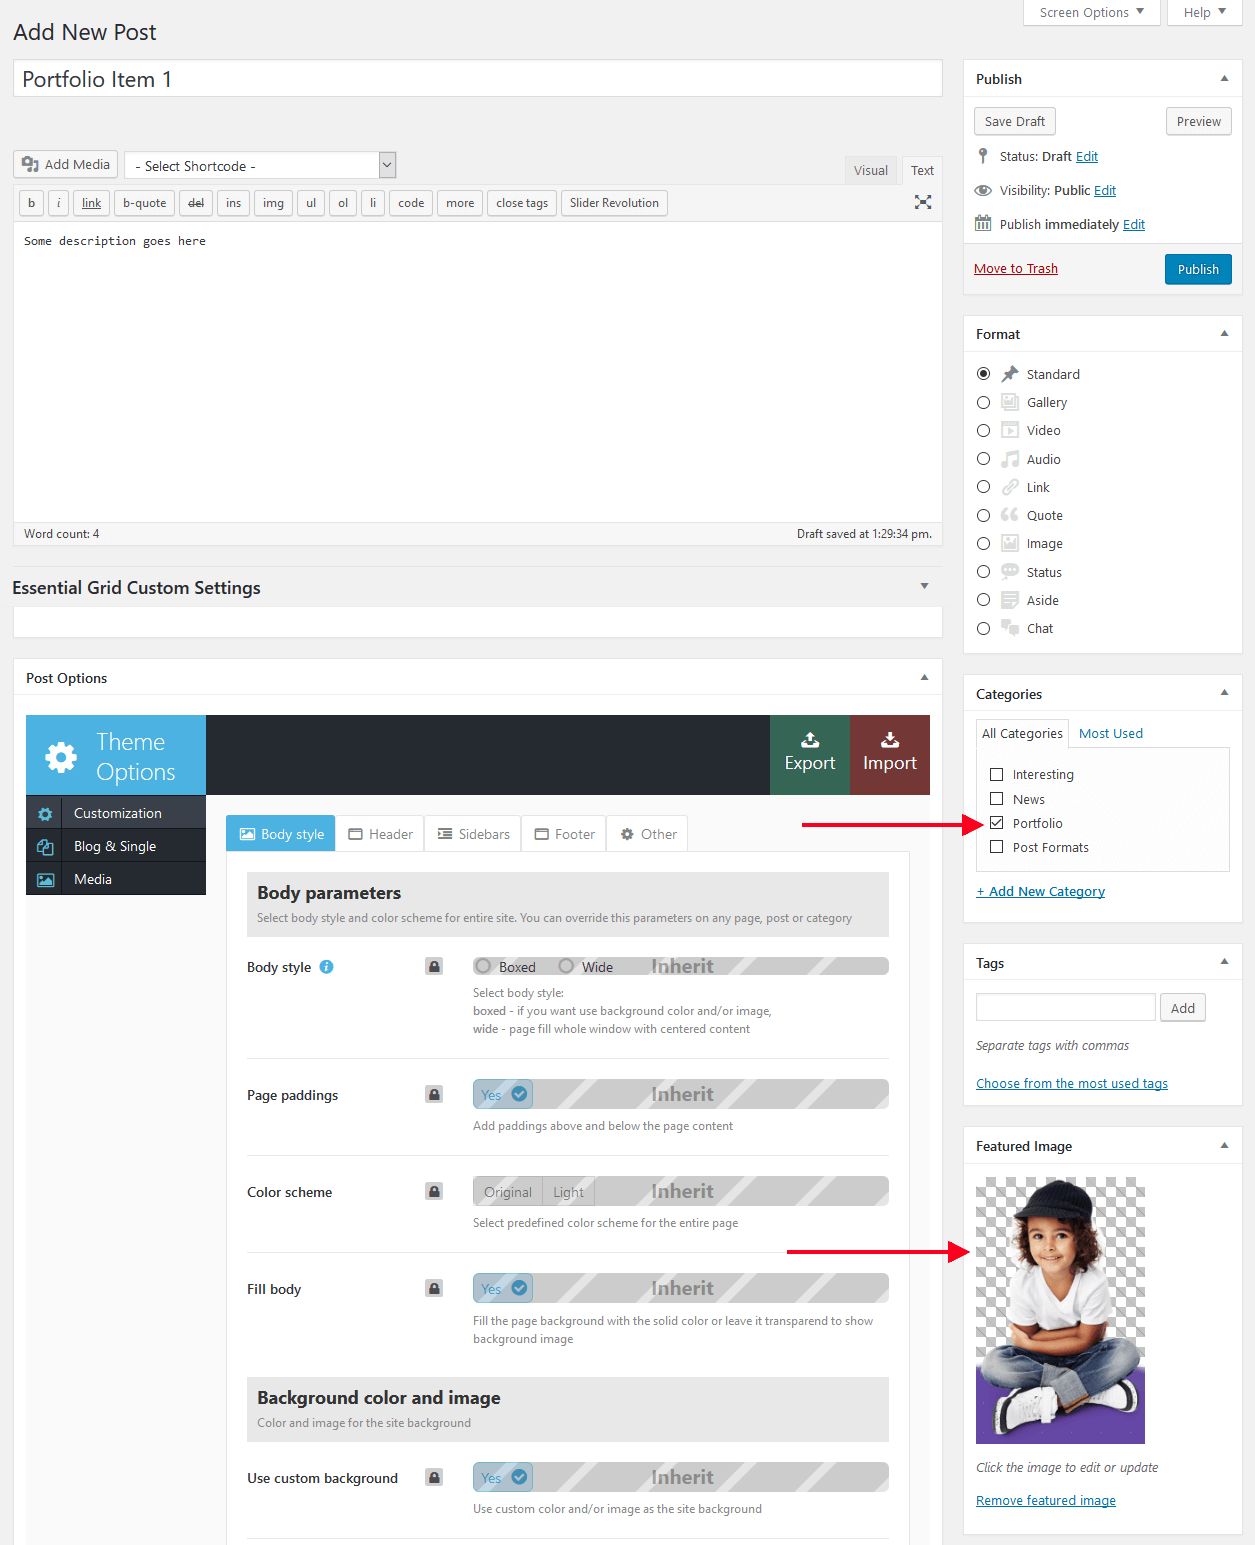
- Go to Posts -> Add New, name the post accordingly
- In the right column find Categories widget and select "Portfolio" category - thus we move usual post entry into portfolio section.
- Set featured image and save the post. Please note that this featured image will be used as a primary portfolio image so make sure it has a good quality.
To add portfolio page to main menu navigate to Appearance -> Menus, select newly created category and add it to main (or any other) menu, save the menu and you are done!

Team
Team is a custom post type used to create team member elements and used for announcements. The list of the staff members is available in Team section.
You can use team members and teams in trx_team shortcode or add new members manually. To read more about trx_team shortcode please follow this link.
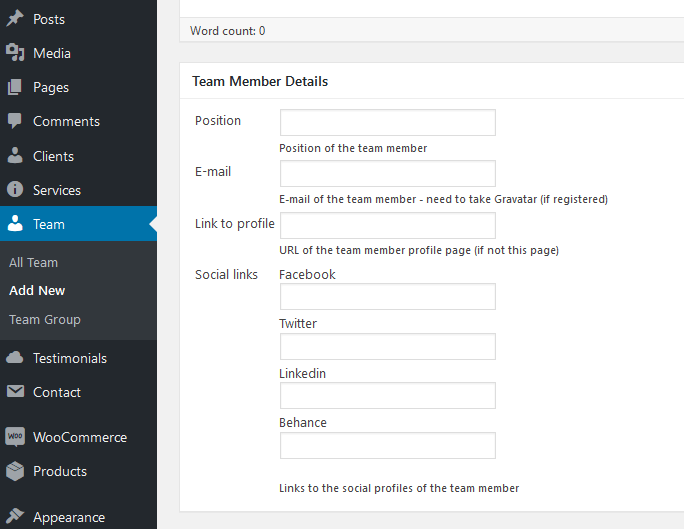
As you can see above each new team member has extra parameters which are custom link to member profile (can be external URL), social profiles, position etc.
Services
Services custom post type is used to create service posts available in admin -> Services section.
You can change the icon for each Service post in admin -> Services, open single Post Options and switch to Blog and Single -> Single page. Please check the screenshot:
Fontello source files are located in whiterabbit/css/fontello folder. You can see the list of all icons opening whiterabbit/css/fontello/demo.html file in the browser.
In order to add new fontello icons to the theme list, please use the following tutorial:
Landing Pages
Landing pages are extremely popular now since they are extremely powerful marketing solutions with high conversion rate. Our themes provide powerful tools helping to create awesome one-page navigation in a blink of an eye.
To create a landing page follow these simple steps:
- Go to Pages -> Add New, give this page a name like "My Landing"
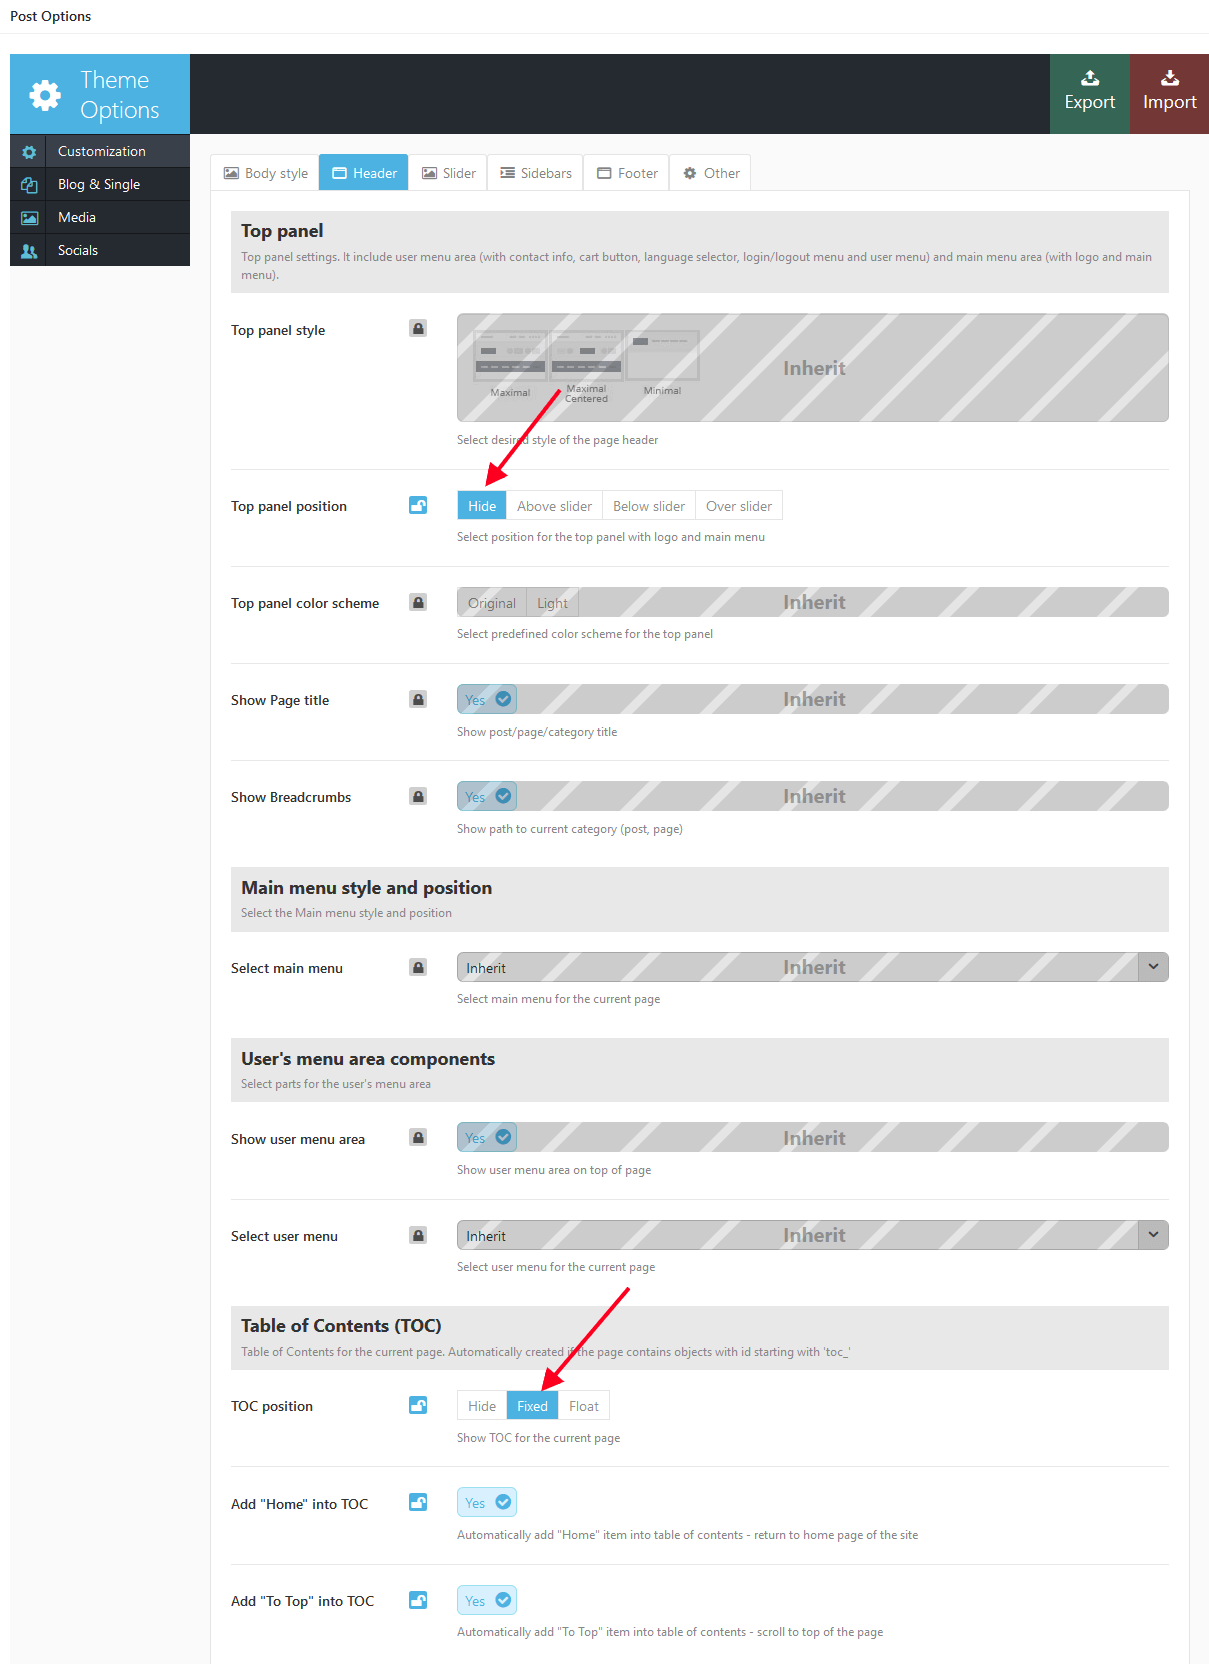
- Enable side "Table of content" menu: Post Options -> Customization -> Header -> TOC position -> Fixed.
- Go to Post Options and disable top menu: Post Options -> Customization -> Header -> Top panel position -> Hide.
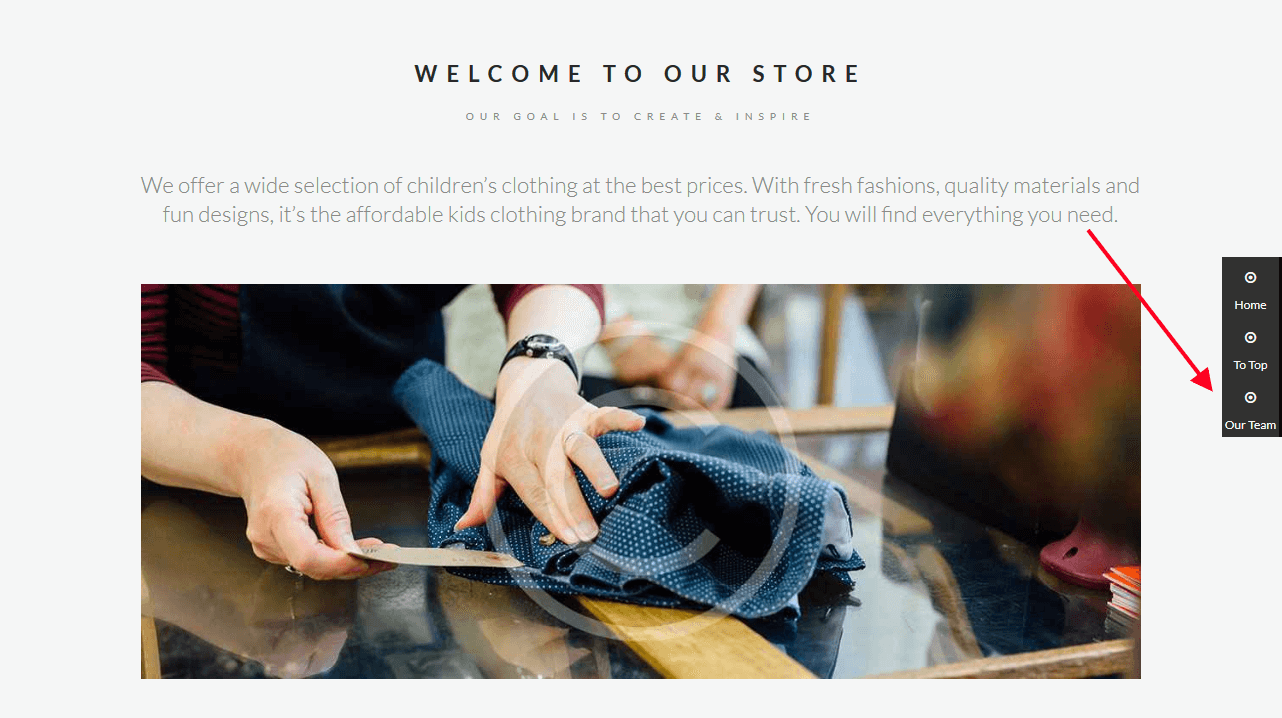
Now we are ready to add menu items. - Lets add some content to the page. In order to obtain a menu item in page navigation menu each content block must be separated with anchor shortcode. Each anchor shortcodes adds new navigation item to Table of Content Menu (see below) and this way organizes page navigation. See example below:
[trx_anchor title="Our Team" description="Read more about our team." separator="yes" id="toc_team"][/vc_column][/vc_row]
This shortcode creates a menu item named "Our Team", adds a description (displayed when mouse is over) and adds menu item icon. When you click "Our Team" menu item, the page will scroll to the place where this shortcode was inserted. This is a simple and effective way to create navigation menu on landing pages.
This is how you can create awesome landing page or single page website in a few clicks. Once again, the core tool to create page navigation and add page anchors is [trx_anchor] shortcode. The theme scans page content, finds trx_anchor shortcodes and builds menu. To get more information regarding this shortcode please follow this link.
Page 404
Now we can prepare another page of our blog. This is not mandatory, but if you want to create an error 404 Page you can customize styles and behavior of it in the following way.
Let's set up an error 404 page. To do this, you need to:
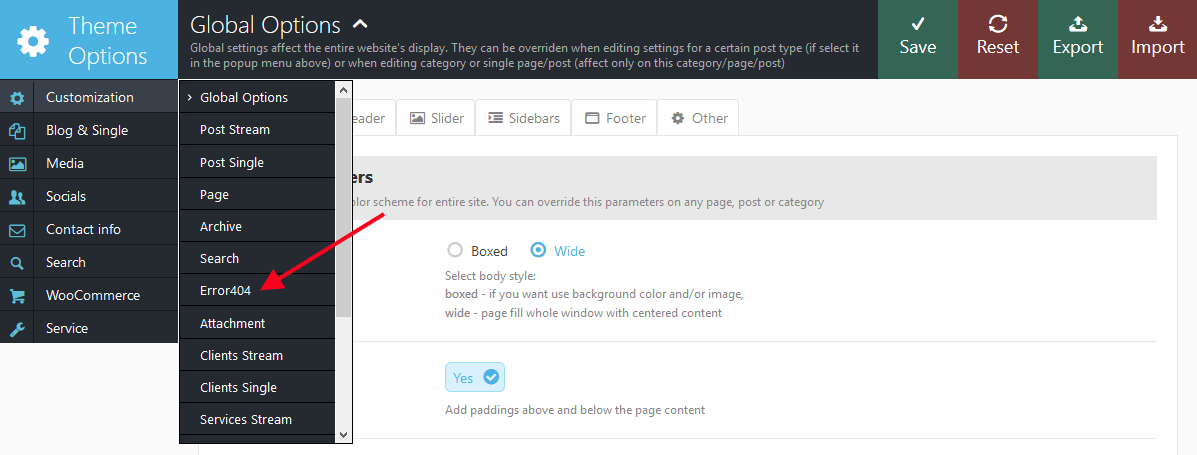
- Navigate to Appearance > Theme Options > Global Options, in the dropdown menu choose "Error 404" option.
- Now you can customize the behavior of your 404 page via available Customization options.
- Once you have done this, click on the "Save" button in the upper right corner of the top Theme Options bar.

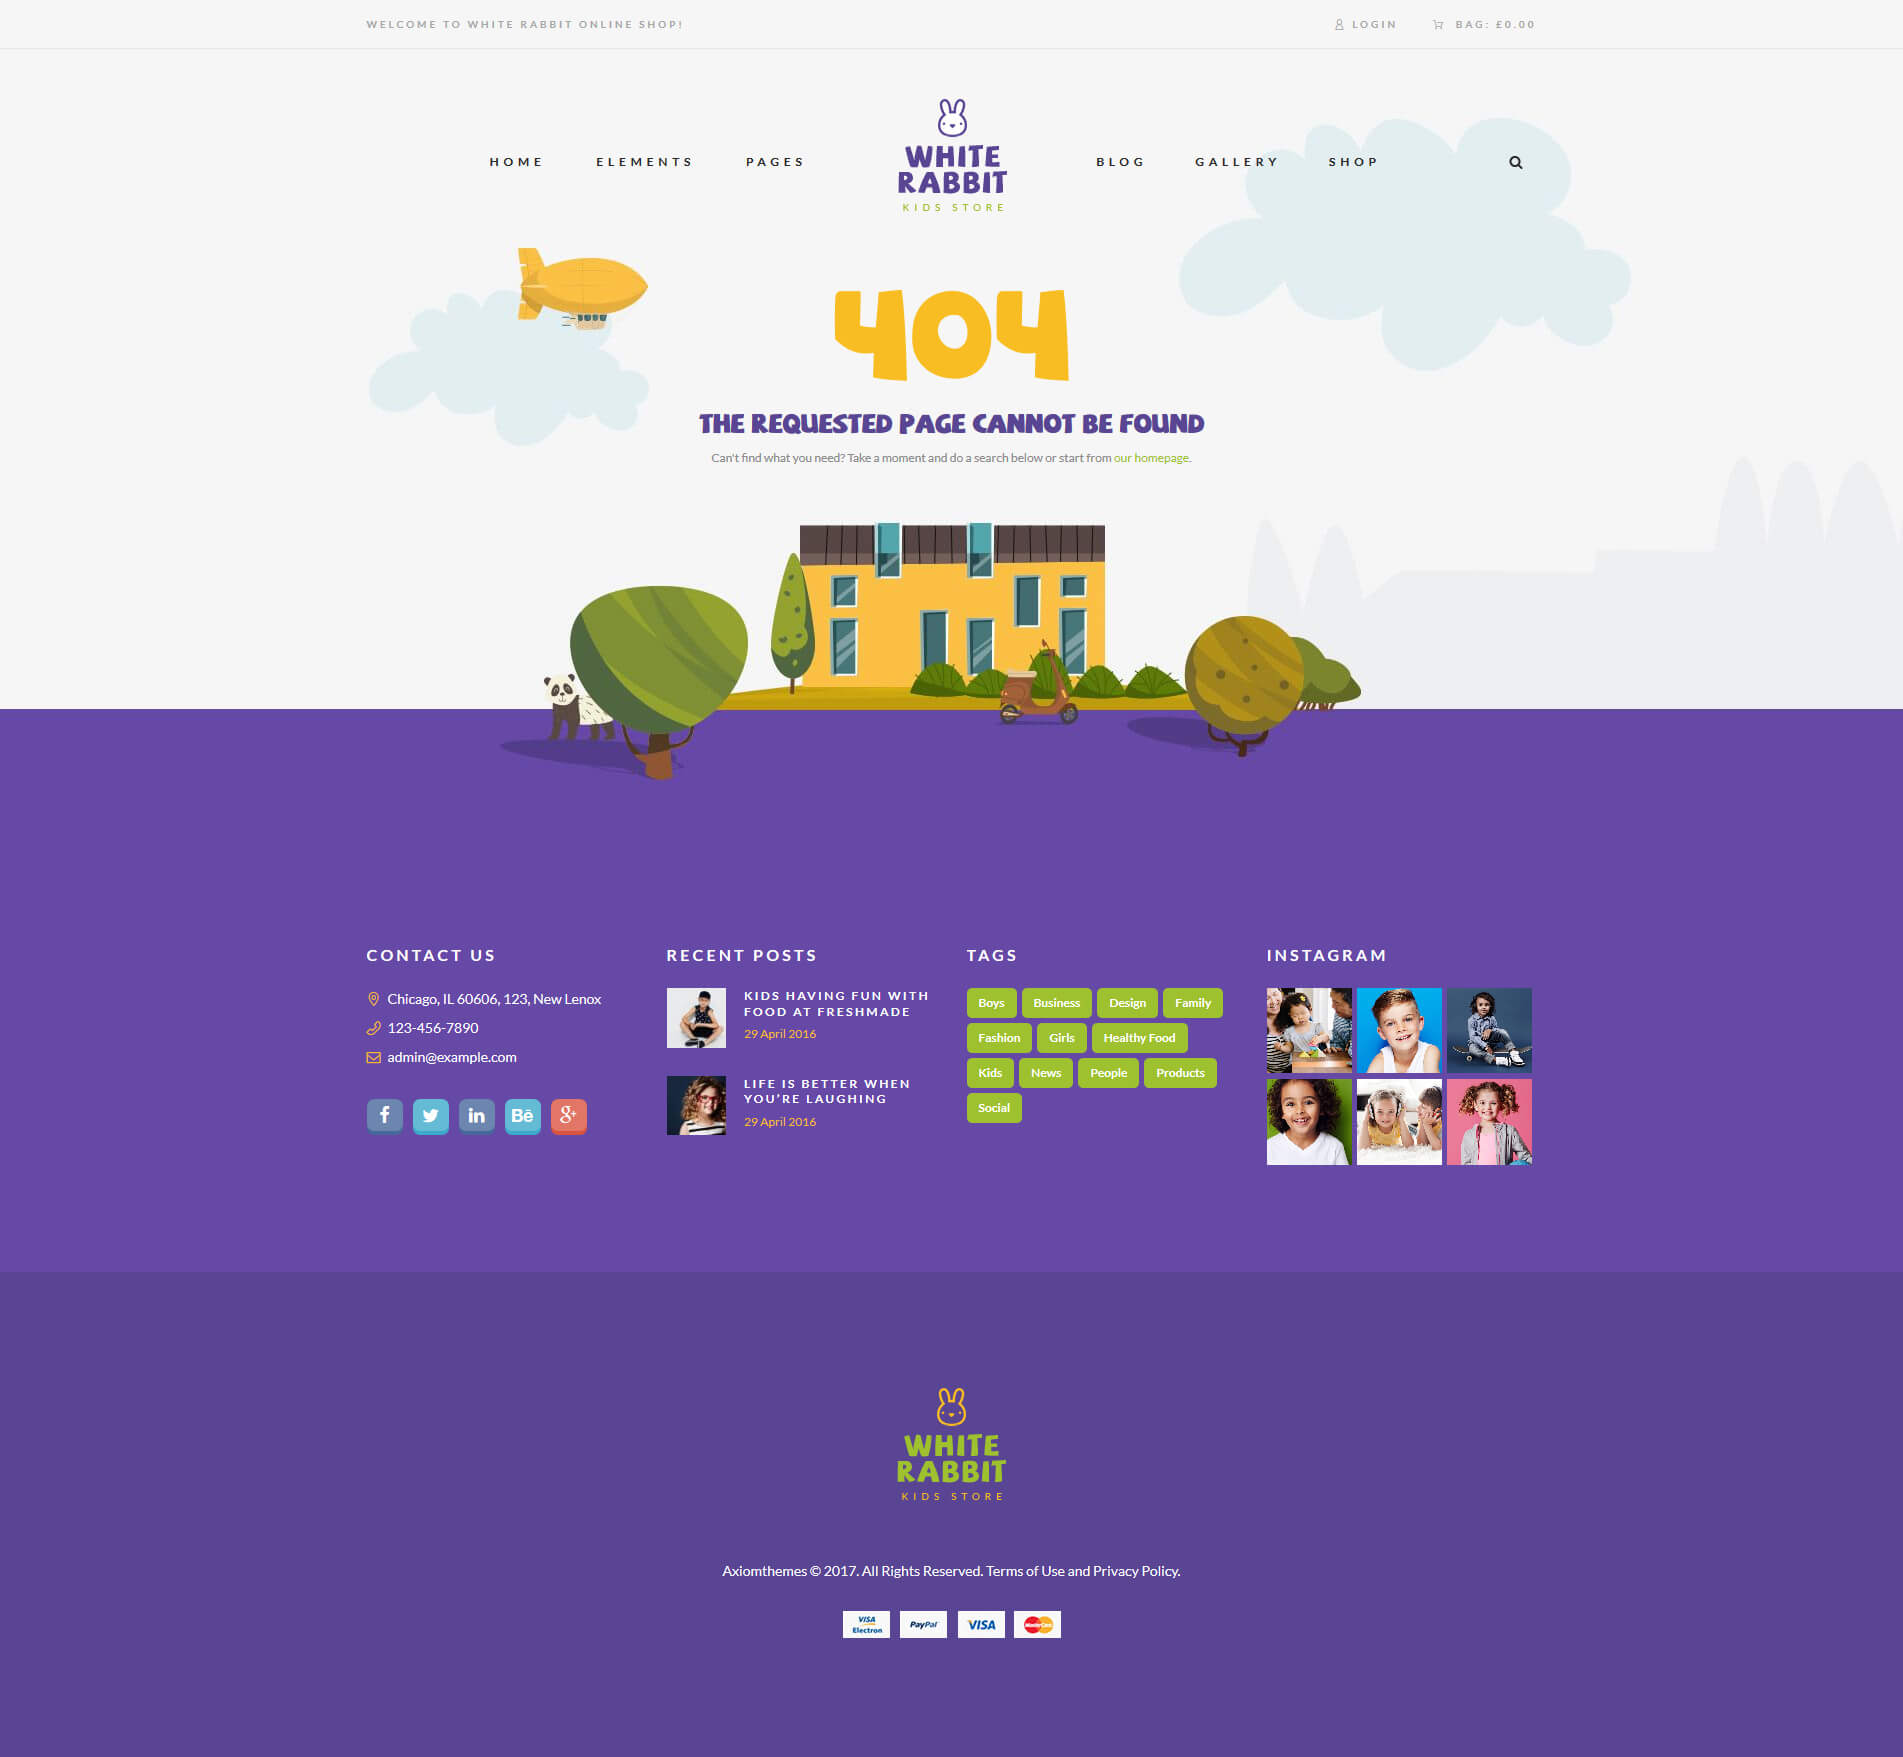
As a result, when you try to open a non existing page on your site, you will see page containing this message:
Please Note! You can not always preview 404 page using WordPress View page or Preview changes button. You should type an incorrect site URL to see the "404" page.
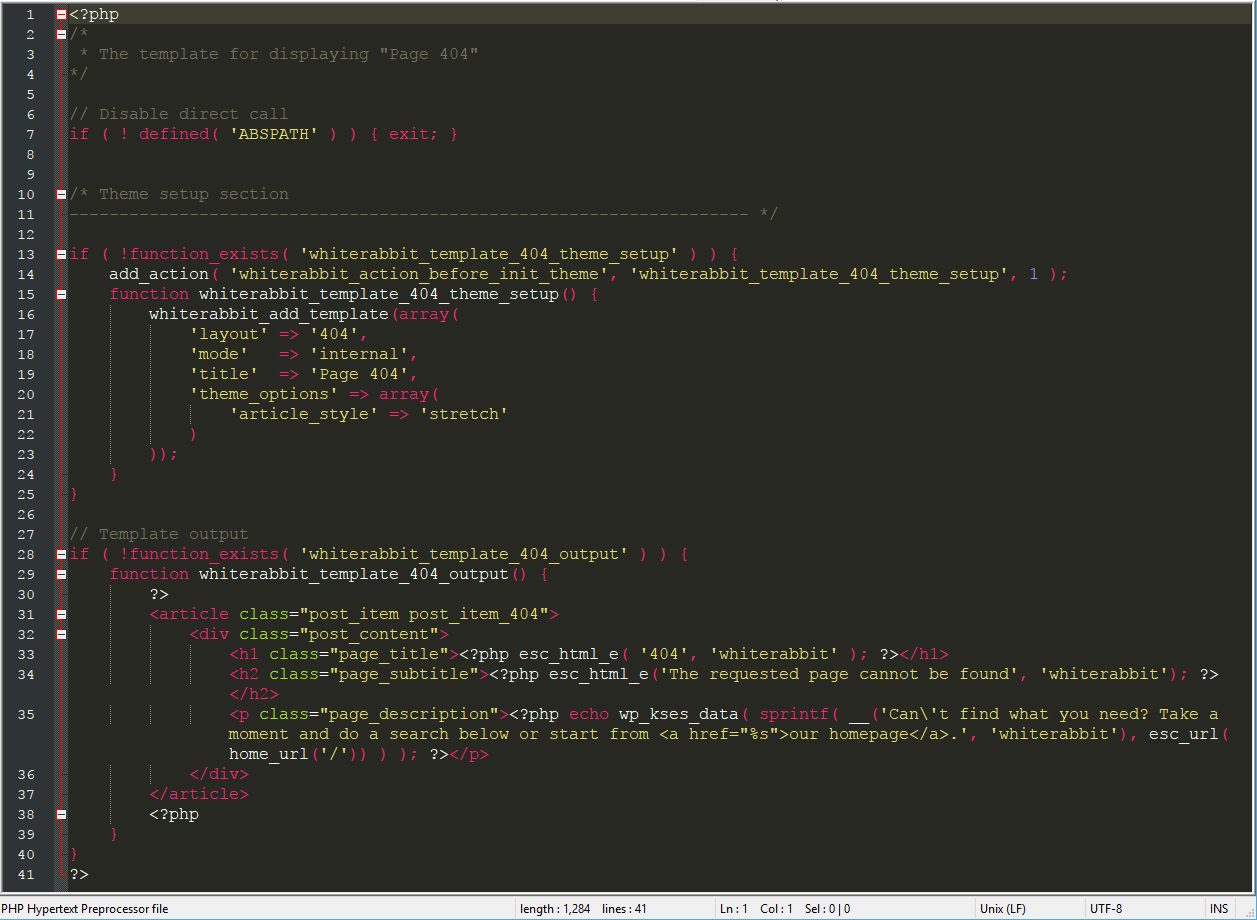
To customize this page you should edit page template file in any text editor like Notepad or TextEdit. Open root folder of your theme and find /templates folder.
This folder contains 404.php file. You can open it in any text editor and change HTML code according to your needs.
Theme Options
Now, let's talk about the theme's settings: Appearance > Theme Options. Here you will get the full control over display and functionality of the web-site.
Some groups of the settings have been described above, in the sections dedicated to the Home Page and Blog.
Here we will consider the rest of the settings.
IMPORTANT:
Please be aware that our theme has a unique inheritance hierarchy. It means that settings of each particular post\page\category can override global theme settings.
The settings of Appearance > Theme Options > Customization section affect behavior of the entire website, all of it. In other words, if you want all of your posts, pages and categories to look exactly the same, all you need to do is go through those Global options:

You can apply a different set of settings to each sub-group of the theme's options. Their settings will override the global options settings. See the screenshot below:
There's one more important thing we'd like to mention. In the Appearance you can find Fonts & Colors section. It allows you to create/customize color schemes and manage theme's fonts.

Here you can create your own color schemes and change fonts. It is based on the LESS framework. More information about it can be found here. Please be aware that creating color schemes requires a lot of server resources and at least 256MB (better 512MB) of RAM. So we recommend to consider a decent hosting plan.
Anyway you can always stick with the predefined color scheme(s).
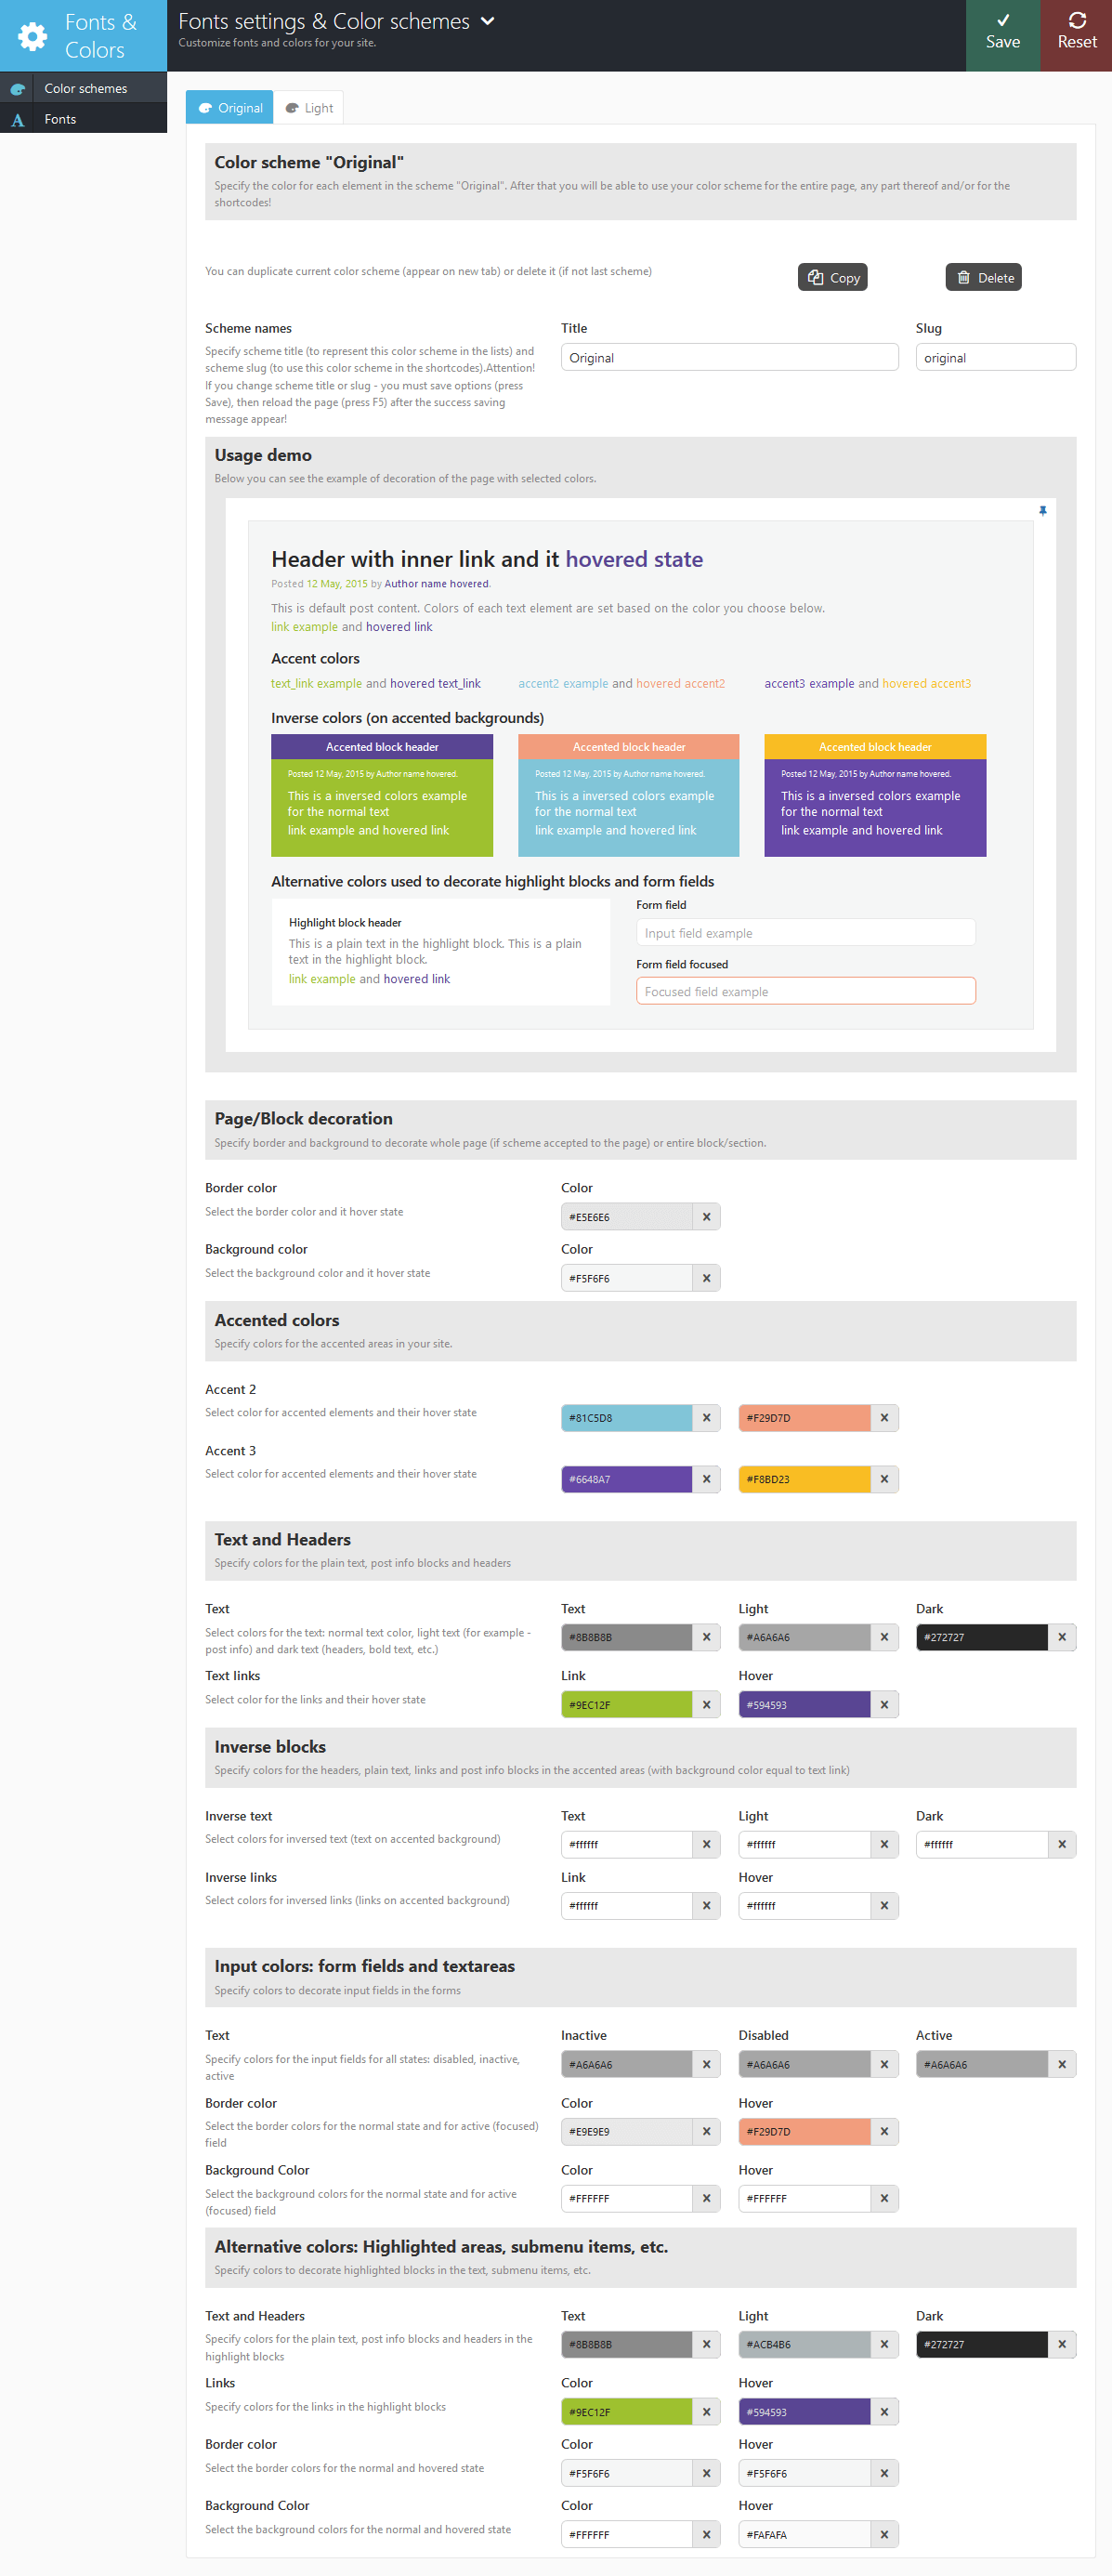
Custom fonts can be set on the Fonts tab.

Please Note! In case fonts or color styles/schemes (accent styles), for some reason (for example after the theme update) fall back to their default settings/values, then you need to regenerate the styles and colors again. All you need to do is just click on "Save" button.
Customization
In this section you can customize your theme:
All the options in this partition are divided into sections:
Body style
- Body style - The way of the page is displayed:
- boxed - page body is located in the zone of limited screen width, behind which the background image is seen (set in the fields below).
- wide - page body occupies entire screen width (background image is not seen behind it), and contents is placed in the area of limited width by screen center.
- Page paddings - This option adds an extra paddings above and below a page's content.
- Color scheme - Select predefined color scheme.
- Fill body - This option allows you to fill background of the page with solid color. You can also leave it transparent.
- Use custom background - Whether to use video as the background. IMPORTANT: Smooth video playback requires good memory and processor power of visitors' computers. On slower computers delays and interruptions may occur.
- Background color - The background color for all pages of the theme (only if Body style = boxed).
- Background predefined pattern - One of the built-in theme images filling the background as tile (repeated both vertically and horizontally). Only if Body style = boxed.
- Background custom pattern - Here you can upload your own image filling the background as tile (repeated both vertically and horizontally). Only if Body style = boxed.
- Background predefined image - One of the built-in theme image used as a background (not repeated). Only if Body style = boxed.
- Background custom image - Here you can upload your own image to be used as a background (not repeated). Only if Body style = boxed.
- Background custom image position - Here you can select the position of the uploaded image. Only if Body style = boxed.
- Load background image - Whether to load bg images by default or only for the Boxed body style version.
Header

- Top panel style - This option allows you to select one of the available headers' styles.
- Top panel position - Select one of the top panel's positions.
- Top panel color scheme - Select one of the predefined color schemes for your top panel.
- Show Page title - Whether to show the page's title.
- Show Breadcrumbs - Whether to show path to the current post, page or category.
- Breadcrumbs max nesting - The maximum of nested categories in the breadcrumbs.
- Select main menu - Select one of the available menus.
- Main menu attachment - Whether to attach main menu to the top of the page or let it go up & down along with the page's content while scrolling.
- Main menu hover effect - Select one of the available menus.
- Submenu show animation - Animation effect for the submenu to show.
- Submenu hide animation - Animation effect for the submenu to hide.
- Main menu responsive - Responsive version will be activated, if window's width is less than the inserted value.
- Submenu width - Dropdown's menu width.
- Show user menu area - Select one of the available user menus (not available for "Minimal" top panel style).
- Select user menu - Select user menu for the current page.
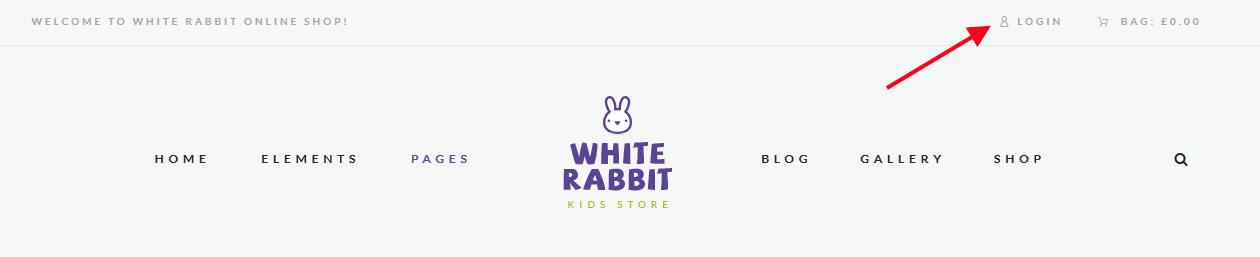
- Show Login/Logout buttons - Shows the Login & Logout buttons.
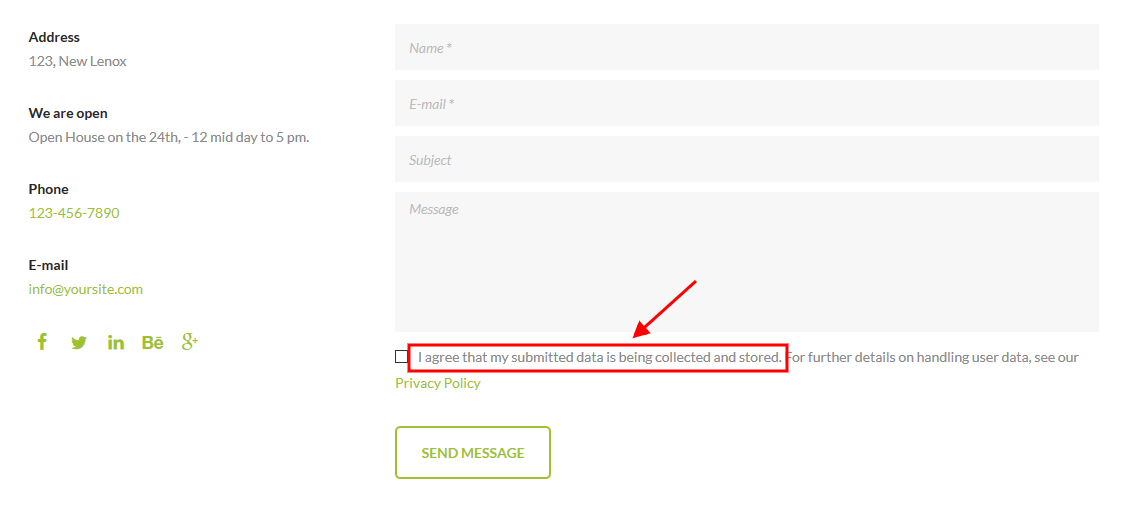
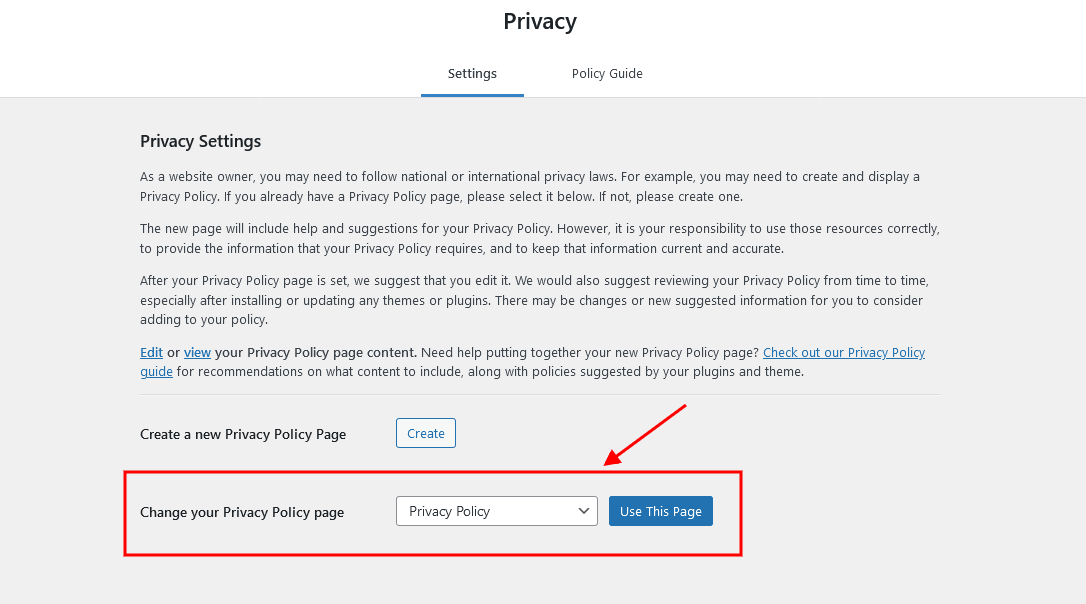
The text for the checkbox "I agree..." (registration form) is set in Appearance > Theme Options > Customization > Other > Text with Privacy Policy link.
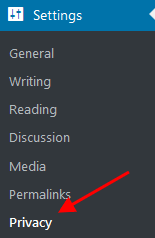
In order to add/customize the Privacy Policy link, navigate to Settings (WP Dashboard) > Privacy and specify the page that will be used as a Privacy Policy one.
NOTICE! In case you are planning to use the registration form without consent checkbox, just leave the "Text with Privacy Policy link" option empty in the Appearance > Theme Options > Customization > Other section!
- TOC Position - Table of content position. Our theme allows to create a table of content menu for single page websites. You can set TOC Fixed | Float | Hide.
- Add "Home" into TOC - Automatically add "Home" item into table of contents - return to home page of the site. This is a recommended option for multipage websites that have single page looking landing pages.
- Add "To Top" into TOC - Automatically add "To Top" item into table of contents - scroll to the top of the page
- Logo image/for Retina - Upload your main/Retina logo image.
- Logo text - Logo text displays right next to the logo image.
- Logo height - Main logo height (in pixels).
- Logo top offset - Top offset for the main logo (in pixels) in the header (main menu) area.
Slider
This section is responsible for the slider's type and it's behavior.

- Show Slider - Enable/Disable the slider IMPORTANT: If you want to display the slider only on special page (for example, only on Homepage) - disable this option here and enable it in settings of the specific page where you want to display a slider, instead.
- Slider Display - Set the slider's behavior.
- Height - Specify the slider's height.
- Slider Engine - Choose type of the slider engine.
- Layer Slider (Revolution)
- Revolution Slider: Select slider - Choose the necessary slider to display.
- Put content over slider - Add the necessary shortcode here to make it display over the slider.
- Color scheme for content above - Select a predefined color scheme(s) for content that goes over the slider.
- Posts Slider (Swiper)
- Put content over slider - Add the necessary shortcode here to make it display over the slider.
- Color scheme for content above - Select a predefined color scheme(s) for content that goes over the slider.
- Posts Slider: Category to show - Here you can select the category of posts which will be used to design the slider.
- Posts Slider: Number posts or comma separated posts list - How many recent posts from the category will be used for to design a slider (select one number) or a make a comma-separated list of ID's of the posts you need.
- Posts Slider: Posts order by - (string). The way to sort posts:
- date - posts ordering by publish date
- alpha - posts ordering alphabetically
- views - posts ordering by views count
- comments - posts ordering by comments number
- author_rating - posts ordering by review's author marks
- users_rating - posts ordering by review's readers marks
- random - posts ordering is random
- Posts Slider: Posts order - (string). The order to sort posts: asc|desc.
- Posts Slider: Slide change interval - Set the necessary time frame for the slides to be changed (in ms).
- Posts Slider: Pagination - Select none, dots or titles pagination style.
- Posts Slider: Show infobox - Do you want to show post title, reviews rating and description on slides in swiper-slider.
- Posts Slider: Show post's category - Do you want to show post's category on slides in swiper-slider.
- Posts Slider: Show post's reviews rating - Do you want to show post's reviews rating on slides in swiper-slider.
- Posts Slider: Show post's description - The maximum length (number of characters) of description displayed on the information bar for each slide. If it's 0, the description is not shown.
- Layer Slider (Revolution)
- Color scheme for content above - Select a predefined color scheme(s) for content that goes over the slider.
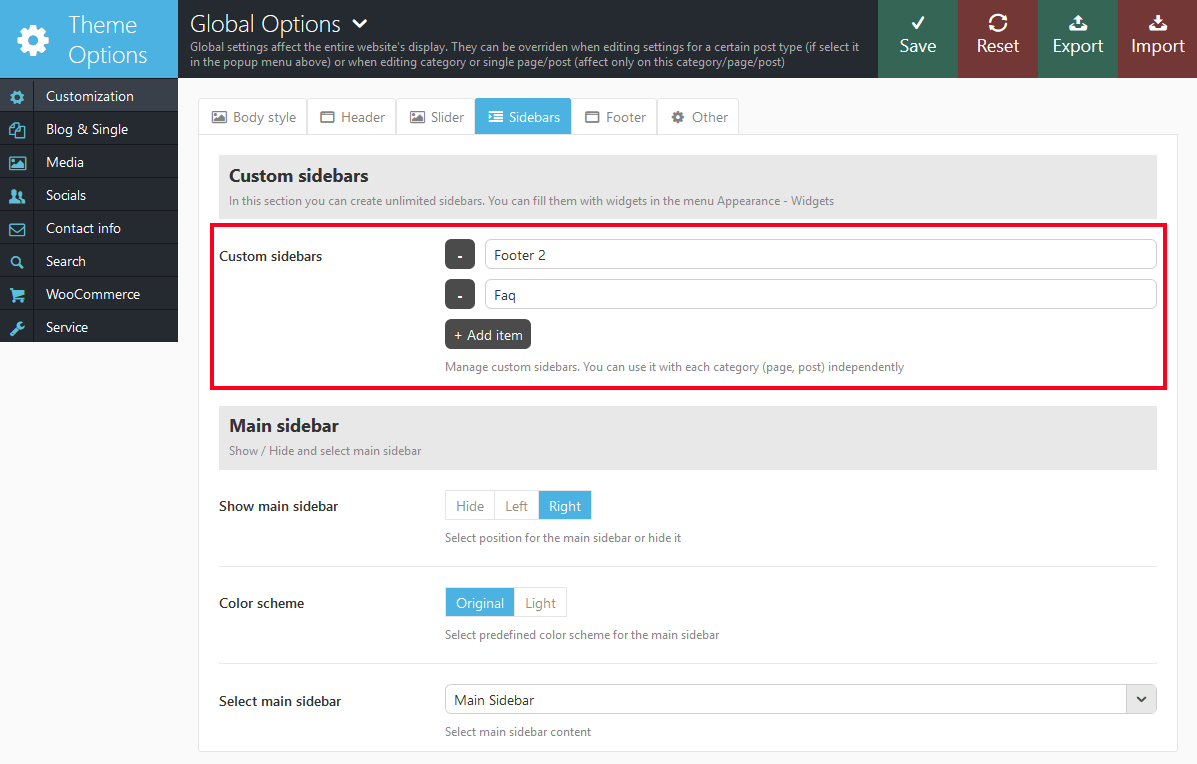
Sidebars
By default, theme provides some standard positions for sidebars (widget sets). Please see Widgets section for more information.
In this section you can add and remove additional sidebars. You are be able to configure the widgets for the newly created sidebars in the Appearance > Widgets menu.
In the settings of each category, post or page, you can assign any of the created widget sets to any of the available sidebars!
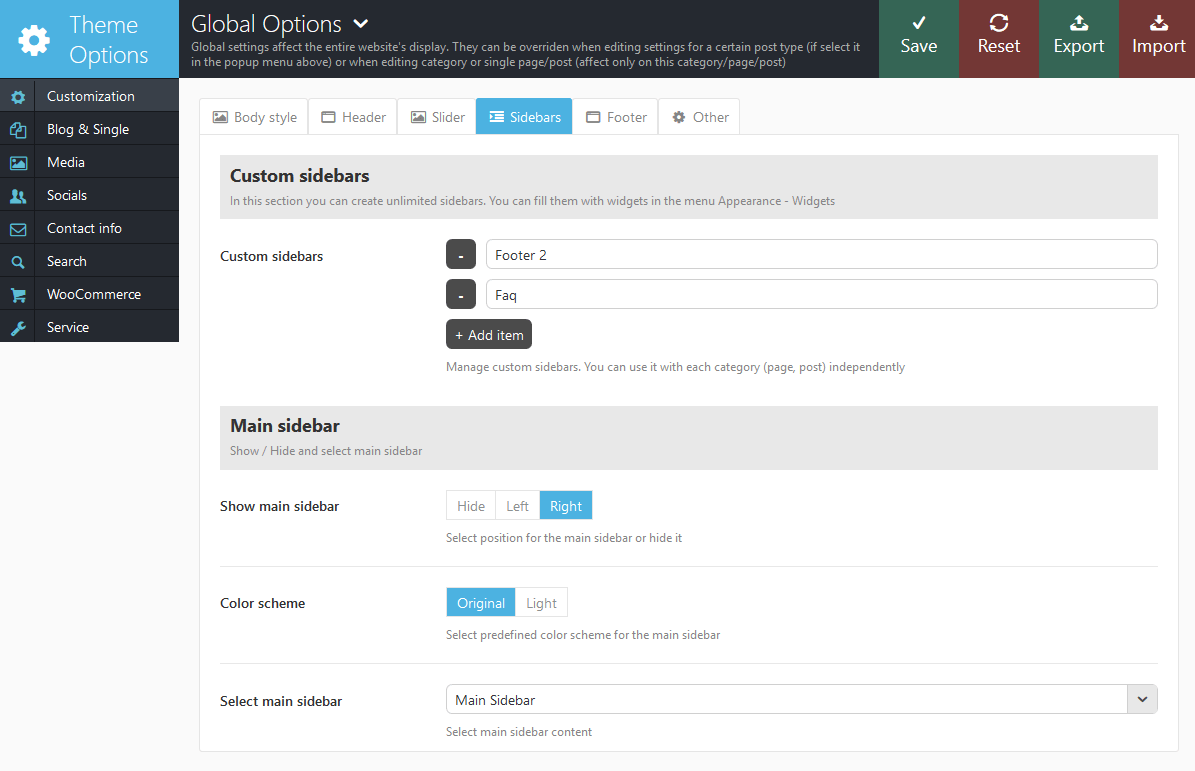
- Custom sidebars - Here you can add any sidebar you want.
- Show main sidebar - Enable/Disable the main sidebar.
- Color scheme - This option allows you to apply a color scheme(s) to the main sidebar.
- Select main sidebar - This option allows you to select content for the main sidebar.
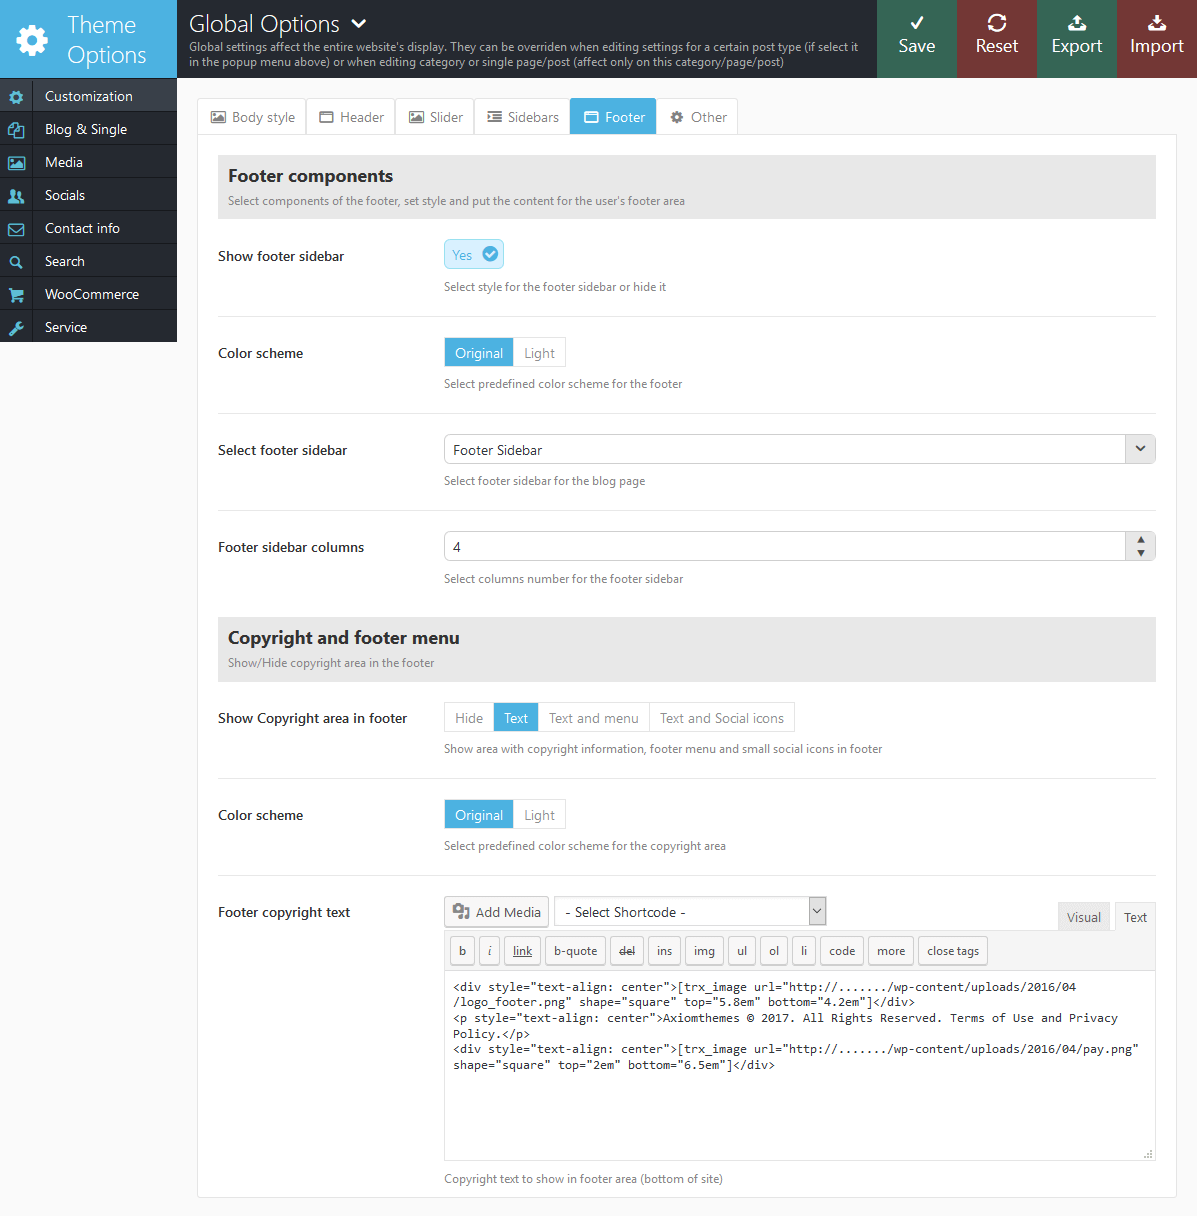
Footer
-
Show footer sidebar - Enable/Disable Footer sidebar and set color scheme. You can customize the sidebar in Appearance > Widgets section.
- Color scheme - Pick the needed color scheme for the footer.
- Select footer sidebar - Pick sidebar you want to display in the footer.
- Footer sidebar columns - Set the number of columns you want to display in the footer.
- Show Copyright area in footer - Shows block with copyright information, footer menu and social icons.
- Color scheme - Pick the necessary color scheme for the copyright area.
- Select footer menu - Select the footer menu (available if the "Show Copyright area in footer" option is set to "Text and menu").
- Footer copyright text - Copyright text that will be displayed in the footer area. In order to make the current year change automatically, just paste {Y} instead of the year.
Other
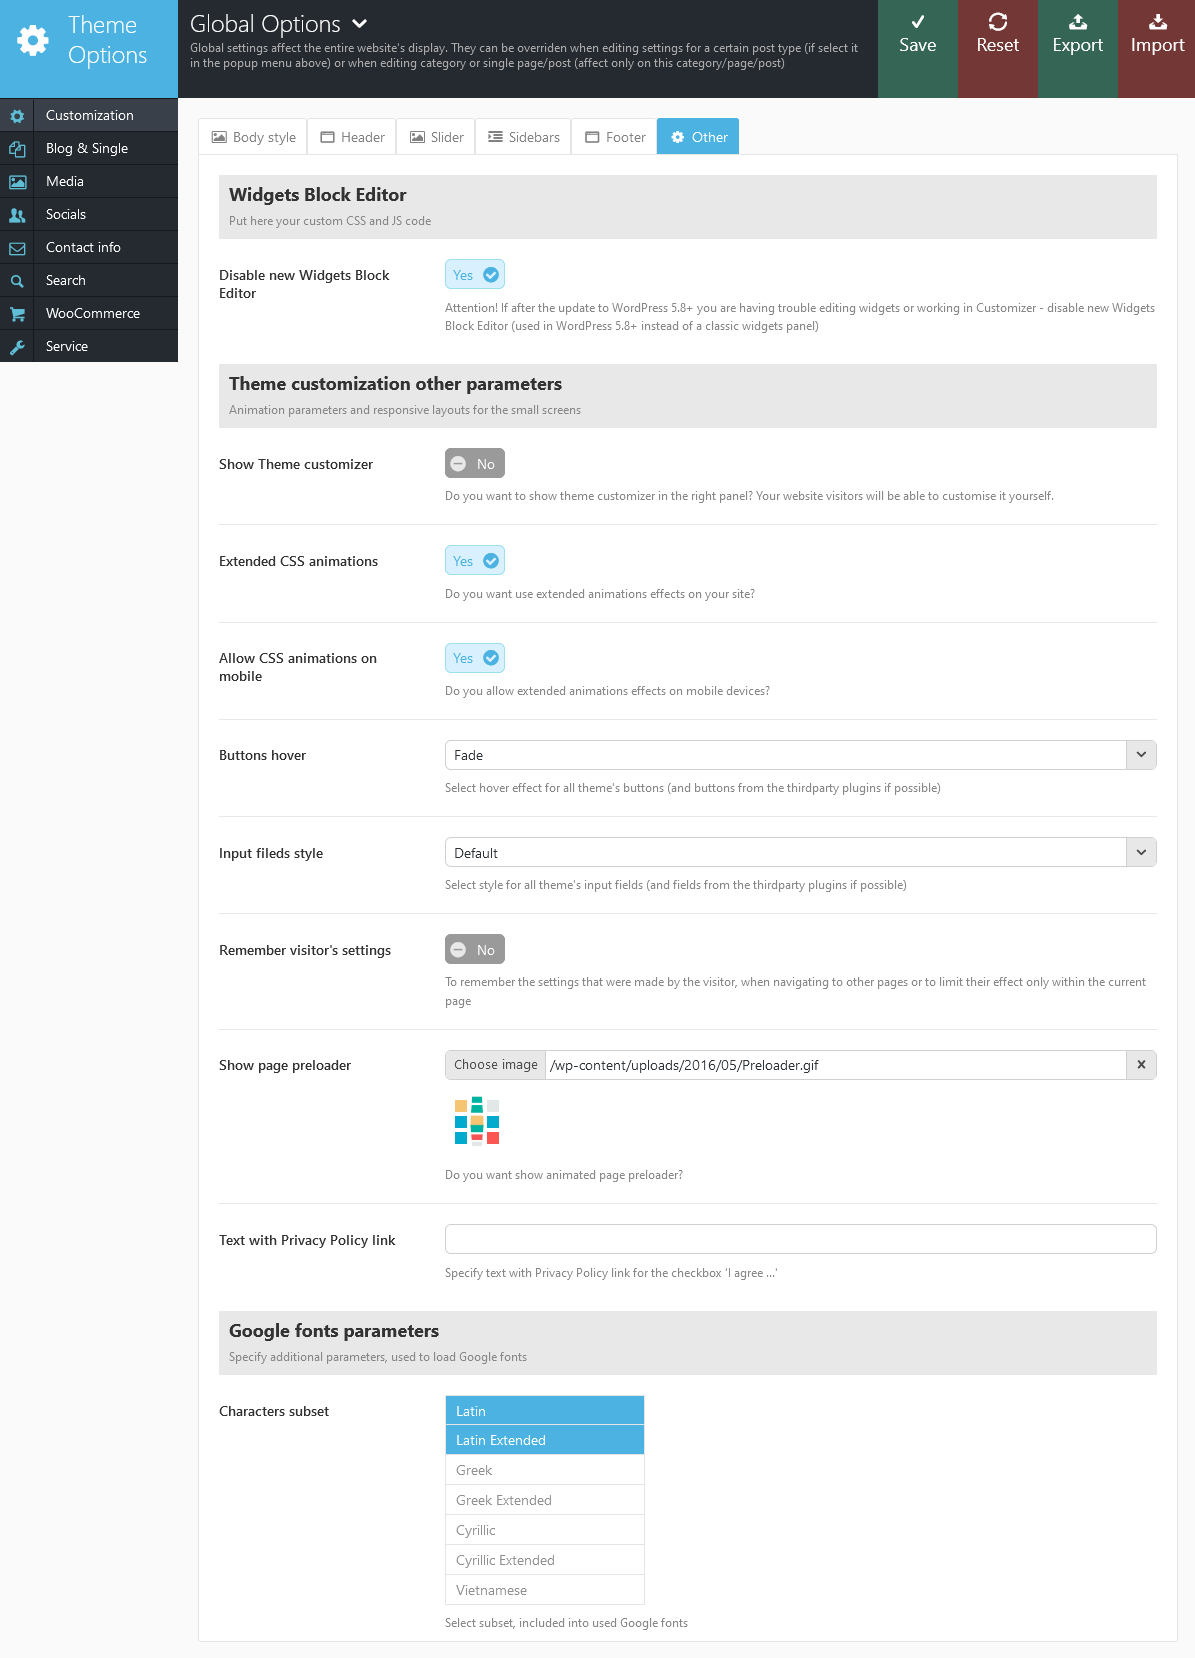
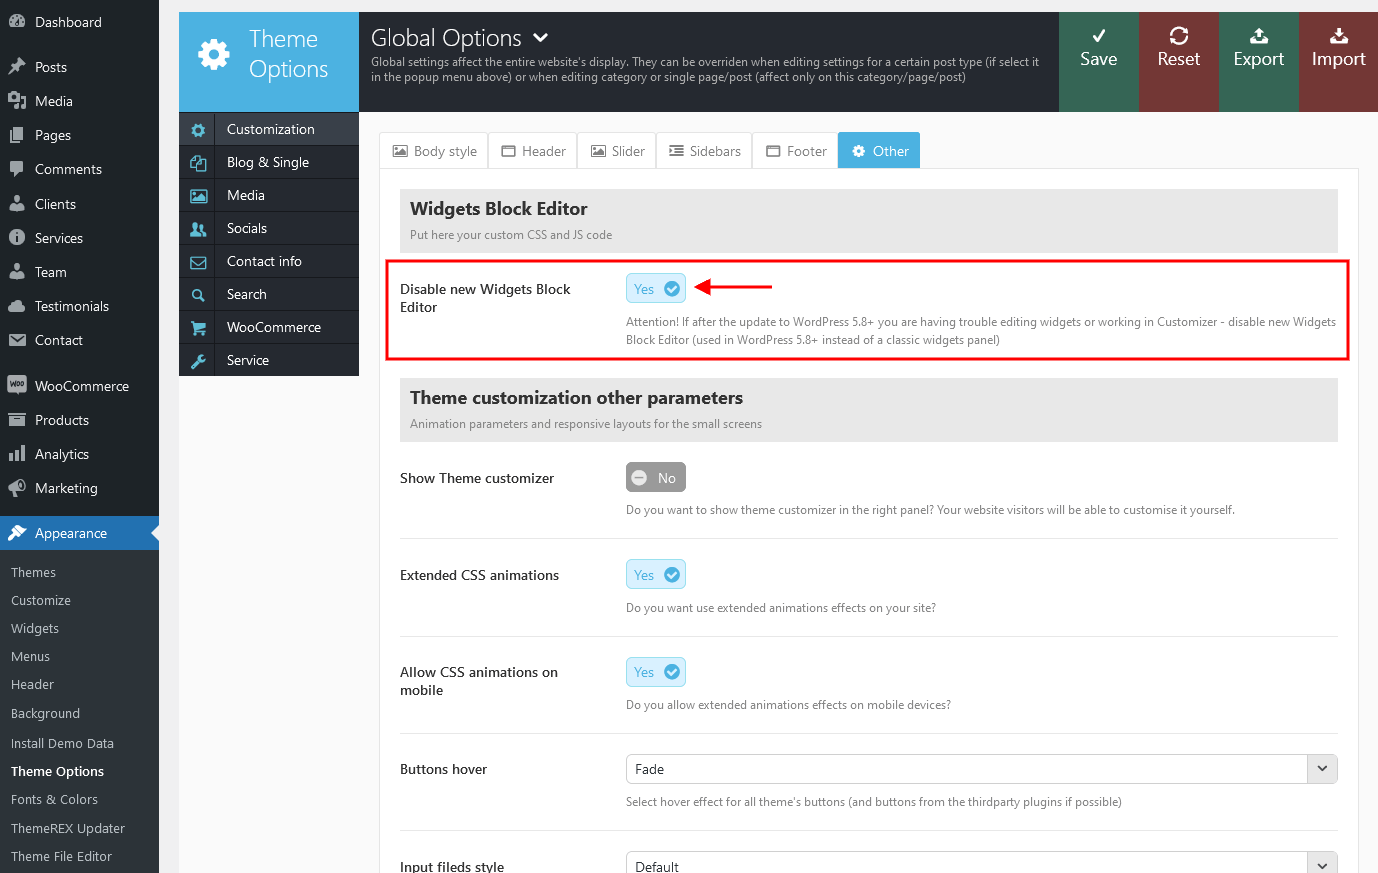
- Disable new Widgets Block Editor - Disable new Widgets Block Editor, if after the update to WordPress 5.8+ you are having trouble with editing widgets or working in Customizer. New Widgets Block Editor is used in WordPress 5.8+ instead of classic widgets panel.
- Show Theme customizer - Whether to show theme customizer in the right panel.
- Theme customizer panel demo time - Time range for the panel to show up.
- Extended CSS animations - Additional animation effects.
- Allow CSS animations on mobile - Additional animation effects.
- Buttons hover - This option allows you to apply one of the available hover effects to all of the buttons used in the theme.
- Input fields style - This option allows you to apply one of the available style to all of the input fields used in the theme.
- Remember visitor's settings - Allows you to save the settings that were made by the visitor.
- Responsive Layouts - Whether to apply responsive layouts for mobile devices screens.
- Show page preloader - Choose the necessary image to act as your page preloader.
-
Text with Privacy Policy link - Specify the text for the checkbox in a default form (built using trx_form shortcode) and in registration form (Appearance > Theme Options > Customization > Header > Show Login/Logout buttons). This text will be displayed before the Privacy Policy link.
In order to add/custimoze the Privacy Policy link, navigate to Settings (WP Dashboard) > Privacy and specify the page that will be used as a Privacy Policy one.
NOTICE! In case you are planning to use default forms without consent checkboxes, just leave the "Text with Privacy Policy link" option empty! - Characters subset - This setting allows you to specify an additional Google Fonts parameters.
Blog and Single
This section lets you to set up the appearance and behavior of the blog stream page and single pages.
IMPORTANT: You can override any settings of this section in the settings of the category (they will work with all posts of current category and sub-categories contained in it), as well as to set them individually for each page and the post (in Post Options section then creating / editing a post (page).
Usually when creating/editing categories and/or posts you do not need to configure each of them! It would be very tedious. It is enough to once configure the display parameters of separate pages and blog in Appearance > Theme Options > Blog and not to change the settings within categories (posts, pages) (in all fields leave the default value - "Inherit").
And only in those categories (posts, pages) that should not look like others, you can change these settings.
Blog Stream page parameters

Below is a set of parameters that affects the display of the blog stream page:
- Blog style - Display style of blog stream page:
- Excerpt - shows large image and only a brief summary of the post (Excerpt) or the part before tag "Read more"
- Masonry (2,3,4 columns) - display positions arranged in columns as small pictures with description underneath. All pictures are scaled proportionally.
- Portfolio (2,3,4 columns) - displays post as pictures with different hover effects. This description shows up when you hover over the image. All pictures are cropped to the same size.
- Related posts (no columns,2,3,4 columns) - displays related posts.
- Article style - you can select boxed or stretch article style.
- Dedicated location - Position of "selected" content (created with the shortcode [trx_section dedicated="on"]) or featured image in respect to the page's text:
- As in the post defined - "dedicated" content or featured image is located the way it's specified in the post settings or in the parameter align of the shortcode [trx_section], that created this "dedicated" content.
- Above the text of the post - "dedicated" content or featured image is located above the text of the post, regardless of what is specified in the post settings.
- To the left the text of the post - "dedicated" content or featured image is located to the left of the text of the post, regardless of what is specified in the post settings.
- To the right the text of the post - "dedicated" content or featured image is located to the right of the text of the post, regardless of what is specified in the post settings.
- Alternates for each post -position of "dedicated" content or featured image is selected alternately for each next post - top, left, right, etc., regardless of what is specified in the settings of the post.
- Blog posts sorted by - (string). The way to sort posts:
- date - posts ordering by publish date
- alpha - posts ordering alphabetically
- views - posts ordering by views count
- comments - posts ordering by comments number
- author_rating - posts ordering by review's author marks
- users_rating - posts ordering by review's readers marks
- random - posts ordering is random
- Blog posts order - (string). The order to sort posts: asc|desc.
- Blog posts per page - The number of posts per page (overrides the same setting from Settings - Reading).
- Excerpt maxlength for streampage - How many characters from post excerpt will be displayed in blog streampage (only for Blog style = Excerpt). 0 - don't trim excerpt.
Single post (page) parameters
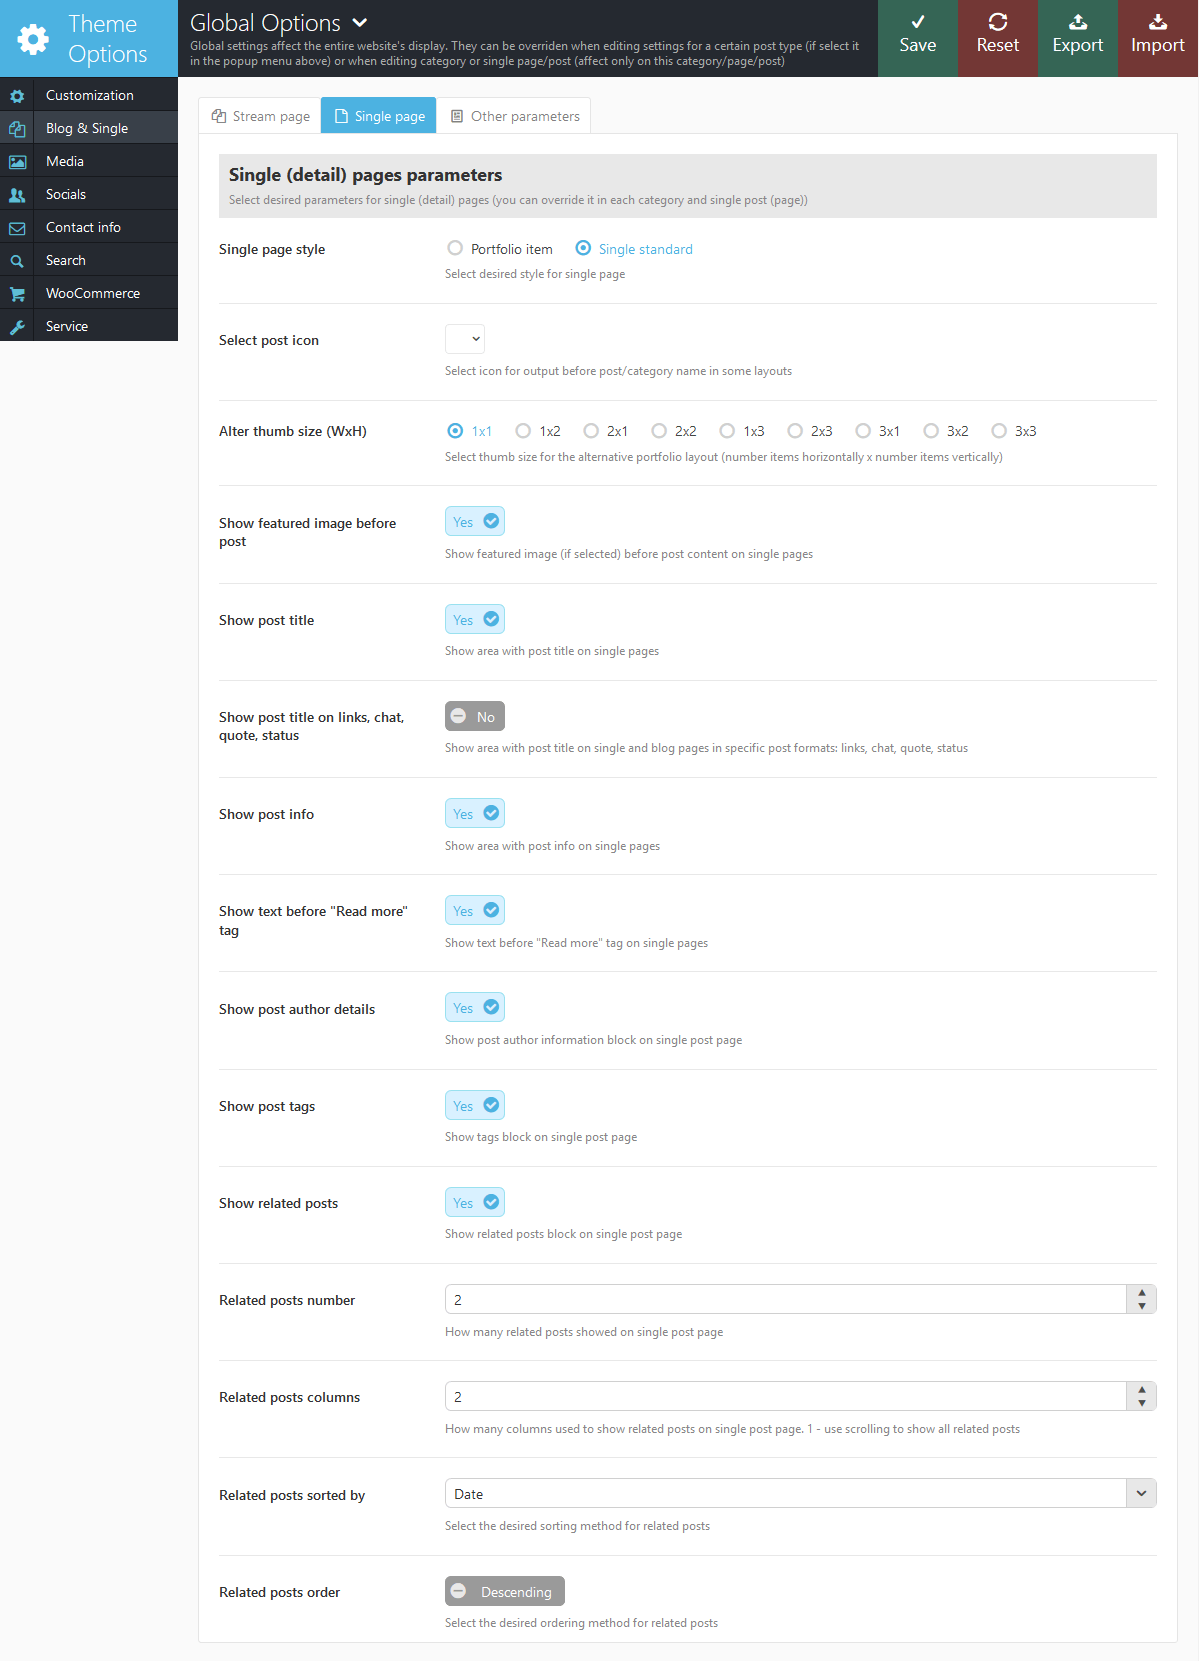
Below is a set of parameters that affects the display of the single posts (pages):
- Single page style - page display style:
- Portfolio item - Used to display posts "Portfolio". Top of the page displays Featured image of this post and the arrows indicating previous / next post in this category. Beneath the images there are the title and the post's text, as well as other additional information - author, tags, meters, related posts, etc.
- Single standard - Standard display of contents. Featured image or "dedicated" content is displayed above the content, to the left or right from it, depending on the corresponding setting in "Post Options".
- Select post icon - Pick the necessary icon to show next to the post's title.
- Alter thumb size (WxH) - This option allows you to select thumb size for the alternative portfolio layout.
- Show featured image before post - Whether to show the attached image (featured image) at the top of the post.
- Show post title - Whether to display the header area of a single post (page)
- Show post title on links, chat, quote, status - Whether to display the header area of a single post (page) on post formats "Quote", "Link", "Aside", "Chat"
- Show post info - Whether to display the info area (date, author, categories list) of a single post (page)
- Show text before "Read more" tag - Whether to display the text of the post, located before tag "Read more"
- Show post author details - Enable/Disable "Post author" section in single post
- Show post tags - Enable/Disable "Post tags" section in single post
- Show related posts - Enable/Disable "Related posts" section in single post.
- Related posts number - How many related posts will be shown on single post page.
- Related posts columns - How many columns will be used to display related posts.
- Related posts sorted by - (string). The way to sort posts:
- date - posts ordering by publish date
- alpha - posts ordering alphabetically
- views - posts ordering by views count
- comments - posts ordering by comments number
- author_rating - posts ordering by review's author marks
- users_rating - posts ordering by review's readers marks
- random - posts ordering is random
- Related posts order - (string). The order to sort posts: asc|desc.
Other parameters
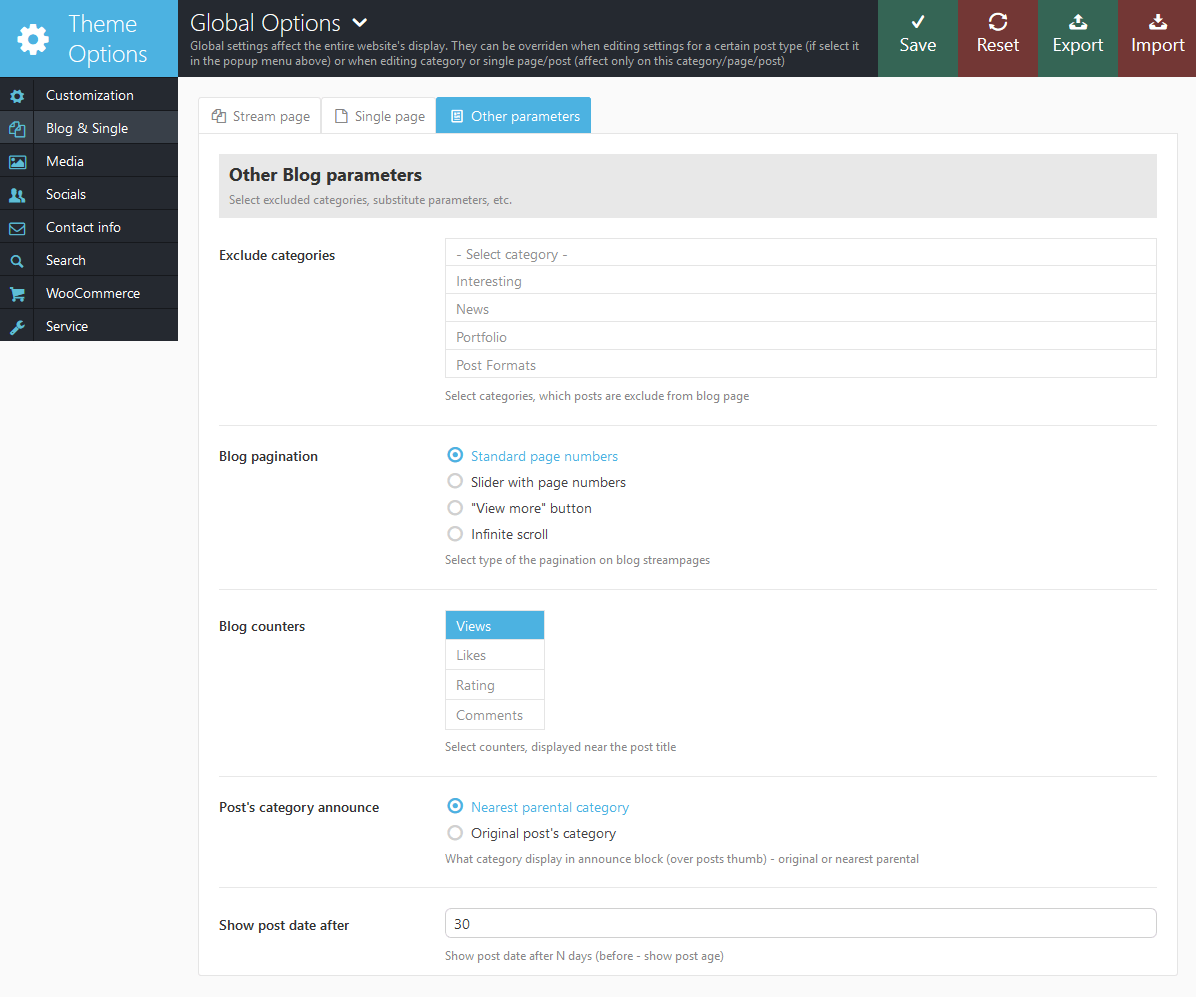
- Exclude categories - In this list, you can mark the categories that should not be displayed in a blog stream page and in the list of categories (Widget Categories). This may be, for example, some service category.
- Blog pagination - Display type of additional portions of posts on blog stream page: standard block with page numbers, the button "View more" or "Infinite scroll" for dynamic-loading for the next batch of articles (without reloading the page).
- Blog counters - Which counters to display on blog stream page, in the widget and a shortcode: post review counter or comments counter .
- Post's category announce - Which category display in announce block (over posts thumb) - original or closest parental.
- Show post date after - How many days after the publication of the post to display the date of its publication in the usual way. Until that time, instead of the date, it will display how many minutes (hours, days) have passed since the publication.
Media
Settings of this group are responsible for an additional processing of media content on the website, such as audio, video and image galleries.
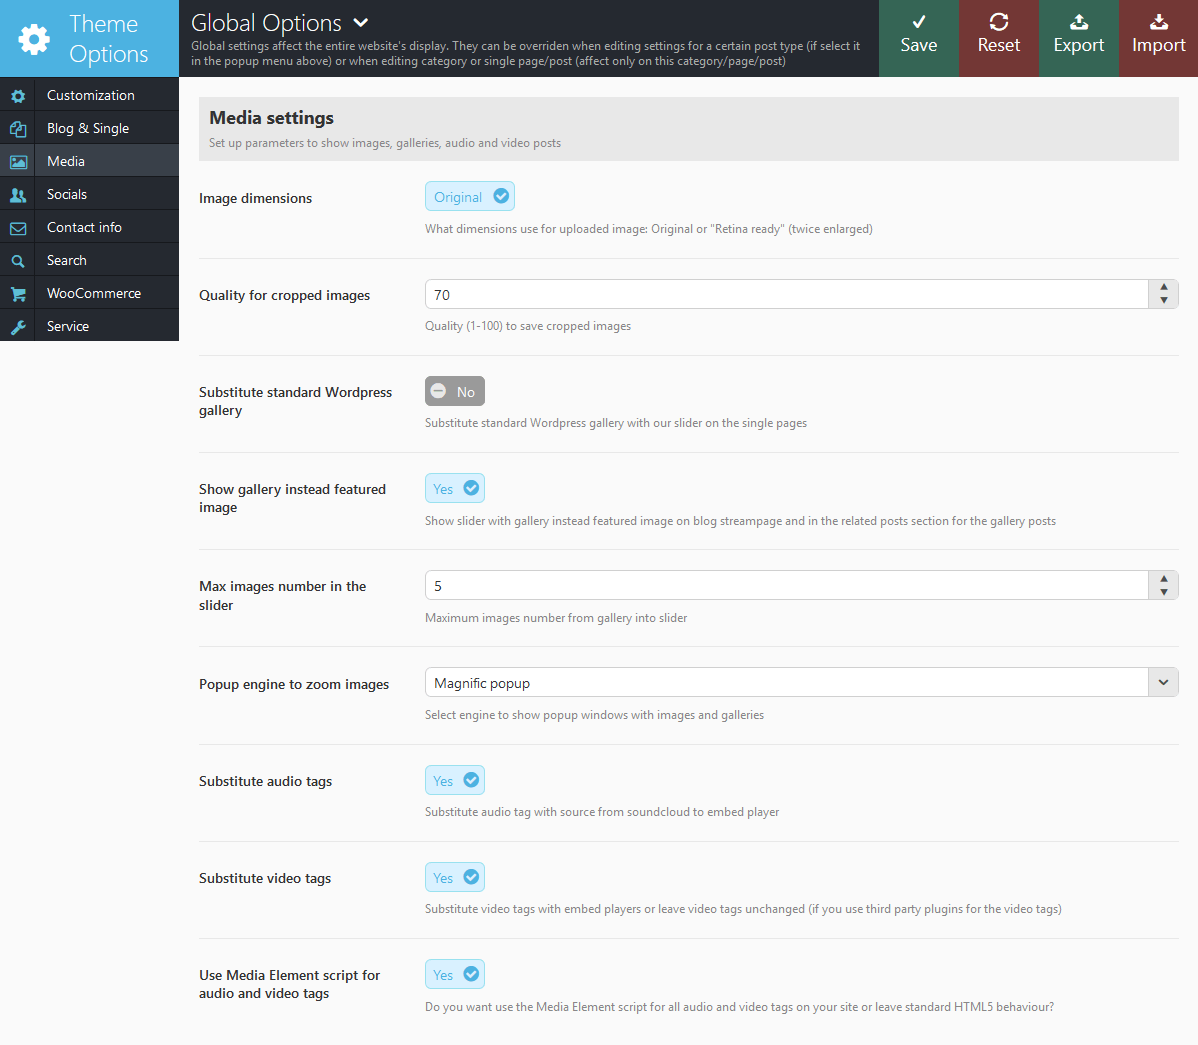
- Image Dimensions - What dimensions will be used to display images on the pages: "Original" - precise dimensions of the image block are used; "Retina Ready" - the image twice bigger fits into the original block (for accurate display on Retina).
- Quality for cropped images - Here you can manually set the quality of cropped images that you are using.
- Substitute standard WordPress gallery - Do you need to replace the original WordPress gallery in the body of the post with our slider?
- Show gallery instead featured image - Show slider with gallery instead featured image on blog streampage and in the related posts section for the gallery posts
- Max images number in the slider - Maximum images number from gallery into slider. For example: gallery contain 50 images, but on the streampage you can see only 5 images in the slider. This setting speed up the page loading (for the page with many sliders or many images in the each slider).
- Popup engine to zoom images - Pick the engine to display popups.
- Substitute audio tags - Do you need to substitute tag <audio> in the post body with special iframe (used for audio files from the server soundclouds)
- Substitute video tags - Do you need to substitute tag <video> in the post body with special iframe (used for audio files from the server youtube and vimeo)
- Use Media Element script for audio and video tags - Do you wan to design tags <audio> and <video> with the popular script Media Elements?
Socials
In this section, you can add links (URLs) to social networks.
Just indicate their URL's (URL's of your profiles on these networks) and select icons for them. Icons of the networks you have added will be displayed in the widget "Social". Here you can also choose the social networks, whose icons will be displayed on the page of the post for sharing in the social networks.
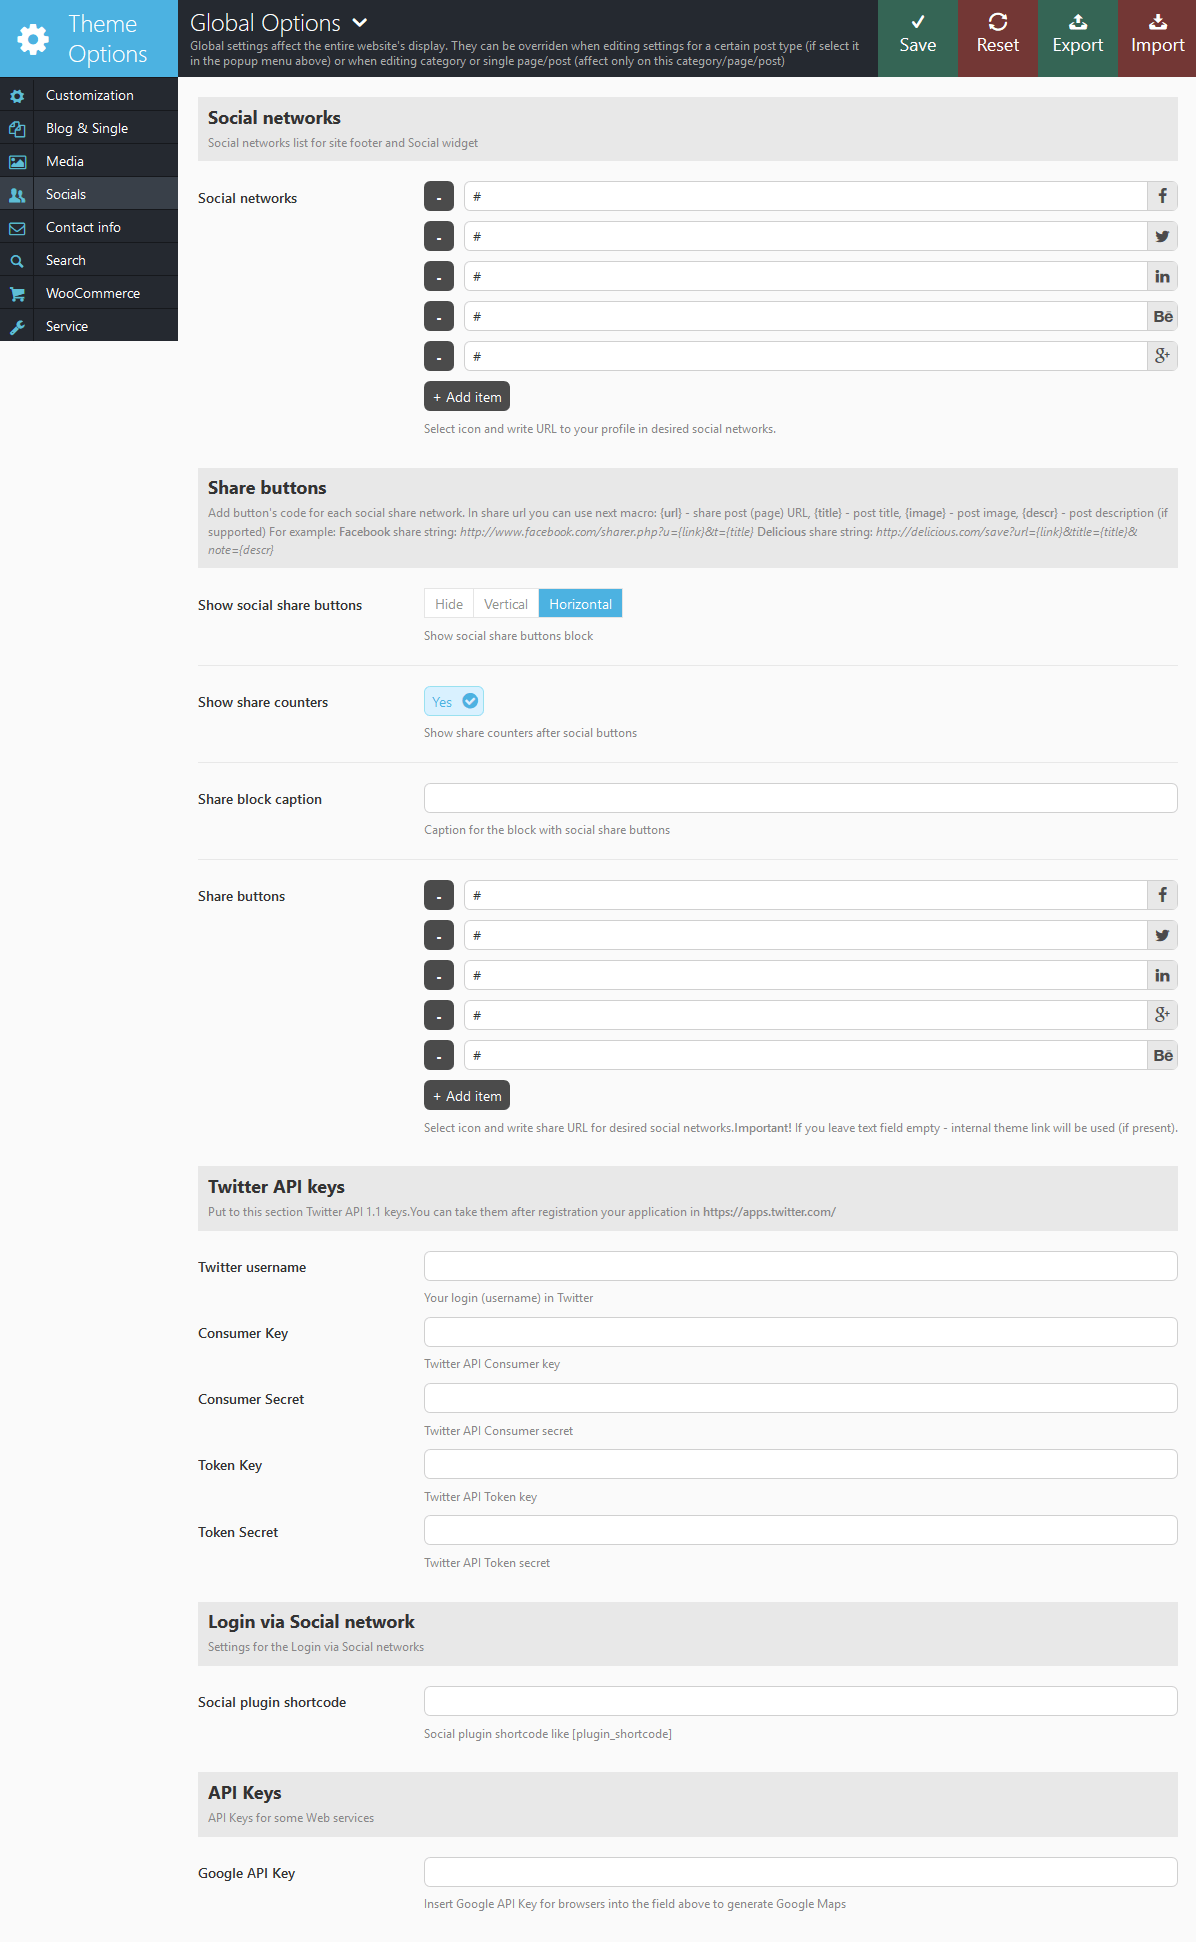
- Social networks - Popular social networks URL. Only icons with filled URL are displayed in widget "Social".
- Show social share buttons - Whether to display the block with buttons of social networks for sharing on the post page.
- Show share counters - this option enables share counters after social buttons.
- Share block caption - add custom caption to share buttons block.
- Share buttons - Share URLs of popular social networks. If URL not filled - used internal theme URLs (if exists). IMPORTANT: You can easily add your own social networks - simply copy the icon of the social network you need into the folder "/images/social", then add a new field and enter there the URL for sharing the text in this social network.
- Twitter API keys - In this section, you must specify a username and keys received when registering your application on https://apps.twitter.com. IMPORTANT: These data is required for Twitter Widget and the output of Twitter feeds on footer of the page.
-
Login via Socials - This setting is responsible for the social login functionality. Paste the necessary shortcode generated by one of these plugins (depends on which one you are going to use) to enable such functionality.
For example, you might want to try installing the WordPress Social Login 3rd party plugin. Recommendation: Please be aware that not every 3rd party plugin might be 100% compatible with our theme.
In case you do not want to use social login, please leave this option empty. - Google API Key - Paste the necessary Google API Key to generate a Google Map. More information on how to generate an API key properly can be found here.
Contact info

This section is responsible for customizing a contact information:
- Contacts in the header - String with the contacts in the top left corner.

- Open hours in the header - String with the working hours.
- Contact form email - E-mail to send messages using contact form and form of registration of new users. If this field is empty, use admin e-mail from WordPress settings.
- Company address (part 1) - The first part of the address: house number and street
- Company address (part 2) - The second part of the address: city, postal code and country
- Phone - Comma separated phone numbers.
- Fax - Comma separated fax numbers.
- Contact form message - Message's maxlength in the contact form shortcode.
- Comments form message - Message's maxlength in the comment form.
- Mail function - What function you want to use for sending mail: the built-in WordPress wp_mail() or standard PHP mail() function? Attention! Some plugins may not work with one of them and you always have the ability to switch to alternative.
Search parameters
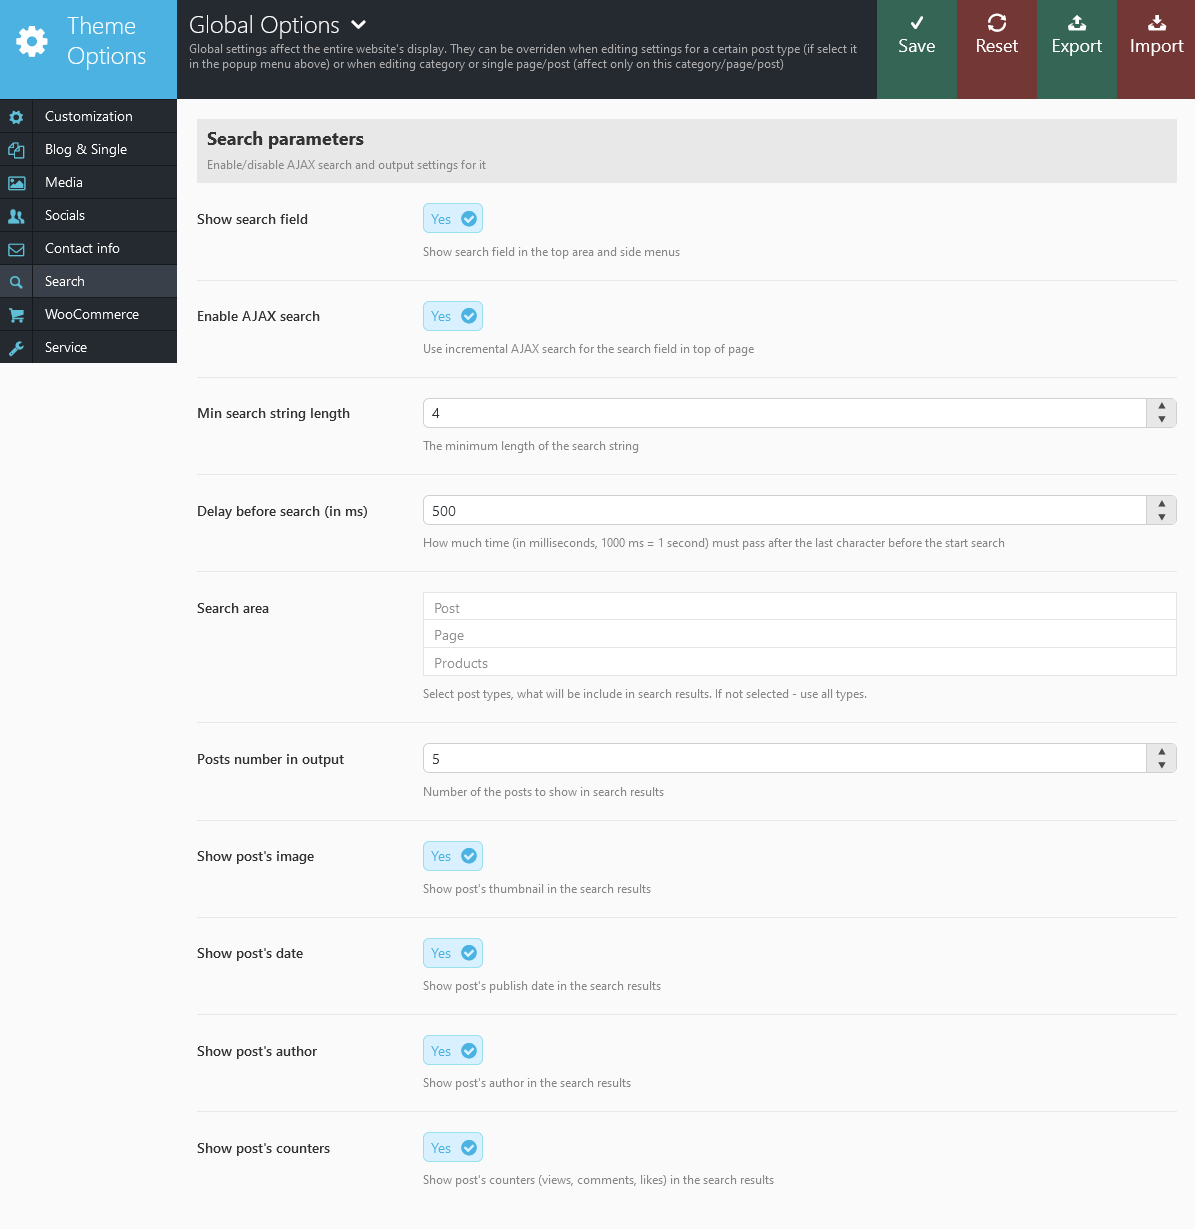
In this section you can configure the mechanism of incremental search.
- Show search field - Show search field in top area and side-menus.
- Enable AJAX search - Use incremental search (AJAX search - the search results appear while you are entering some text) or standard WordPress search (by pressing Enter or button "Search").
NOTICE! The AJAX search is available for all prebuilt top panel styles (header areas).
Below you can find an example of AJAX search (before pressing Enter):

- Min search string length - Minimum number of characters after entering which the AJAX search begins.
- Delay before search (in ms) - Pause after the last keystroke (in milliseconds, 1000ms = 1s) before starting the AJAX search.
- Search area - Check the types of posts, among which to search. It is allowed to mark multiple types at a time. This works only for AJAX search (displays search results as you type, before pressing Enter).
- Posts number in output - The number of posts displayed in AJAX search results.
- Show post's image - Show featured image in the AJAX search results.
- Show post's date - Show the date of publication of the post in the AJAX search results.
- Show post's author - Show the author of the post in the AJAX search results.
- Show post's counters - Show post counts (number of views, likes or comments) in AJAX search results.
- Enable AJAX search - Use incremental search (AJAX search - the search results appear while you are entering some text) or standard WordPress search (by pressing Enter or button "Search").
WooCommerce

The section is responsible for settings of the WooCommerce posts:
- Shop list style - Default list style for the shop products stream pages: "thumbs" (only thumbs with titles) or "list" (thumbs, titles and short description).
- Show style buttons - show sorting buttons allowing to switch between display styles.
- Show cart button - Whether to show or hide cart button.
- Show Navigation - Whether to show or hide navigation on single product.
- Crop product's thumbnail - Whether to crop thumbnails or scale them.
The quantity of products displayed on shop page is inherited from the Appearance > Customize > WooCommerce > Product Catalog section. "Products per row" and "Rows per page" options work only if the "Shop list style" (Appearance > Theme Options > WooCommerce) is set to "Thumbs".
Service

In this section you can set the following settings:
- Use AJAX post views counter - What type of counter should I use to count the number of page views: AJAX is applied if your site uses content caching system (in this case extra requests to the server are being generated). If you do not use caching - this option should be disabled.
- Frontend editor - This option allows posts' authors edit their posts right in the frontend mode.
- Additional filters in the admin panel - Whether to use extra filters for Post Format and Tags in admin panel when viewing the list of the blog posts.
- Show overridden options for taxonomies - Shows an extra column with already overridden options in categories list.
- Show overridden options for posts and pages - Shows an extra column with already overridden options in posts and pages lists.
- Enable demo data installer - If disabled you won't see "Import demo data" link in your admin panel. We recommend to disable it after site setup to avoid accidental data rewriting
- Demo Data Installer Timeout - Time range for the files import procedure.
- Debug mode - In the debug mode we are using unpacked scripts and styles, else - using minified scripts and styles (if present).
- Use menu cache - Clear WordPress/Menu cache data.
Clear cache options is recommended, for example, after activating the WPML plugin - incorrect data about the structure of categories and your site left in the cache may result in " the white screen". After clearing the cache the performance of the site is usually restored.
Widgets
Theme comes with several default widget sidebars (areas). Check the Appearance > Widgets section.
- Main sidebar - Displays widgets vertically on the left/right from the main content.
- Footer/Footer 2 sidebar - Displays widgets horizontally.
- FAQ - This sidebar is responsible for the FAQ related content.
- WooCommerce Cart Sidebar - Available only if the WooCommerce plugin is installed. Designed to display contents of the cart using the Woocommerce Cart widget.
You can create an unlimited number of additional sidebars for each post, page and category in Appearance > Theme Options > Customization > Sidebars section.
Attention! Our theme supports both Classic Widgets Editor and New Block Widgets Editor (WordPress 5.8+). You can easily switch between the editors using the "Disable new Widgets Block Editor" option in Appearance (WP Dashboard) > Theme Options > Customization > Other section.
Theme widgets can be set in the Appearance > Widgets section.
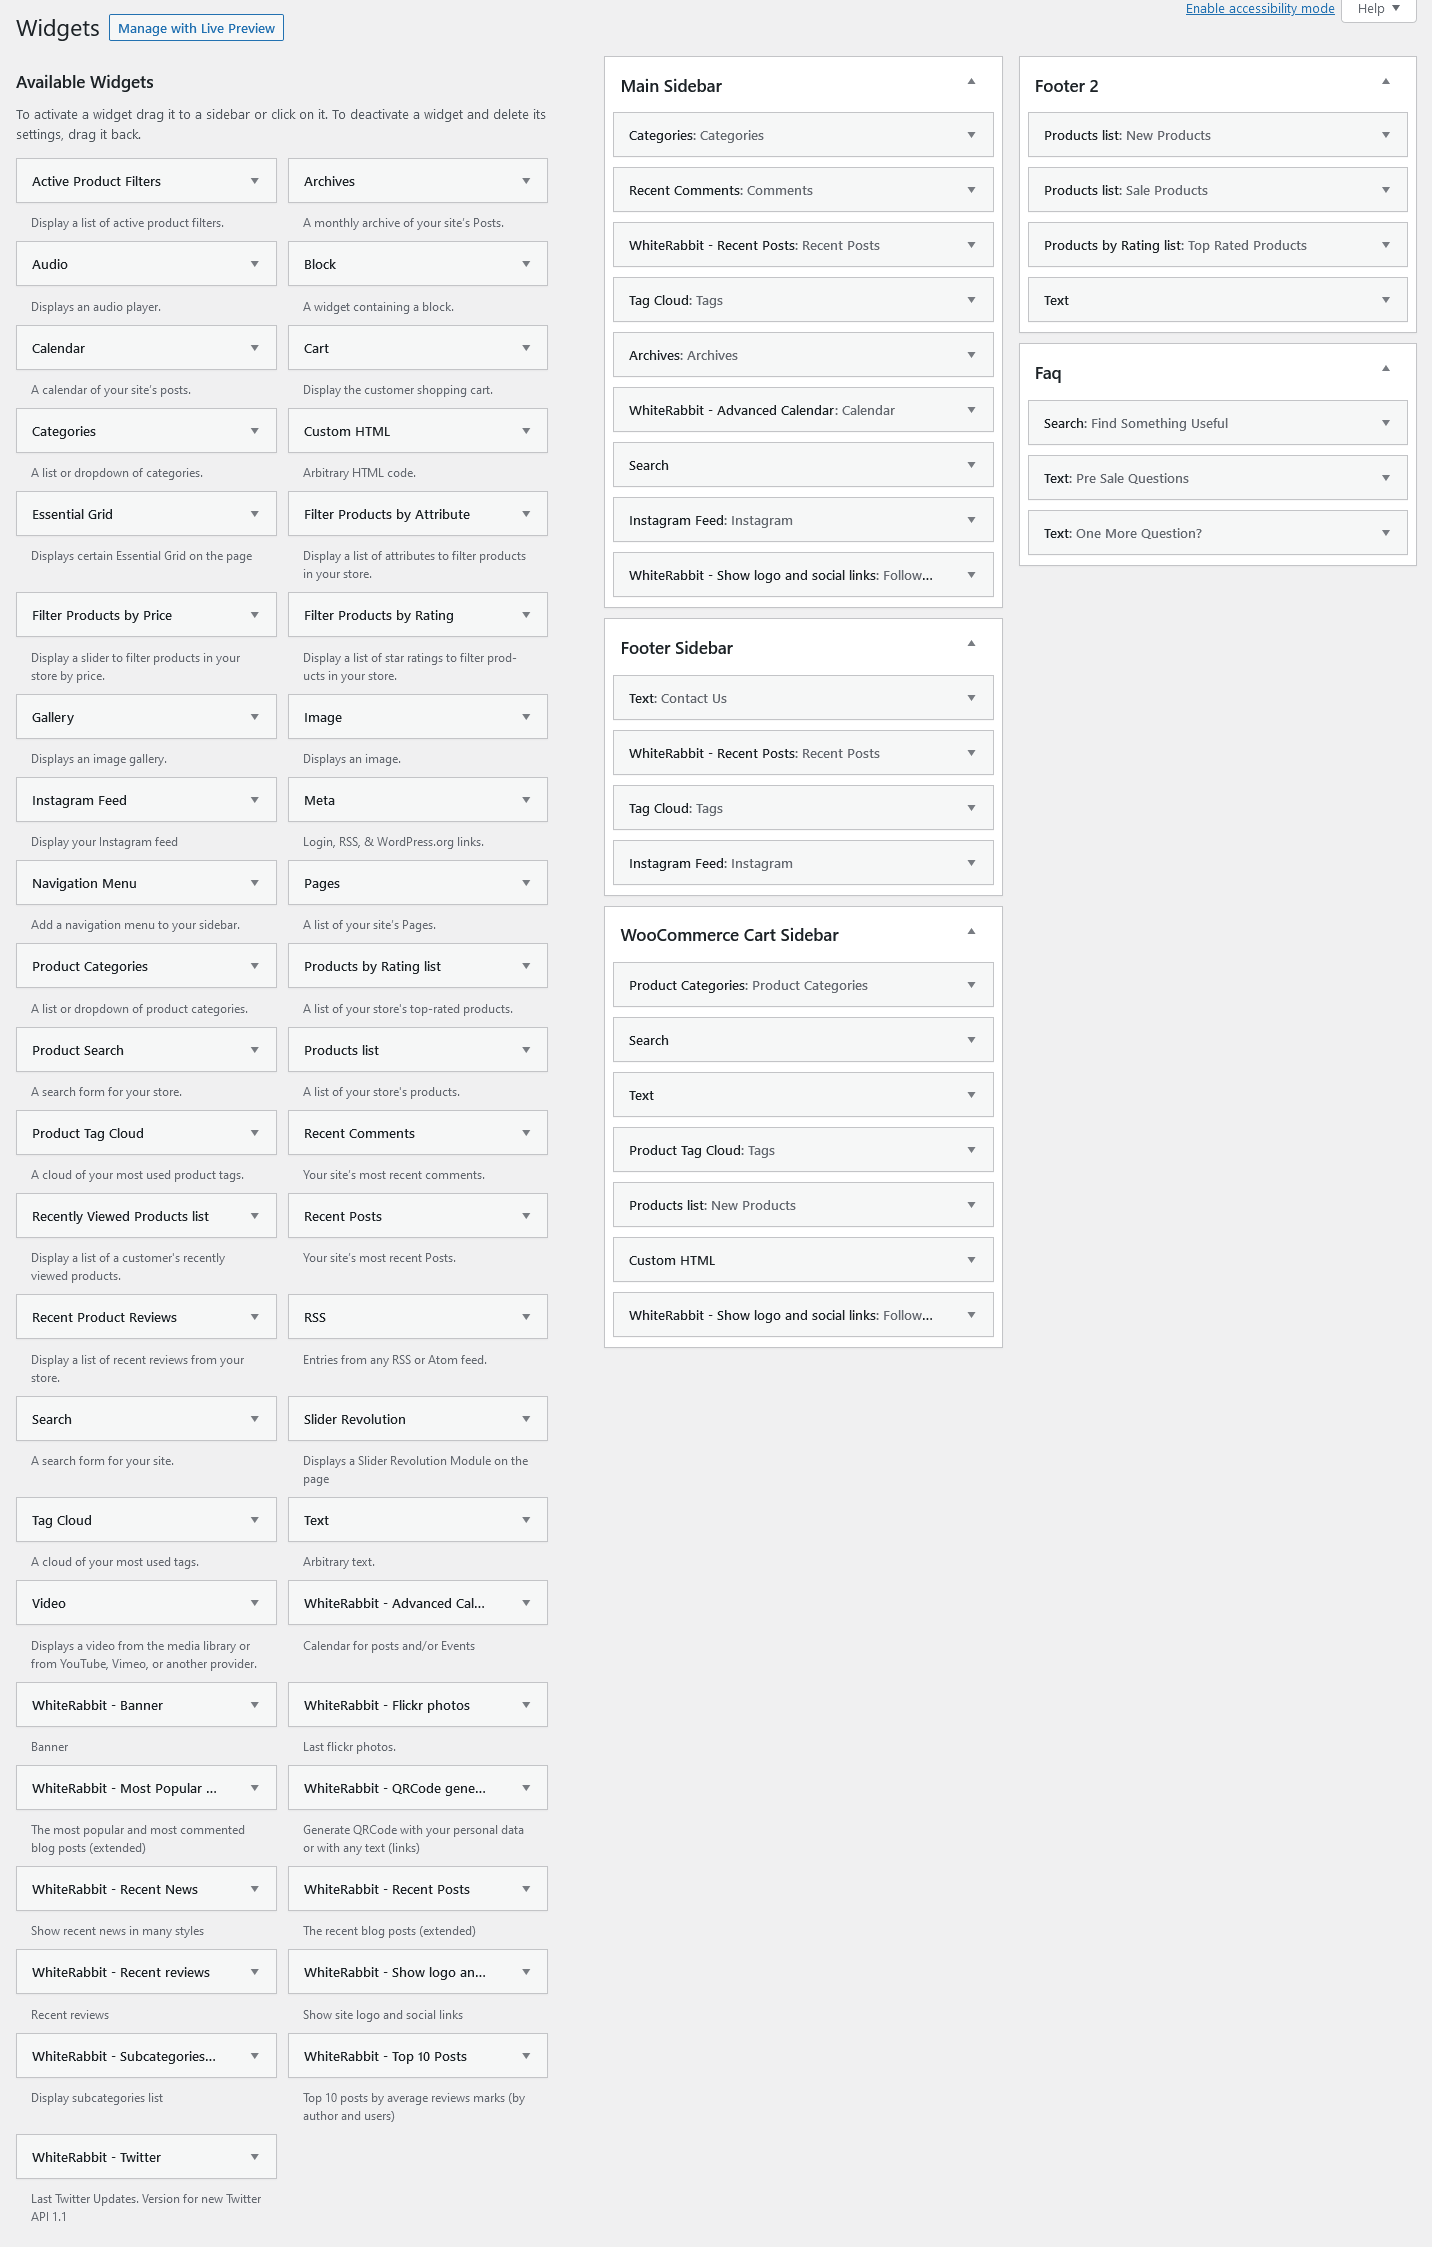
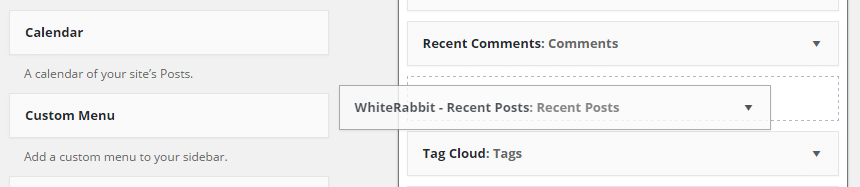
Here you should just populate selected sidebar with widgets and assign this sidebar to any page, post or category. Simply drag and drop selected widget to sidebar area.
To add a sidebar to page simply go to Pages > Edit page you want to modify, in the bottom of the page find Posts Options > Customization > Sidebars and select a sidebar you want to associate with this page. Click on Update button in top right corner, this will save changes to the page.
Custom widgets:
- Instagram Feed: Shows photos from Instagram account. IMPORTANT! You need to install "Smash Balloon Social Photo Feed" plug-in before using this widget. You can connect your Instagram account in the WP Dashboard > Instagram Feed > All Feeds > Add New. Please click here for more information.
- WhiteRabbit - Advanced Calendar: Adds a calendar for posts and events.
- WhiteRabbit - Banner: Adds an image banner.
- WhiteRabbit - Subcategories List: Used to show subcategories list (children of selected category)
- WhiteRabbit - Flickr photos: Shows photos from Flickr account.
- WhiteRabbit - Most Popular & Commented Posts: Displays the most visited and most commented articles.
- WhiteRabbit - QRCode generator: Displays VCard 3.0 with your personal data (address, phone, email, etc.) as QR Code. Also you can display as QR Code any text (or link).
- WhiteRabbit - Recent Posts: Displays the most recent posts. Unlike the standard widget, it displays the post's featured image, author's name, comments or views number.
- WhiteRabbit - Recent Reviews: Displays the most recent reviews. Unlike the "Recent posts" widget, it displays only posts with reviews marks.
- WhiteRabbit - Recent News: Displays the most recent news.
- WhiteRabbit - Show Logo and Social Links: Displays icons of social networks, the parameters of which are filled on the page Appearance > Theme Options > Socials. Also site logo and short description will be displayed.
- WhiteRabbit - Top 10 posts: Displays the best Reviews (with the highest ratings) in the opinion of the authors and visitors.
- WhiteRabbit - Twitter: This widget shows the last Tweets from your Twitter-feed using the API 1.1 (entered into force in June 2013)
For its work, this version of the widget requires creating "Twitter Application" and obtaining the appropriate codes. Due to the fact that Twitter from June 2013 switched to the new API 1.1 and discontinued support of out-of-date API 1.0, now to get information out of this social network, you must create an account on the resource https://dev.twitter.com/apps. Then, click the "Create a new application", fill in the required fields and generate "Access token" and "Access token secret". As a result, you will get four important core values to work with Twitter API 1.1:- Consumer key
- Consumer secret
- Access token
- Access token secret
Here is an example of how the Footer sidebar might look like:


Contact US block code:
                        <ul class="sc_list sc_list_style_iconed">
                        <li class="sc_list_item" style="margin-bottom: 8px;">
                        <span class="sc_list_icon icon-pin12" style="color:#f8bc22;"></span>
                        <p>Chicago, IL 60606, 123, New Lenox</p>
                        </li>
                        <li class="sc_list_item even" style="margin-bottom: 8px;">
                        <span class="sc_list_icon icon-phone14" style="color:#f8bc22;"></span>
                        <p>123-456-7890</p>
                        </li>
                        <li class="sc_list_item odd" style="margin-bottom: 8px;">
                        <span class="sc_list_icon icon-mail2" style="color:#f8bc22;"></span>
                        <p>[email protected]</p>
                        </li></ul><br/>
                        [trx_socials type="images"]
Shortcodes
Shortcodes is a handy feature in WordPress that allows you to do some pretty incredible things by just inserting a shortcode into a page or post. Using Shortcodes is very straight-forward, just insert one where you want the relevant content to show up.
The theme comes with a number of shortcodes allowing you to add the info in a simple way. Moreover, you can use WPBakery Page Builder to add new elements to the page. More information on how to use WPBakery Page Builder properly can be found here:
IMPORTANT: If you are using Classic mode to add shortcodes, please make sure to always start new shortcodes from new lines. Most of the time you won't encounter any errors, if you don't do that, but unfortunately WordPress does mess up the html sometimes. This is true for all shortcodes, but the inline ones like trx_highlight, are the only ones that don't need a new paragraph.
Please note that almost all the shortcodes allow parameters:
- id - unique id for element. Allow to address this element form javascript or CSS
- class - class name for element. Allow set up additional decorations for element in CSS stylesheets.
IMPORTANT: You can use next common classes to decorate any shortcode:- theme_accent - main (accent) theme color used for decorate inner text of the shortcode
- theme_accent_bg - main (accent) theme color used as background (instead bg image) of the shortcode
- theme_accent_bgc - main (accent) theme color used as background color of the shortcode
- theme_accent_border - main (accent) theme color used as border color of the shortcode (if border present)
- theme_accent2 - accent2 theme color used for decorate inner text of the shortcode
- theme_accent2_bg - accent2 theme color used as background (instead bg image) of the shortcode
- theme_accent2_bgc - accent2 theme color used as background color of the shortcode
- theme_accent2_border - accent2 theme color used as border color of the shortcode (if border present)
- texture_bg_1 ... texture_bg_10 - set texture image for the shortcode's background
- bg_pattern_0 ... bg_pattern_9 - set pattern image for the shortcode's background (repeat, fill background)
- bg_image_1 ... bg_image_6 - set image for the shortcode's background (no repeat, fit to background)
[trx_section class="theme_accent_bgc texture_1"]Section inner text[/trx_section] - top, bottom, left, right the value of which is the number - the margin in pixels from the top, bottom, left and right of the block respectively.
Also, note that "on | off" and "yes | no" in values of the parameters are interchangeable! That is, if the shortcode's description indicates that the value of a parameter can be "on" or "off", it means that along with them you can use the "yes" or "no".
Here's a list of the shortcodes included into the theme.
trx_accordion
Creates blocks of the "accordion" type. Only one of the blocks can be open at a time.
Parameters:
- initial - (number). The number of the initially open block (from 1 to the number of blocks). Attention: if you want to make all accordion items to be closed initially, just write parameter initial greater, than items count!
- style - (number). Accordion style.
- large - (string). Use enlarged headings for elements: on|off
- counter - (string). Number elements of headings: on|off
- shadow - (string). Display shadow under the block Accordion: on|off
- id - unique id for element. Allow to address this element form javascript or CSS
- class - class name for element. Allow set up additional decorations for element in CSS stylesheets.
- css - add custom css styles
- animation - select one of available animation effects for this shortcode
- top, bottom, left, right the value of which is the number - the margin in pixels from the top, bottom, left and right of the block respectively.
Examples:

[trx_accordion initial="1" bottom="4em"][trx_accordion_item title="Accordion 1"][vc_column_text]Excepteur sint occaecat cupidatat non proident, sunt in culpa qui officia deserunt mollit anim id est laborum. Sed ut perspiciatis unde omnis iste natus error sit voluptatem accusantium doloremque[/vc_column_text][/trx_accordion_item][trx_accordion_item title="Accordion 2"][vc_column_text]Excepteur sint occaecat cupidatat non proident, sunt in culpa qui officia deserunt mollit anim id est laborum. Sed ut perspiciatis unde omnis iste natus error sit voluptatem accusantium doloremque[/vc_column_text][/trx_accordion_item][trx_accordion_item title="Accordion 3" id="sc_accordion_item_1458833650145_8"][vc_column_text]Excepteur sint occaecat cupidatat non proident, sunt in culpa qui officia deserunt mollit anim id est laborum. Sed ut perspiciatis unde omnis iste natus error sit voluptatem accusantium doloremque[/vc_column_text][/trx_accordion_item][/trx_accordion]
trx_accordion_item
Creates one item for the "accordion" block. Used only within the shortcode [trx_accordion].
Parameters:
- title - (string). Applied only for the shortcode [trx_accordion_item]. Contains title for the current element.
- id - unique id for element. Allows to address this element form javascript or CSS
- css - add custom css styles.
- class - class name for element. Allows set up additional decorations for element in CSS stylesheets.
trx_anchor
Creates anchor for the "one page" navigation. If the page contains one or more anchors, this automatically creates a table of contents (TOC), that may be displayed on the right edge of the window. The position of the TOC may be fixed or floating.
Parameters:
- title - (string). Contains short title displayed in the TOC (under the icon).
- description - (string). Contains description displayed in the TOC (at the left of the icon).
- icon - (string). Icon displayed in the TOC for addressing this section.
- URL - (string). add an URL linked to anchor item.
- separator - (boolean). Enable/disable separator, disabled by default.
- id - (string) Unique id for element. Allow to address this element from TOC.
Examples:
[trx_anchor id="toc_parallax" title="Parallax" description="Create unlimited parallax backgrounds" icon="icon-picture"]
trx_audio
Inserts an audio file.
Parameters:
- Title - audio file title
- author - audio file author
- image - add or upload image associated with the audio file
- align - Choose shortcode alignment
- frame - Enable/disable frame. Enabled by default
- url or src or mp3 or wav - (string). URL of an audio file
- controls - (number). Whether to display the playback controls. The value can be on or off.
- autoplay - (number). Allows autostart playback. The value can be on or off.
- width - (number). The audio container's width (in percent or pixels).
- height - (number). The audio container's height (in pixels).
- id - unique id for element. Allows to address this element form javascript or CSS
- class - class name for element. Allow set up additional decorations for element in CSS stylesheets.
- css - add custom css styles.
- animation - add one of available animation effects.
- top, bottom, left, right the value of which is the number - the margin in pixels from the top, bottom, left and right of the block respectively.
Examples:

[trx_audio url="/Music/Pachelbel%20-%20Canon%20in%20D%20Major.mp3" title="QACHINA" author="Damien Jurado"]
trx_banner
Displays a banner image.
Example:
                            [trx_banner]
                                [trx_banner_item src="/wp-content/uploads/2016/04/9-1.jpg"]
                            [/trx_banner]
trx_br
Inserts forced newline. Can be used where you can not use html-code. Also used to disable the flow around objects.
Parameters:
- clear - (string). Disables flowing around objects created with any shortcode with parameter align="left|right|both" or means of CSS. The value can be "both" or "left" or "right".
trx_blogger
Well, we have arrived at the punch line of our collection - shortcode "Blogger". On one hand, it is rather simple - it just displays the specified number of posts from a given category. But just look how it works! It can do this in many different ways and styles. And by skillfully combining them you can easily create such blocks as Announce, ad units, interviews and much more. We think you had a chance to make sure of that by the example of creating of many different home pages.
Let's examine its parameters more carefully:
- style - (string). Block display style:
- regular
- date
- image_large or image_medium or image_small or image_tiny
- accordion_1 or accordion_2
- list
- excerpt
- related
- classic1 or classic2 or classic3 or classic4
- portfolio1 or portfolio2 or portfolio3 or portfolio4
- masonry2 or masonry3 or masonry4
- filters - this option enables categories or tag filters
- hover - (string). Hover effect (only if style=portfolio1|2|3|4):
- shift
- dir
- book
- cube
- circle effect1 ... circle effect20 (space separated!)
- square effect1 ... square effect15 (space separated!)
- hover_dir - (string). Hover effect direction (only if style=portfolio1|2|3|4 and hover=circle...|square...):
- left_to_right
- right_to_left
- top_to_bottom
- bottom_to_top
- from_left_and_right
- from_top_and_bottom
- scale_up
- scale_down
- scale_up_down
- post_type - Select a post type to work with. Posts are selected by default, you can also choose pages, products, events and announcements.
- ids - (numbers). Comma-separated ID posts to be displayed.
- cat - (number or string). ID or slug of the category, which puts out the most recent (or the first) posts added (unless ids parameter is specified). It is allowed to specify several ID's (or slugs) separated with commas.
- count - (number). The number of posts queried from the category.
- visible - (number). The number of posts displayed at once. The remaining posts will either scroll or be located in the following strings (depending on the style)
- offset - (number). How many posts to skip before starting output.
- orderby - (string). The way to sort posts:
- date - posts ordering by publish date
- alpha - posts ordering alphabetically
- views - posts ordering by views count
- comments - posts ordering by comments number
- author_rating - posts ordering by review's author marks
- users_rating - posts ordering by review's readers marks
- random - posts ordering is random
- order - (string). The order to sort posts: asc|desc.
- descr - (number). The maximum length post description (excerpt). If 0 - description not showed.
- readmore - (string). Show (on) or not (off) link "»" (read more) at the end of the post.
- rating - (string). Show (on) or not (off) rating stars under the post title.
- dir - (string). The direction of the output of the posts: horizontal | vertical
- scroll - (string). Whether to create a scrolling section to display all selected posts: on|off or yes|no. IMPORTANT: Scrolling is created only if count > visible
- controls - (string). The presence of a scroll controls: on|off or yes|no
- info - (string). Whether to display the section with tags and buttons "More", "Connents", "Likes", etc. The value can be on or off.
- date_format - (string). Format to display the posts date. For example, if we want display (on style="date") time at the top, and date below, it would be date_format="H:i+F d".
- location - (string). Position of "dedicated" content or featured image. Used only for style="excerpt". The value can be center, left, right, alter or default. See detailed description in section "Blog" (parameter "Dedicated location")
- width - (number). Section width (in percent or pixels).
- height - (number). Section height (in pixels).
- id - unique id for element. Allow to address this element form javascript or CSS
- class - class name for element. Allow set up additional decorations for element in CSS stylesheets.
- top, bottom, left, right the value of which is the number - the margin in pixels from the top, bottom, left and right of the block respectively.
Example:
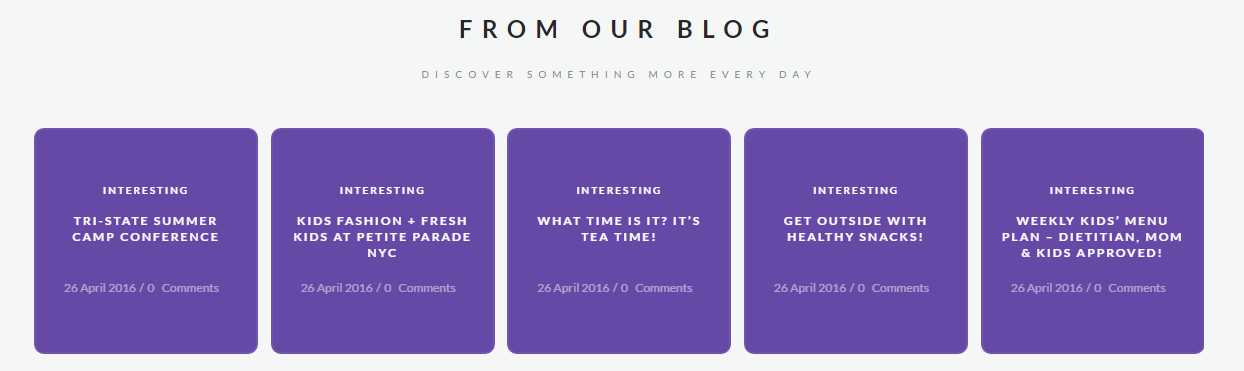
[trx_blogger style="masonry_4" columns="5" descr="0" title="from our blog" description="Discover something more every day" cat="1" count="6" offset="0" scroll="yes"]
trx_button
Creates different types of buttons and inputs.
Parameters:
- type - (string). The button type. It can take one of the following values: square|round. If this parameter is not specified - it gets 'square'
- style - (string). The button style. It can take one of the following values: global|light|dark. If this parameter is not specified - it gets 'global'
- size - (string). The button size. It can take one of the following values: mini|medium|big|huge|banner. If this parameter is not specified - it gets 'medium'
- fullsize - (string). Indicates that the button should extend over the entire width available. It can take one of the following values: on|off. If this parameter is not specified - it gets 'off'
- icon - (string). The button icon. It can take icon name from 'fontello' set. You can select a required icon with the shortcode builder or learn about a complete list of available icons by opening the page "/css/fontello/demo.html" inside the theme folder.
- color - (string). The button color. It can take color name (up to 140 names: red, green, blue, yellow, etc.) or color code (#ff0000 for example)
- link - (string). The URL where the link from the button leads to.
- target - (string). The window where the link leads to. If this parameter is not specified - URL will open in the same window.
- rel - (string). Add the "rel" attribute to the link.
- align - (string). The way to align the button left|right|center.
- popup - (string). Do you need to open the contents in the popup window. In this case using the shortcode [trx_popup id="popup_name"]Popup content[/trx_popup] you create the required contents, and in the shortcode [trx_button link="#popup_name" popup="on"] you specify the name of the popup you have created in the parameter link (Be sure to place a sign "#" in front of the name of popup).
- id - unique id for element. Allow to address this element form javascript or CSS
- class - class name for element. Allow set up additional decorations for element in CSS stylesheets.
- top, bottom, left, right the value of which is the number - the margin in pixels from the top, bottom, left and right of the block respectively.
Examples:
[trx_block align="center" title="BUTTONS" subtitle="Types & Shapes" width="990px"][trx_button size="large" bottom="1rem" left="10px" right="10px"]Button Large[/trx_button][trx_button size="medium" bg_color="#323232" bottom="1rem" left="10px" right="10px"]Button Medium[/trx_button][trx_button bg_color="#8ed4cc" bottom="1rem" left="10px" right="10px"]Base Button[/trx_button][trx_button style="border" size="small" bottom="1rem" left="10px" right="10px"]Small Button[/trx_button][trx_columns count="3" margins="" top="2em"][trx_column_item][trx_button size="medium" css="box-sizing: border-box;" width="100%" bottom="1rem"]Read More[/trx_button][/trx_column_item][trx_column_item][trx_button size="medium" bg_color="#8ed4cc" css="box-sizing: border-box;" width="100%" bottom="1rem"]Read More[/trx_button][/trx_column_item][trx_column_item][trx_button size="medium" bg_color="#323232" css="box-sizing: border-box;" width="100%" bottom="1rem"]Read More[/trx_button][/trx_column_item][/trx_columns][/trx_block]
trx_chat
Creates chat elements.
Parameters:
- title - (string). The title of the chat element.
- link - (string). URL for the current chat element.
- width - (number). Section width (in percent or pixels).
- height - (number). Section height (in pixels).
- id - unique id for element. Allows to address this element form javascript or CSS
- class - class name for element. Allows to set up additional decorations for element in CSS stylesheets.
- top, bottom, left, right the value of which is the number - the margin in pixels from the top, bottom, left and right of the block respectively.
Example:

                            [trx_chat title="Mike" link="#"]

                            Lorem ipsum dolor sit amet, consectetur adipisicing elit, sed do eiusmod temporincididunt ut labore et dolore magna aliqua. Ut enim ad minim veniam, quis nostrud exercitation ullamco laboris nisi ut aliquip ex ea commodo consequat.

                            [/trx_chat]


                            [trx_chat title="Lisa" link="#"]

                            Vivamus nec quam nec elit porta dictum. Praesent dignissim eget ligula vel posuere. Proin sed mauris faucibus, euismod erat a, placerat odio.

                            [/trx_chat]
trx_clients
Displays a clients section. Single clients posts can be customized in WordPress dashboard > Clients tab.
Here are the main settings:
- title/subtitle - (string). The title/subtitle of the chat element.
- description - enter some description text here.
- style - choose the desired style to display the block.
- columns - specify columns quantity to show clients in.
- color scheme - pick the necessary color scheme.
- slider - enable the slider to display clients.
- categories - choose the necessary category.
- button url - link up your button to make it active.
- button caption - leave the necessary caption in this field.
- width/height - set the necessary width and height.
Examples:

[trx_clients slider="yes" slides_space="40" cat="0" columns="7" count="7"][/trx_clients]
trx_columns
Creates columns in the text.
Parameters:
- count - (number). The number of columns in the generated block. IMPORTANT: Inside the block [trx_columns] ... [/trx_columns] the number of blocks [trx_column_item] ... [/trx_column_item] must correspond to the parameter count.
- id - unique id for element. Allow to address this element form javascript or CSS
- class - class name for element. Allow set up additional decorations for element in CSS stylesheets.
- top, bottom, left, right the value of which is the number - the margin in pixels from the top, bottom, left and right of the block respectively.
Examples:

                            [trx_columns count="3"]


                            [trx_column_item]

                            1/3

                            Lorem ipsum dolor sit amet, consectetur adipisicing elit, sed do eiusmod tempor incididunt ut labore et dolore magna aliqua. Ut enim ad minim veniam, quis nostrud exercitation ullamco laboris nisi ut aliquip ex ea commodo consequat. Duis aute irure dolor in reprehenderit in voluptate velit esse cillum dolore eu fugiat nulla pariatur

                            [/trx_column_item]


                            [/trx_columns]
trx_column_item
Creates one column item in the columns block.
Parameters:
- span - (number). Indicates the number of the merged columns.
- align - (string). Text's alignment inside column. Permitted values are: center | left | right
- color - (string). Color of the inner text.
- bg_color - (string). Background color of the column.
- bg_image - (string). Background image of the column.
- id - unique id for element. Allows to address this element form javascript or CSS
- class - class name for element. Allows to set up additional decorations for element in CSS stylesheets.
trx_content
Creates a block for contents (limited by width) on Fullscreen pages.
Parameters:
- style - (string). Any additional CSS-rules for this block.
- class - (string). CSS class name for this block.
- id - unique id for element. Allows to address this element from javascript or CSS
- class - class name for element. Allows to set up additional decorations for element in CSS stylesheets.
- top, bottom the value of which is the number - the margin in pixels from the top and bottom of the block respectively.
trx_dropcaps
Used to create the dropcaps effect - special highlighting of the first letter in a paragraph.
Parameters:
- style - (number). Display style of the first letter. The value can be from 1 to 6. If not specified - use 1.
- id - unique id for element. Allows to address this element form javascript or CSS
- class - class name for element. Allows to set up additional decorations for element in CSS stylesheets.
Examples:

                            [trx_columns][trx_column_item]


							[trx_dropcaps style="1" css="margin-bottom: 30px;"]Dorem ipsum dolor sit amet, consectetur adipisicing elit, sed do eiusmod tempor incididunt ut labore et dcitation ullamco laboris nisi ut aliquip ex ea commodo consequat.[/trx_dropcaps]


							[trx_dropcaps style="2"]Dorem ipsum dolor sit amet, consectetur adipisicing elit, sed do eiusmod tempor incididunt ut labore et dcitation ullamco laboris nisi ut aliquip ex ea commodo consequat.[/trx_dropcaps]


							[/trx_column_item]

							[trx_column_item]


							[trx_dropcaps style="3" css="margin-bottom: 30px;"]Dorem ipsum dolor sit amet, consectetur adipisicing elit, sed do eiusmod tempor incididunt ut labore et dcitation ullamco laboris nisi ut aliquip ex ea commodo consequat.[/trx_dropcaps]


							[trx_dropcaps style="4"]Dorem ipsum dolor sit amet, consectetur adipisicing elit, sed do eiusmod tempor incididunt ut labore et dcitation ullamco laboris nisi ut aliquip ex ea commodo consequat.[/trx_dropcaps]


							[/trx_column_item]

							[/trx_columns]
trx_form
Display Contact form. Please note that by default the contact form has gray fields with no background. You should either add custom background or make sure it's being used on contrasting background.
IMPORTANT: To activate the contact form, please paste your email address into the Appearance -> Theme Options -> Contact info -> Contact form email field.
To customize the form in available styles you should edit form template file in any text editor like Notepad or TextEdit. In the .../whiterabbit/templates/trx_form folder you can find form-related files like form_1.php, form_2.php or form_custom.php. These files are responsible for displaying the form in different styles. Choose the file you need, open it in any text editor, and change HTML code according to your needs.
The text for the checkbox "I agree..." is set in Appearance > Theme Options > Customization > Other > Text with Privacy Policy link.
In order to add/customize the Privacy Policy link, navigate to Settings (WP Dashboard) > Privacy and specify the page that will be used as a Privacy Policy one.
NOTICE! In case you are planning to use default form without consent checkbox, just leave the "Text with Privacy Policy link" option empty in the Appearance > Theme Options > Customization > Other section!
Parameters:
- title - (string). The Contact form's title
- description - (string). The Contact form's description. Displayed under the title.
- id - unique id for element. Allows to address this element form javascript or CSS
- class - class name for element. Allows to set up additional decorations for element in CSS stylesheets.
- top, bottom, left, right the value of which is the number - the margin in pixels from the top, bottom, left and right of the block respectively.
Examples:
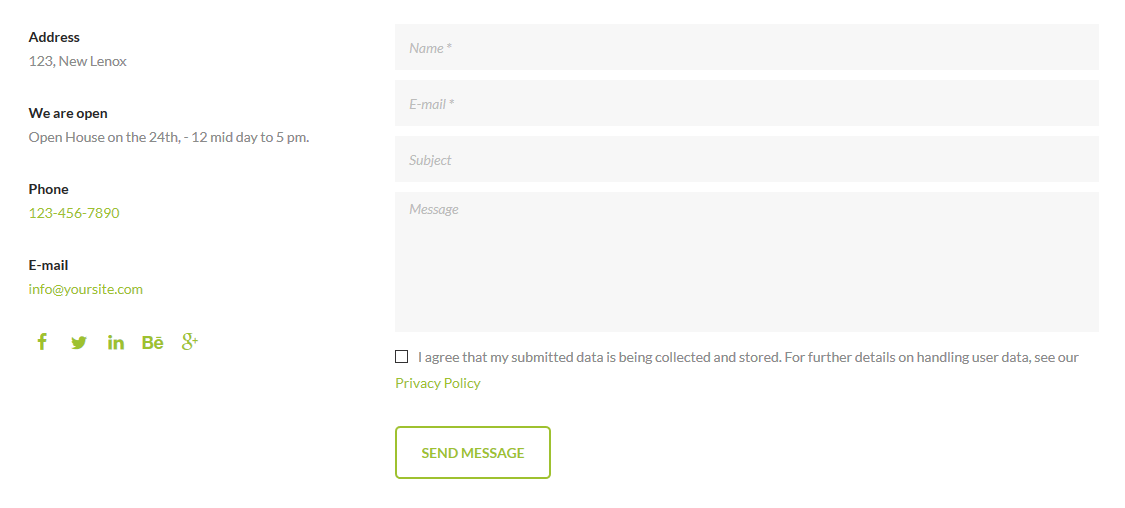
                            [vc_row inverse="" css=".vc_custom_1545808439756{padding-top: 50px !important;padding-right: 50px !important;padding-bottom: 50px !important;padding-left: 50px !important;background-color: #ffffff !important;}"][vc_column]


							[trx_form style="form_2" return_page="none"][/trx_form]


							[/vc_column][/vc_row]
trx_gap
Creates a "gap" in contents of the page, allows the contents specified in this shortcode to stretch to the entire width of the window (the screen).
Examples:
                            [trx_gap][trx_block bg_color="#ff6e40"][trx_content][vc_empty_space height="1.5em"][trx_banner]
                                [trx_banner_item src="/wp-content/uploads/2016/04/9-1.jpg"]
                            [/trx_banner][vc_empty_space height="1em"][/trx_content][/trx_block][/trx_gap]
trx_googlemap
Displays Google map at the address you specified. Make sure there is a valid API key in the "Google API key" field in the Appearance > Theme Options > Socials tab.
Parameters:
- address - (string). The address to which you want to display the map
- latlng - (double,double). The latitude and longtitude coordinates for map center
- zoom - (number). Initial map zoom (from 1 to 20)
- style - (string). Map frame visual style: default|simple|greyscale|greyscale2|style1|style2|style3
- width - (number). Map frame width (in pixels or percents)
- height - (number). Map frame height (in pixels)
- id - unique id for element. Allows to address this element form javascript or CSS
- class - class name for element. Allows to set up additional decorations for element in CSS stylesheets.
- top, bottom, left, right the value of which is the number - the margin in pixels from the top, bottom, left and right of the block respectively.
Examples:
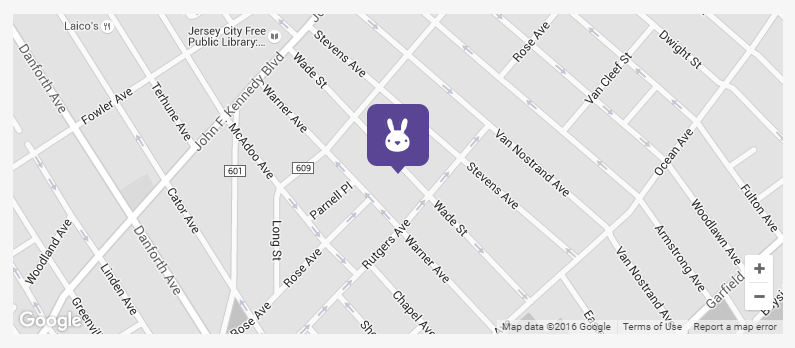
[trx_googlemap zoom="12" style="greyscale" height="450"][trx_googlemap_marker address="56-34 Waldron St Flushing, NY 11368, USA" title="56-34 Waldron St Flushing, NY 11368, USA" point="58"][/trx_googlemap_marker][/trx_googlemap]
The address for the Googlemap can be specified in the Googlemap marker shortcode's general settings.
trx_hide
Hide any html block with desired selector (id and/or classes combination).
IMPORTANT: For advanced users only! Careless hide of objects can disrupt the design of your site. Be extremely careful.
Parameters:
- selector - (string). Id and/or classes combination (CSS-selector)
- hide - (string). "on" or "off" - do you want hide selector or show it
- delay - (number). Delay before hide/show element (in ms)
Examples:
[trx_hide selector="#sidebar .calendar"]
trx_highlight
Used to highlight a text with the font's color and / or background.
Parameters:
- type - (number). Type selection: accent theme color letters or white letters on a background of accent theme color. Possible values: 1 or 2. Instead, you can explicitly specify the text color and background color using the following parameters.
- color - (string). The color of the text. You can specify the color (white|black|red|blue|green|brown|... - up to 140 styles) ot its code in format #rrggbb, where rr is a hexademical value of the red component, gg - a hexademical value of the green component, bb - a hexademical value of the blue component
- backcolor - (string). The background color of the text. The same parameter as color.
- style - (string). Arbitrary set of CSS-properties (for advanced users only)
- id - unique id for element. Allows to address this element form javascript or CSS
- class - class name for element. Allows to set up additional decorations for element in CSS stylesheets.
Examples:

                            [trx_highlight type="2"]adipisicing elit, sed[/trx_highlight]

							<del>Ut enim ad minim veniam,</del>

							[trx_highlight type="1"]Duis aute irure dolor[/trx_highlight]

							[trx_highlight type="3"]voluptate velit esse cillum dolore[/trx_highlight]
trx_icon
Inserts an image into the text, pressing it (image) to the left or right edge of the text, and the next image text flows around it on the opposite side. You can expand the list of available icons by adding new ones from the fontello website. Watch this video guide for more information.
Parameters:
- icon - (string). Icon name. It can take icon name from 'fontello' set. You can select a required icon using the shortcode builder, or you may learn about a complete list of available icons, opening the page "/css/fontello/demo.html" inside the theme folder.
- size - (number). Font size for the icon (in pixels)
- weight - (number). Font weight for the icon: 100-900 (step 100)
- align - (string). Alignment of the icon. It can take one of the following values: left|right|center
- color - (string). Color of the icon.
- bg_color - (string). Background color of the icon.
- background - (string). Background style for the icon: none|round|square.
- id - unique id for element. Allows to address this element form javascript or CSS
- class - class name for element. Allows to set up additional decorations for element in CSS stylesheets.
- top, bottom, left, right the value of which is the number - the margin in pixels from the top, bottom, left and right of the block respectively.
Examples:
[trx_icon icon="icon-soundcloud"]
trx_image
Inserts an image into the text, pressing it (image) to the left or right edge of the text, and the next image text flows around it on the opposite side.
Parameters:
- src or url - (string). URL of the image
- title - (string). Text at the bottom of the image.
- align - (string). Alignment of the image. It can take one of the following values: left|right
- width - (number). the image's width (in pixels).
- height - (number). the image's height (in pixels).
- id - unique id for element. Allows to address this element form javascript or CSS
- class - class name for element. Allows to set up additional decorations for element in CSS stylesheets.
- top, bottom, left, right the value of which is the number - the margin in pixels from the top, bottom, left and right of the block respectively.
Example:

[trx_image url="/wp-content/uploads/2016/04/2-9.jpg" shape="square"]
trx_infobox
Creates different types of messages.
Parameters:
- style - (string). The infobox style. It can take one of the following values: regular|info|success|error|result. If this parameter is not specified - it gets 'regular'
- closeable - (string). If this parameter is set to "yes" - right in the block there is a button "x" and the block may be closed (disappear) when you click on it. If this parameter is not specified - it gets "no".
- id - unique id for element. Allows to address this element form javascript or CSS
- class - class name for element. Allows to set up additional decorations for element in CSS stylesheets.
- top, bottom, left, right the value of which is the number - the margin in pixels from the top, bottom, left and right of the block respectively.
Examples:

                            [trx_columns margins="" top="3.5em"]

							[trx_column_item]

							[trx_infobox][vc_column_text]WARNING MESSAGE GOES HERE[/vc_column_text][/trx_infobox]

							[trx_infobox style="info"][vc_column_text]INFORMATION MESSAGE GOES HERE[/vc_column_text][/trx_infobox]

							[/trx_column_item]

							[trx_column_item]

							[trx_infobox style="error"][vc_column_text]ERROR MESSAGE GOES HERE[/vc_column_text][/trx_infobox]

							[trx_infobox style="success"][vc_column_text]SUCCESS MESSAGE GOES HERE[/vc_column_text][/trx_infobox]

							[/trx_column_item]

							[/trx_columns]
trx_line
It creates the line of the set style.
Parameters:
- style - (string). The line style. It can take one of the following values: none|solid|dashed|dotted|double|groove|ridge|inset|outset|shadow
- color - (string). The color line. You can specify the color (white|black|red|blue|green|brown|... - up to 140 styles) of its code in format #rrggbb, where rr is a hexademical value of the red component, gg - a hexademical value of the green component, bb - a hexademical value of the blue component
- width - (number). The line width. It can be set in pixels (simply specify the number) or as a percentage of the page width (specify number with percents). If this parameter is not specified - it gets100%.
- height - (number). Line width (in pixels)
- id - unique id for element. Allows to address this element form javascript or CSS
- class - class name for element. Allows to set up additional decorations for element in CSS stylesheets.
- top, bottom, left, right the value of which is the number - the margin in pixels from the top, bottom, left and right of the block respectively.
Examples:

                            [trx_line css="margin-top: 0; margin-bottom: 0.75em;" height="2"]

                            [trx_line style="dashed" color="#f9beb9" css="margin-top: 0; margin-bottom: 0.75em;" height="2"]

                            [trx_line style="dotted" color="#69c4c7" css="margin-top: 0; margin-bottom: 0.75em;"]
trx_list
Creates lists of different styles.
Parameters:
- style - (string). List display style. It can take one of the following values: regular|check|mark|error. Can be used both ih a shortcode [list] to set the style of all the elements of the list, and in the shortcode [list_item] to change the style of one item in the list.
- icon - (string). Icon name. It can take icon name from 'fontello' set. You can select a required icon using the shortcode builder, or you may learn about a complete list of available icons, opening the page "/css/fontello/demo.html" inside the theme folder. This parameter can be used both in shortcode [trx_list] to specify an icon for the entire list as a whole, and for [trx_list_item] to change icons of a particular item in the list.
- id - unique id for element. Allows to address this element form javascript or CSS
- class - class name for element. Allows to set up additional decorations for element in CSS stylesheets.
- top, bottom, left, right the value of which is the number - the margin in pixels from the top, bottom, left and right of the block respectively.
Examples:

[trx_columns count="3" margins=""][trx_column_item][trx_list][trx_list_item][vc_column_text]Lorem ipsum[/vc_column_text][/trx_list_item][trx_list_item][vc_column_text]Dolor sit amet[/vc_column_text][/trx_list_item][trx_list_item][vc_column_text]Consectetur[/vc_column_text][/trx_list_item][trx_list_item][vc_column_text]Adipisicing elit[/vc_column_text][/trx_list_item][trx_list_item][vc_column_text]Sed do eiusmod[/vc_column_text][/trx_list_item][/trx_list][/trx_column_item][trx_column_item][trx_list style="iconed" icon="icon-arrow30" icon_color="#594593"][trx_list_item][vc_column_text]Lorem ipsum[/vc_column_text][/trx_list_item][trx_list_item][vc_column_text]Dolor sit amet[/vc_column_text][/trx_list_item][trx_list_item][vc_column_text]Consectetur[/vc_column_text][/trx_list_item][trx_list_item][vc_column_text]Adipisicing elit[/vc_column_text][/trx_list_item][trx_list_item][vc_column_text]Sed do eiusmod[/vc_column_text][/trx_list_item][/trx_list][/trx_column_item][trx_column_item][trx_list style="ol"][trx_list_item][vc_column_text]Lorem ipsum[/vc_column_text][/trx_list_item][trx_list_item][vc_column_text]Dolor sit amet[/vc_column_text][/trx_list_item][trx_list_item][vc_column_text]Consectetur[/vc_column_text][/trx_list_item][trx_list_item][vc_column_text]Adipisicing elit[/vc_column_text][/trx_list_item][trx_list_item][vc_column_text]Sed do eiusmod[/vc_column_text][/trx_list_item][/trx_list][/trx_column_item][/trx_columns]
trx_list_item
Creates one list item in the list.
Parameters:
- icon - (string). Icon's name. It can take icon name from 'fontello' set. You can select a required icon using the shortcode builder, or you may learn about a complete list of available icons, opening the page "/css/fontello/demo.html" inside the theme folder. This parameter can be used both in shortcode [trx_list] to specify an icon for the entire list as a whole, and for [trx_list_item] to change icons of a particular item in the list.
- title - (string). Indicate the title of the item in the list.
- link - (string). URL for the link of the item in the list.
- target - (string). Target for URL.
- id - unique id for element. Allows to address this element form javascript or CSS
- class - class name for element. Allows to set up additional decorations for element in CSS stylesheets.
trx_popup
Creates a block that opens in a popup window. Surrounds the selected text to the block and gives it the properties of a given class from the style table.
Parameters:
- id - (string). ID of the block. Used in the shortcode [trx_button] parameter link="#popup_id" to show this block.
- class - (string). The name of class of the block
- style - (string). CSS-style for the generated block
- top, bottom, left, right the value of which is the number - the margin in pixels from the top, bottom, left and right of the block respectively.
Examples:


[trx_button icon="icon-code" color="#ffffff" bg_color="#66c94a" align="center" link="#popup_shortcode_1" popup="yes" top="32"]Get shortcode[/trx_button][trx_popup id="popup_shortcode_1"]Lorem Ipsum[/trx_popup]
trx_price
Displays a price tag (number).
Parameters:
Example:

[trx_price money="2499" currency="$" top="inherit" bottom="inherit" left="inherit" right="inherit"]
trx_price_block
Creates blocks with prices.
Parameters:
- align - (string). The table alignment: left|right|center.
- count - (number). Columns count
- id - unique id for element. Allows to address this element form javascript or CSS
- class - class name for element. Allows to set up additional decorations for element in CSS stylesheets.
- top, bottom, left, right the value of which is the number - the margin in pixels from the top, bottom, left and right of the block respectively.
Examples:

							[trx_columns count="3" margins="" top="3.1em"][trx_column_item]


							[trx_price_block style="1" title="Basic" link="#" link_text="Sign Up" money="30" period="mo"]
                            <div>
                            <h6 class="sc_title">Starting from</h6>
                            Free! 30 Days

                            </div>
                            [/trx_price_block]


							[/trx_column_item][trx_column_item]


							[trx_price_block style="2" title="Premium" link="#" link_text="Sign Up" money="59" period="mo"]
                            <div>
                            <h6 class="sc_title">Starting from</h6>
                            Save $98 every year compared to the monthly plan by paying yearly.

                            </div>
                            [/trx_price_block]


							[/trx_column_item][trx_column_item]


							[trx_price_block style="3" title="Premium" link="#" link_text="Sign Up" money="99" period="mo"]
                            <div>
                            <h6 class="sc_title">Starting from</h6>
                            Save $120 every year compared to the monthly plan.

                            </div>
                            [/trx_price_block]


							[/trx_column_item][/trx_columns]
trx_promo
Used to create different styles of blocks with images and description text.
All the options are pretty self explainable, so we will describe only the most important of them.
Parameters:
- Alignment of the promo block - Choose the desired alignment.
- Size of the promo block - Specify the necessary block size.
- Image URL/Position/Width - Manage the image parameters.
Examples:

[trx_column_item][trx_image url="657" align="left" class="hide_on_ipad"][trx_promo size="small" image="649" image_width="36.22%"][vc_empty_space height="2em"][trx_title type="4" bottom="0"]<a href="#">Free Returns</a>[/trx_title][vc_column_text]All returns are subject to verification of original sale.[/vc_column_text][vc_empty_space height="2em"][/trx_promo][/trx_column_item]
trx_quote
Used to emphasize the big and small quotes in the text.
Parameters:
- cite - (string). URL of the site with the original.
- title - (string). Title for link to the site with the original.
- id - unique id for element. Allows to address this element form javascript or CSS
- class - class name for element. Allows to set up additional decorations for element in CSS stylesheets.
- top, bottom the value of which is the number - the margin in pixels from the top and bottom of the block respectively.
Examples:

[trx_quote cite="#" title="Mike Aniston" top="medium" left="huge"]We practice in personal injury and commercial litigation, with an emphasis on complex contractual matters and mass tort litigation.[/trx_quote]
trx_search
Used to display the Search Bar.
Parameters:
- style - Choose the necessary style.
- state - Choose the initial state.
- title - Insert the block's title.
- ajax - Whether to use the ajax search or not.
- element ID - Specify the element id. (optional)
- element CSS class - Specify a CSS class for the necessary element. (optional)
- animation - Specify the necessary animation effect. (optional)
- CSS styles - Specify an additional CSS rules. (optional)
Examples:

[trx_search style="regular" state="fixed" title="Search …" ajax="yes" top="inherit" bottom="inherit" left="inherit" right="inherit"]
trx_section and trx_block
Surrounds the selected text to the block and gives it the properties of a given class from the style table. These two shortcodes are absolutely identical! They are created in order to overcome the restriction of WordPress due to which the same shortcodes can not be inserted into each other.
Parameters:
- style - (string). CSS-style for the generated block
- align - (string). Block alignment: none|right|left|center
- columns - (string). Block width in "columns" equivalent: 1_2, 1_3, 1_4, 2_3, 3_4
- dedicated - (string). Do you need to create "selected" block from the contents. If this parameter is set for "yes", the contents of the block is "cut out" of the place where it's mentioned and is displayed at the beginning of the page's contents (before the title) instead of "Featured image".
- scroll - (string). Do you need to create a container with a scrollbar and an option to scroll content using swipe gestures. Possible values: yes | no
- controls - (string). Whether to display buttons with arrows to control scrolling. Possible values: yes|no
- dir - (string). Scroll type: horizontal|vertical
- color - (string). Color of the inner text.
- bg_color - (string). Background color of the section.
- bg_image - (string). Background image of the section.
- width - (number). The block's width (in pixels or percents).
- height - (number). The block's height (in pixels).
- id - unique id for element. Allows to address this element form javascript or CSS
- class - class name for element. Allows to set up additional decorations for element in CSS stylesheets.
- top, bottom, left, right the value of which is the number - the margin in pixels from the top, bottom, left and right of the block respectively.
Examples:
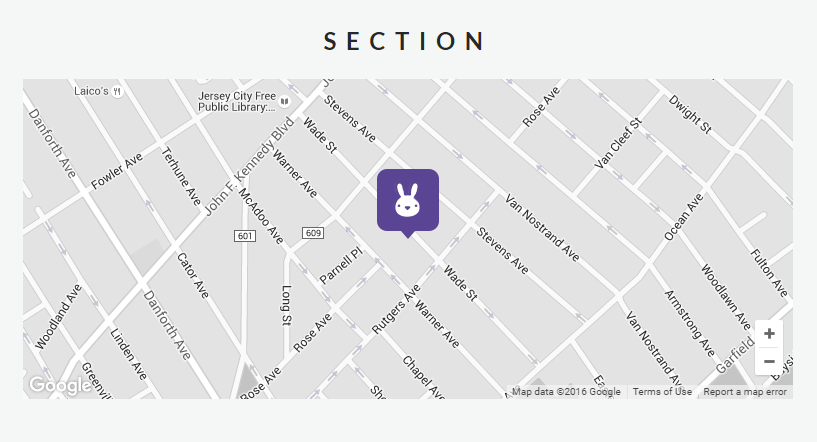
You can wrap any shortcode you want into the "section" one, for example Google map.
[trx_section title="Section" dedicated="no" pan="no" scroll="no" bg_overlay="0" bg_texture="0" bg_padding="yes" remove_top="no" remove_bottom="no" remove_left="no" remove_right="no" top="inherit" bottom="inherit" left="inherit" right="inherit"][trx_googlemap style="greyscale" height="320"][trx_googlemap_marker address="Jersey City, NJ 07305, USA" point="437"][vc_column_text]Jersey City, NJ 07305, USA[/vc_column_text][/trx_googlemap_marker][/trx_googlemap][/trx_section]
trx_services
Used to display block with available services.
You can customize content for each Service post in WordPress dashboard > Services tab, just open single service post and edit the Featured Image section for the image of the single post.
Examples:
[vc_row full_width="stretch_row" inverse="yes" css=".vc_custom_1461931857592{background-color: #81c5d8 !important;}"][vc_column][vc_empty_space height="6.4em"][trx_services type="images" slider="yes" controls="pagination" slides_space="50" align="center" title="Our services" description="make user’s experience easier and much more pleasant. " cat="48" columns="3"][/trx_services][vc_empty_space height="3.2em"][/vc_column][/vc_row]
You can choose whether to display font icons or images in the services shortcode's general settings. Please follow this link to see how to change font icons.

trx_skills
Shows the levels of your abilities in many different styles.
Parameters:
- type - (string). Type of the skills block: bar|pie|counter|arc
- style - (number). Style of the skills blocks (only for type="counter"): from 1 to 4
- dir - (string). Direction: horizontal|vertical
- layout - (string). Skills block's layout: rows|columns
- count - (number). Number of skills items in the block.
- maximum - (number). Max value for each skills element. Default value is 100
- title - (string). Skills block's title.
- subtitle - (string). Skills block's subtitle - showed in the center (only if type="arc").
- align - (string). Alignment of the skills block: left|right|center
- color - (string). Color for the skills elements. The main color of accented theme's elements is used by default.
- width - (number). The skills block's width (in pixels or percents).
- height - (number). The skills block's height (in pixels).
- id - unique id for element. Allows to address this element form javascript or CSS
- class - class name for element. Allows to set up additional decorations for element in CSS stylesheets.
- top, bottom, left, right the value of which is the number - the margin in pixels from the top, bottom, left and right of the block respectively.
Examples:

[trx_skills][trx_skills_item title="CSS3" value="98%" style="1"][/trx_skills_item][trx_skills_item title="HTML5" value="48%" style="1"][/trx_skills_item][trx_skills_item title="PHP" value="65%" style="1"][/trx_skills_item][trx_skills_item title="MySQL" value="86%" style="1"][/trx_skills_item][/trx_skills]

[trx_columns][trx_column_item][vc_empty_space height="2em"][trx_title type="2"]Type Arc[/trx_title][trx_skills type="arc" arc_caption="Skills"][trx_skills_item title="JavaScript" value="90" color="#594593" style="1"][/trx_skills_item][trx_skills_item title="CSS3" value="82" color="#81c5d8" style="1"][/trx_skills_item][trx_skills_item title="HTML5" value="73" color="#f29d7d" style="1"][/trx_skills_item][trx_skills_item title="PHP" value="59" color="#9ec12f" style="1"][/trx_skills_item][trx_skills_item title="MySQL" value="45" color="#f8bd23" style="1"][/trx_skills_item][/trx_skills][/trx_column_item]

[trx_columns][trx_column_item][vc_empty_space height="2em"][trx_title type="2"]Pie Charts[/trx_title][trx_skills type="pie" layout="columns" columns="3" border_color="#f5f6f6" pie_compact="no"][trx_skills_item title="Graphic Design" value="75%" color="#f8bd23" style="1"][/trx_skills_item][trx_skills_item title="HTML & CSS3" value="60%" color="#9ec12f" style="1"][/trx_skills_item][trx_skills_item title="WordPress" value="85%" color="#81c5d8" style="1"][/trx_skills_item][/trx_skills][/trx_column_item][trx_column_item][vc_empty_space height="2em"][trx_title type="2"]Countdowns[/trx_title][trx_skills type="counter" layout="columns" style="1" columns="3"][trx_skills_item title="HTML5" value="549" style="2"][/trx_skills_item][trx_skills_item title="PHP" value="174" style="3"][/trx_skills_item][trx_skills_item title="MySQL" value="68" style="4"][/trx_skills_item][/trx_skills][/trx_column_item][/trx_columns]
trx_skills_item
Shows one item of the skills block. Used only in the [trx_skills] shortcode.
Parameters:
- title - (string). The name of the current element.
- level - (number). Ability level for the current element (up to maximum)
- color - (string). Color for the current item. The main color of accented theme's elements is used by default.
- style - (number). Style of the skills item (only for type="counter"): from 1 to 4
- id - unique id for element. Allows to address this element form javascript or CSS
- class - class name for element. Allows to set up additional decorations for element in CSS stylesheets.
trx_slider
And one more feature of our theme - shortcode "Slider". It can display all posts from a specific category or the slideshow of the Revolution Slider you have prepared beforehand, as a slider (if you have previously installed this plugins).
Let us examine its parameters:
- engine - (string). The engine of the slider: swiper|revo. "Revo" options are available if the plugin revslider.zip is installed. The default parameter is "swiper".
- alias - (string). Name of the slide show, prepared in Revolution Slider (if engine=revo)
- interval - (numbers). Slides change interval (in milliseconds: 1000ms = 1s). Default: 5000 (if engine=swiper).
- ids - (numbers). Comma-separated ID posts to be displayed in the slider (if engine=swiper).
- cat - (number or string). ID or slug of the category, which puts out the most recent (or the first) posts added (unless ids parameter is specified). If parameter "cat" is not specified - posts from any category will be displayed (if engine=swiper). It is allowed to specify several ID's (or slugs) separated with commas.
- count - (number). The number of posts displayed from the category (if engine=swiper)
- offset - (number). How many posts to skip before starting output (if engine=swiper)
- orderby - (string). Posts order by (if engine=swiper):
- date - posts ordering by descending of publish date
- views - posts ordering by descending of views count
- comments - posts ordering by descending of comments number
- author_rating - posts ordering by descending of review's author marks
- users_rating - posts ordering by descending of review's readers marks
- random - posts ordering is random
- order - (string). Posts order: asc|desc
- controls - (string). The presence of the buttons with arrows in the slider: yes|no
- pagination - (string). The presence of the circles (to switch between slides) at the bottom of the slider: yes|no
- border - (string). The presence of the border (phone image) around the slider: none|dark|light
- titles - (number). Show or not post infobox on each slides (if engine=swiper): none|fixed|slide. If titles='slide' - infobox hide on hover, if titles='fixed' - infobox position is fixed.
- description - (number). Posts excerpt max length. If 0 - excerpt not showed.
- links - (string). Make each slide as link to the correspond post (if engine=swiper): yes|no
- align - (string). The alignments of the slider: left|center|right
- width - (number). The slider's width (in pixels or percents).
- height - (number). The slider's height (in pixels).
- id - unique id for element. Allows to address this element form javascript or CSS
- class - class name for element. Allows to set up additional decorations for element in CSS stylesheets.
- top, bottom, left, right the value of which is the number - the margin in pixels from the top, bottom, left and right of the block respectively.
Examples:

[trx_slider custom="yes" cat="0" controls="yes"][trx_slider_item src="43"][/trx_slider_item][trx_slider_item src="22"][/trx_slider_item][trx_slider_item src="42"][/trx_slider_item][/trx_slider]
trx_slider_item
Create one item of the slider. Used only in the [trx_slider] shortcode.
Parameters:
- src or url - (string). URL of the image for current slide.
- id - unique id for element. Allows to address this element form javascript or CSS
- class - class name for element. Allows to set up additional decorations for element in CSS stylesheets.
trx_socials
Displays Social Icons. Please do not forget to specify the necessary links (URLs) to your social profiles in the Appearance > Theme Options > Socials tab.
Example:
[trx_socials type="icons" size="small" shape="square" custom="no"][/trx_socials]
trx_table
Displays a table.
Parameters:
- style - (number). The table style.
- id - unique id for element. Allows to address this element form javascript or CSS
- class - class name for element. Allows to set up additional decorations for element in CSS stylesheets.
- top, bottom, left, right the value of which is the number - the margin in pixels from the top, bottom, left and right of the block respectively.
Examples:
                            [trx_table]
                            <table>
                            <tbody>
                            <tr align="center">
                            <td>#</td>
                            <td>Name</td>
                            <td align="left">Description</td>
                            <td>Price</td>
                            </tr>
                            <tr align="center">
                            <td>1</td>
                            <td>Item #1</td>
                            <td align="left">Lorem ipsum dolor sit amet, consectetur</td>
                            <td>$10</td>
                            </tr>
                            <tr align="center">
                            <td>2</td>
                            <td>Item #2</td>
                            <td align="left">Ut enim ad minim veniam</td>
                            <td>$20</td>
                            </tr>
                            <tr align="center">
                            <td>3</td>
                            <td>Item #3</td>
                            <td align="left">Eiusmod tempor incididunt</td>
                            <td>$70</td>
                            </tr>
                            <tr align="center">
                            <td>4</td>
                            <td>Item #4</td>
                            <td align="left">Lorem ipsum dolor sit amet, consectetur</td>
                            <td>$100</td>
                            </tr>
                            <tr align="center">
                            <td>5</td>
                            <td>Item #5</td>
                            <td align="left">Ut enim ad minim veniam</td>
                            <td>$350</td>
                            </tr>
                            <tr>
                            <td colspan="3">TOTAL</td>
                            <td align="center">$1000</td>
                            </tr>
                            </tbody>
                            </table>
                            [/trx_table]
trx_tabs
Creates blocks with tabs.
Parameters:
- tab_names - (string). Headlines tabs listed per the sign "|" (vertical bar)
- initial - (number). The number of previously open tabs (from 1 to the number of tabs)
- scroll - (string). Creates a scrollable area in the each tab: yes|no
- width - (number). The block's width (in pixels or percents).
- height - (number). The block's height (in pixels).
- id - unique id for element. Allows to address this element for javascript or CSS
- class - class name for element. Allows to set up additional decorations for element in CSS stylesheets.
- top, bottom, left, right the value of which is the number - the margin in pixels from the top, bottom, left and right of the block respectively.
Examples:

[trx_columns][trx_column_item][trx_tabs style="1" initial="1" bottom="4em"][trx_tab title="Tab 1" tab_id="sc_tab_1458833428_1_75" id="sc_tab_1458833428_1_75"][vc_column_text]Lorem ipsum dolor sit amet, consectetur adipisicing elit, sed do eiusmod tempor incididunt ut labore et dolore magna aliqua. Ut enim ad minim veniam, quis nostrud exercitation ullamco laboris nisi ut aliquip ex ea commodo consequat. Duis aute irure dolor in reprehenderit in voluptate velit esse cillum dolore eu fugiat nulla pariatur. Excepteur sint occaecat cupidatat non proident, sunt in culpa qui officia deserunt mollit anim id est laborum. Sed ut perspiciatis unde omnis iste natus[/vc_column_text][/trx_tab][trx_tab title="Tab 2" tab_id="sc_tab_1458833428_2_44" id="sc_tab_1458833428_2_44"][vc_column_text]Lorem ipsum dolor sit amet, consectetur adipisicing elit, sed do eiusmod tempor incididunt ut labore et dolore magna aliqua. Ut enim ad minim veniam, quis nostrud exercitation ullamco laboris nisi ut aliquip ex ea commodo consequat. Duis aute irure dolor in reprehenderit in voluptate velit esse cillum dolore eu fugiat nulla pariatur. Excepteur sint occaecat cupidatat non proident, sunt in culpa qui officia deserunt mollit anim id est laborum. Sed ut perspiciatis unde omnis iste natus[/vc_column_text][/trx_tab][trx_tab title="Tab 3" tab_id="sc_tab_1458833718516_7" id="sc_tab_1458833718516_7"][vc_column_text]Lorem ipsum dolor sit amet, consectetur adipisicing elit, sed do eiusmod tempor incididunt ut labore et dolore magna aliqua. Ut enim ad minim veniam, quis nostrud exercitation ullamco laboris nisi ut aliquip ex ea commodo consequat. Duis aute irure dolor in reprehenderit in voluptate velit esse cillum dolore eu fugiat nulla pariatur. Excepteur sint occaecat cupidatat non proident, sunt in culpa qui officia deserunt mollit anim id est laborum. Sed ut perspiciatis unde omnis iste natus[/vc_column_text][/trx_tab][/trx_tabs][/trx_column_item][/trx_columns]
trx_tab_item
Creates one tab item (with tab content) in the tabs block.
Parameters:
- title - (string). Headline for current tab (instead tab_names in parent shortcode [tabs])
- id - (string). ID for the current tab content (optional)
- class - class name for element. Allows to set up additional decorations for element in CSS stylesheets.
trx_team
Displays the members of your team (photo with description).
IMPORTANT: You can customize content for each Team post in WordPress dashboard > Team tab, just open single team post and edit the Team Member Details section for the position and social links, the Featured Image section for the image.
Parameters:
- count - (number). Number of items in the team block
- id - unique id for element. Allows to address this element form javascript or CSS
- class - class name for element. Allows to set up additional decorations for element in CSS stylesheets.
- top, bottom, left, right the value of which is the number - the margin in pixels from the top, bottom, left and right of the block respectively.
Examples:

[trx_team slider="yes" controls="pagination" slides_space="50" align="center" cat="0" width="900px" top="4.2em" bottom="2.3em" style="team-3"][/trx_team]
trx_team_item
Displays one member of your team.
Parameters:
- user - (string). Contains the user login to your blog. The user's data contains the description and links to the user profile in popular social networks. If team member is not registered in your blog - you can put name, photo, email and socials links directly in parameters below.
- name - (string). The team member's name.
- photo - (string). The team member's photo url.
- email - (string). The team member's email.
- socials - (string). The team member's socials links, separated with character '|'.
- id - unique id for element. Allows to address this element form javascript or CSS
- class - class name for element. Allows to set up additional decorations for element in CSS stylesheets.
trx_testimonials
It generates a block with the statement of any person (you must also specify its parameters).
IMPORTANT: You can customize content for a single Testimonial post in WordPress dashboard > Testimonials tab, just open a single testimonial post and edit the fields to your needs.
Parameters:
- title - (string). Title of the block
- controls - (string). The presence of the buttons with arrows in the block: yes|no
- width - (number). The block's width (in pixels or percents).
- height - (number). The block's height (in pixels).
- id - unique id for element. Allows to address this element form javascript or CSS
- class - class name for element. Allows to set up additional decorations for element in CSS stylesheets.
- top, bottom, left, right the value of which is the number - the margin in pixels from the top, bottom, left and right of the block respectively.
Examples:

[trx_testimonials controls="side" cat="0" bottom="2.8em" style="testimonials-2"][/trx_testimonials]
trx_testimonials_item
It generates one item for testimonials slider.
Parameters:
- photo - (string). The displayed photo (unless user parameter is specified).
- name - (string). The displayed name (unless user parameter is specified).
- position - (string). The position (unless user parameter is specified).
- email - (string). E-mail (unless user parameter is specified)
- id - unique id for element. Allows to address this element form javascript or CSS
- class - class name for element. Allows to set up additional decorations for element in CSS stylesheets.
trx_title
Generates standard html title tag.
Example:

[trx_title type="2"]Heading 2[/trx_title]
trx_tooltip
Used to create pop-up tips that appear when you hover over a given piece of text.
Parameters:
- title - (string). Tooltip text.
- id - unique id for element. Allows to address this element form javascript or CSS
- class - class name for element. Allows to set up additional decorations for element in CSS stylesheets.
Examples:

[trx_tooltip title="Tooltip Title"]veritatis[/trx_tooltip]
trx_twitter
Used to create slider with twitter feed.
Parameters:
- interval - (number). Interval before slides change (in milliseconds). Default value is 7000 (7000ms = 7s)
- count - (number). Interval before slides change. Default value is 3
- user, consumer_key, consumer_secret, token_key, token_secret - (string). Parameters from your twitter application. Default values pick up from Theme Options.
- width - (number). The slider's width (in pixels or percents).
- height - (number). The slider's height (in pixels).
- id - unique id for element. Allows to address this element form javascript or CSS
- class - class name for element. Allows to set up additional decorations for element in CSS stylesheets.
- top, bottom, left, right the value of which is the number - the margin in pixels from the top, bottom, left and right of the block respectively.
Example:
[trx_twitter count="3" controls="yes" interval="7000" autoheight="yes" bg_overlay="0" bg_texture="0" top="inherit" bottom="inherit" left="inherit" right="inherit"]
As the matter of security reasons we provide the shortcode without the twitter tokens and consumer keys. Please use your own keys to make it display your twitter feed properly.
trx_video
Inserts a video file from one of the most popular video hosting services - youtube or vimeo.
Parameters:
- url or src - (string). URL of a video file
- image - (string). URL of the cover image for the video. For video from Youtube picture is retrieved automatically.
- title - (string). Shows title bar above the video frame
- autoplay - (string). Allows autostart playback. The value can be "on" or "off".
- width - (number). Video frame width in pixels or percent.
- height - (number). Video frame height in pixels
- id - unique id for element. Allows to address this element form javascript or CSS
- class - class name for element. Allows to set up additional decorations for element in CSS stylesheets.
- top, bottom, left, right the value of which is the number - the margin in pixels from the top, bottom, left and right of the block respectively.
Examples:
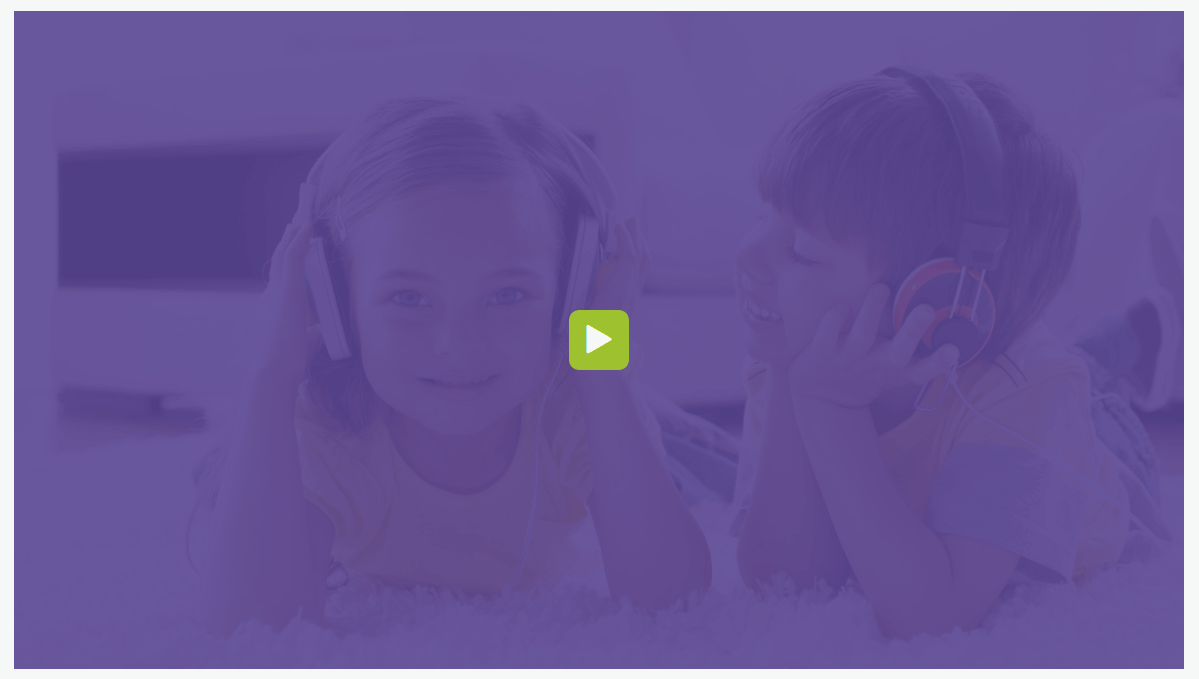
[trx_video url="https://vimeo.com/61983125" image="1004"]
WooCommerce
Woocommerce is an industry leader e-commerce plugin for WordPress. Another good news is that our theme is fully compatible with this great tool, allowing you to turn your website into sales machine in just a few clicks. You simply need to install this plugin and allow it to create a set of pages to display categories, products etc. Then you need to add a set of products.
We highly encourage you to read the great documentation files WooCommerce offers. These manuals help to create effective and reliable on line stores providing more features than you can imagine. Here is a list of really useful links helping you create and polish your shop
- Documentation - official plugin documentation.
- Free and Premium extensions - powerful toolbox bringing more features to your shop
- iOS app for Woocommerce - this application gives you full control over your shop.
A few words should be also said about how to set a page set created with WooCommerce. After you created these pages using the plugin, please open the menu "Pages" and set the display parameters for each of the pages. Setting of the the pages for WooCommerce is similar to the settings of Home pages and is described in this section.
Please remember that amongst all pages of the WooCommerce set the page "Shop" has a priority status. It is a sort of a 'blog stream page' for the list of your products and categories. That is why you can set your store's display by changing parameters of the page "Shop" in menu "Pages" (main theme color, availability and position of sidebars etc.).
The products pages inherit the global settings (for header, footer, etc.) specified in Appearance > Theme Options > Global Options > WooCommerce Stream/Single.

The quantity of products displayed on shop page is inherited from the Appearance > Customize > WooCommerce > Product Catalog section. "Products per row" and "Rows per page" options work only if the "Shop list style" (Appearance > Theme Options > WooCommerce) is set to "Thumbs".
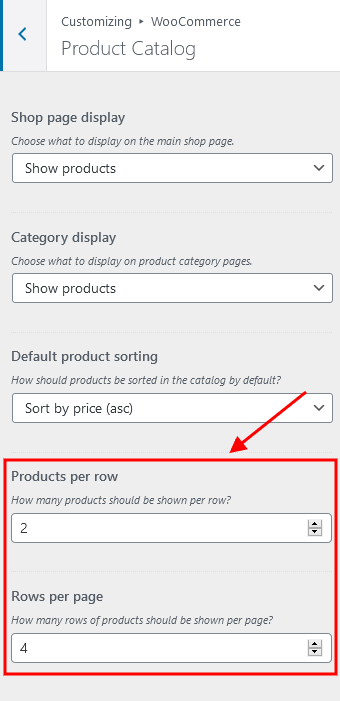
Products list:

Product page:

Cart widget:
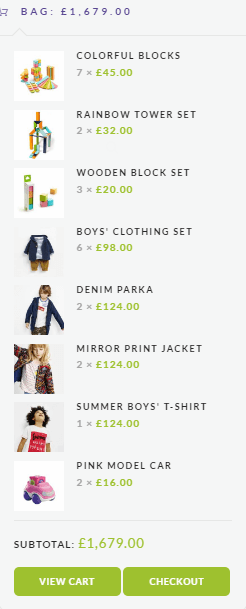
Essential Grid
We have added an Essential Grid plugin, to let you create nice gallery views. More information on how to use this plugin can be found here.
To get started you should create page and put specific alias, which is essential grid shortcode, for example:
[ess_grid alias="grid-8"]
Images on the gallery page are featured images that are inserted in posts. Those posts are assigned to the specific grid gallery in essential grid plugin settings.

Find the Gallery page code below.
[vc_row full_width="stretch_row" css=".vc_custom_1462871678504{background-color: #ffffff !important;}"][vc_column][vc_empty_space height="6em"][ess_grid alias="grid-8"][vc_empty_space height="6em"][/vc_column][/vc_row]

ThemeREX Updater
This is our self-made plugin that allows you to update the main theme as well as the bundled plugins through the WordPress admin panel. ThemeREX Updater plugin requires a valid purchase code that can be entered in the Appearance > ThemeREX Updater section. To get the code, please navigate to your ThemeForest "Downloads" page and click on the theme download link. Check this guide for more details. Once any plugins or theme updates are available for download, you will receive a corresponding notice in WP Dashboard > Updates. Please view the Theme Update chapter of this documentation file for more information.
Smash Balloon Social Photo Feed (formerly Instagram Feed)
Instagram Feed plugin allows you to display a completely customizable Instagram feed on your WordPress website. Please click here for more information about this plugin.
Contact Form 7
Contact Form 7 can manage multiple contact forms, plus you can customize the form and the mail contents flexibly with simple markup. The form supports Ajax-powered submitting, CAPTCHA, Akismet spam filtering and so on. More information on how to use this plugin can be found here.
You can also check their documentation.
Find a default shortcode below:
[contact-form-7 id="1342" title="Contact form 1"]
Please set the page/block contrasting background color/image before using this shortcode.
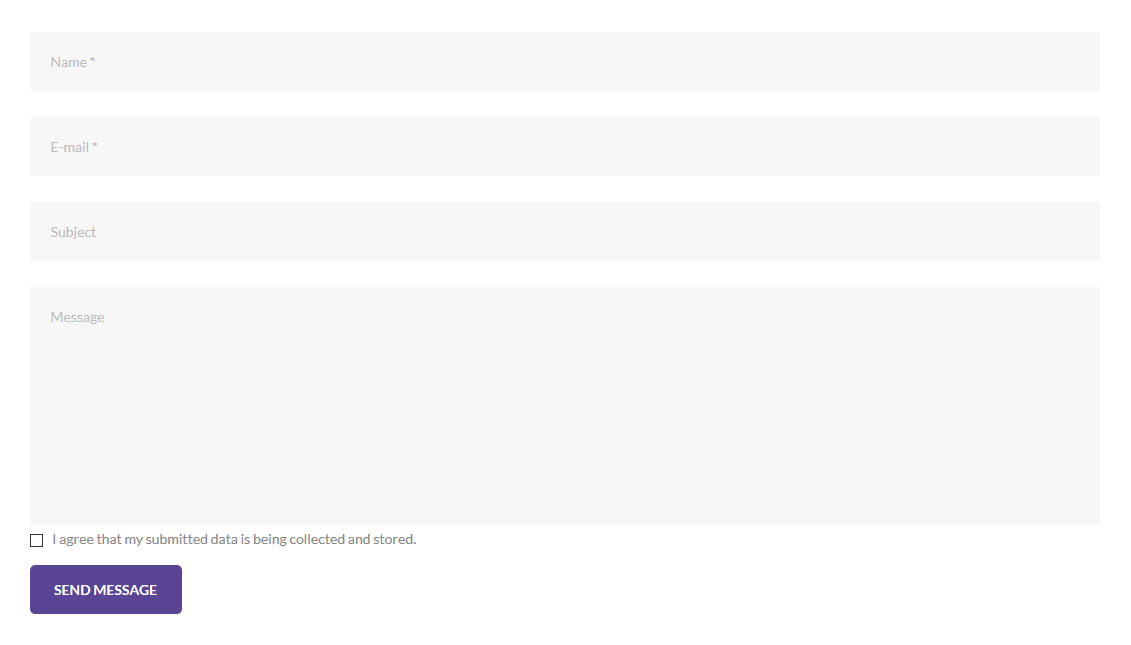
Attention! According to General Data Protection Regulation, you need to make your forms compliant. Some prebuilt forms, that come with this theme, already have the corresponding "I agree..." checkboxes. For newly created forms you should add the consent checkboxes in ONE of the following ways:
- Use [acceptance acceptance-85]...[/acceptance] tag. Treat the code and the screenshot below just as an example:

- Use any external GDPR plug-in, like The GDPR Framework or Cookie Information (not provided with the theme).
Theme Translation
We recommend using Poedit software for translation-related purposes. To translate the theme to your language, please follow these steps:
- Download and install Poedit software.
- Navigate to the theme/.../languages/ folder and locate .pot file. Copy it to your desktop for editing.
- Double click on the .pot file. In the Poedit window click on the "Create New Translation" button, choose the necessary language of the translation from the dropdown list and click "OK."
- Now select the constant text string you need to translate from the "Source text - English" field and type in the necessary translation into the "Translation" field. You can translate as much as you want, just go through the file and click on each string in Poedit and add your translation.
- Next, you have to save the changes to your .po file using the naming convention based on the language code (e.g. pt for Portuguese) followed by the country code (for instance _BR for Brazil).
To do that click on the "sheet" icon (you can also use hotkeys CMD+Shift+S in OS X or Win+S in Windows) and type in the name according to the screenshot below. The first lower-case letters define the language, whereas the second upper-case letter defines the country. In most cases, the language and country are the same, like “de_DE” for Germany. However, there is a difference for languages like English or Portuguese, which are spoken in several countries natively. In this case, the difference is in the first and second letter pairs; for the UK, the code would be en_GB, whereas the en_US stands for the USA. If you are not familiar with the codes for your native language and country, then visit the GNU website.
See Language Codes and Country Codes for the lists of codes.
Please note, if you use the wrong naming convention WordPress can not process your translation.
- When saving your .po file, Poedit automatically creates a new .mo file, with the same naming convention. According to the example above, the file would be called pt_BR.mo.

- Upload the .po and .mo files you just created to the .../languages/ folder. Make sure these files are in the same directory as the default.pot one.
- OPTIONAL! Only for themes with WordPress version 4.0 or lower.
The last step is to tell WordPress what language to display. Open your wp-config.php file in a text editor and search for: define ('WPLANG', ''); string. Edit this line according to the .mo file you should already have downloaded (e.g. for the Portuguese spoken in Brazil you need to add define ('WPLANG', 'pt_BR');).
In case you still have questions on how to use Poedit, please check the following resources:
Sources and Credits
This section discloses the sources of various files used within the theme and describes their function. Use this section to gain an understanding on how the theme functions behind the scenes if considering any type of modification.
- Fonts:
- Google fonts
- Fontello (non standard, icons set)
All non standard fonts are from Google Web Fonts and Fontello icons set
We have used the pictures from:
http://www.depositphotos.com/
IMPORTANT! Please be advised that all clipart images included in this theme are the copyrighted to their respective owners and are not available for download with this theme.
Clipart images can not be used without express permission from the owner and/or need to be purchased separately.
We can provide you with the list of image ids used in the theme, just contact our support team.